Impostazioni sulla gestione del colore
Le opzioni della Gestione dei colori di digiKam vengono configurate da .
Panoramica
digiKam è un’applicazione in grado di gestire i colori delle tue immagini. File RAW provenienti direttamente da una fotocamera senza il vantaggio di alcuna elaborazione del colore. La tua fotocamera fornisce i dati che ha catturato in un formato grezzo, e tutta l’elaborazione è a tuo carico. Ogni macchina fotografica ha aspetti unici riguardo il modo in cui registra le informazioni sui colori, quindi dovrai applicare un profilo specifico della fotocamera alle immagini che vuoi elaborare. Fai riferimento al capitolo sulla gestione dei profili di colori ICC per maggiori dettagli e spiegazioni.
Fondamentalmente, un profilo mappa le informazioni sui colori grezzi dalla fotocamera all’interno di una matrice uniforme di pixel colorati, con informazioni su come l’immagine dovrebbe essere resa. Fornisce anche informazioni al motore Lcms e a digiKam su come tradurre le informazioni dei colori da uno spazio dei colori a un altro per mantenere i colori più accurati possibile passando attraverso ogni possibile dispositivo multimediale di resa.
Impostazioni sul comportamento
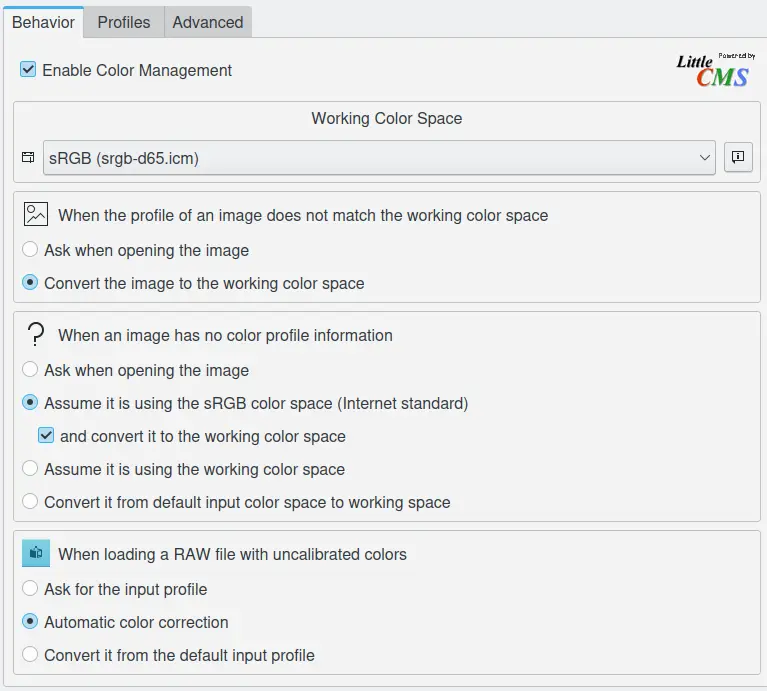
La scheda Comportamento contiene molte opzioni per la gestione dei colori in digikam.

La pagina di configurazione del comportamento della Gestione dei colori di digiKam
Abilita la gestione dei colori è la prima opzione e viene utilizzata per attivare o disattivare la gestione automatica dei colori all’interno di digiKam. Se vuoi lavorare solo con lo spazio dei colori sRGB, puoi tenere questa opzione spenta.
Se la gestione dei colori è attivata, devi allora fornire selezionare un profilo per lo Spazio dei colori di lavoro. La scelta include, tra gli altri, i profili lineari quali sRGB, ECI-RGB, LStar-RGB, Adobe-RGB e CIE-RGB. Per stampare le immagini, potresti preferire Adobe-RGB. Se le tue immagini sono solo destinate alla visualizzazione sul web, sRGB è la scelta migliore (Adobe-RGB verrà visualizzato con colori non netti in programmi non abilitati alla gestione dei colori come i browser web). Puoi però cambiare questo profilo in qualsiasi momento selezionando un altro profilo, dunque Adobe-RGB può essere una buona scelta per salvare e gestire le immagini, dato che puoi sempre convertirlo in sRGB prima di produrre un’immagine per il tuo blog. Nota: non usare dei profili non lineari perché modificherebbero il bilanciamento dei colori delle tue immagini.
Le tre sezioni che seguono di questa vista impostano i comportamenti della gestione dei colori di digiKam quando un’immagine viene caricata:
Quando il profilo di un’immagine non combacia con lo spazio dei colori di lavoro - digiKam fornisce le due opzioni:
Chiedi quando si apre l’immagine: se un’immagine ha un profilo di colore incorporato che non combacia con lo spazio dei colori di lavoro, digiKam chiederà se vuoi convertirla allo spazio dei colori di lavoro, mantenere il profilo incorporato oppure scartare il profilo incorporato e assegnarne uno diverso.
Converti l’immagine allo spazio dei colori di lavoro: se un’immagine ha un profilo di colore incorporato che non combacia con lo spazio dei colori di lavoro, digiKam convertirà automaticamente le informazioni dei colori dell’immagine nello spazio dei colori di lavoro. Questo cambia i dati dei pixel per corrispondere allo spazio dei colori di lavoro, ma non l’aspetto dell’immagine.
Quando un’immagine non ha informazioni sul profilo di colore - digiKam fornisce quattro opzioni:
Chiedi quando si apre l’immagine: se un’immagine non ha un profilo di colore incorporato, digiKam chiederà quale spazio dei colori deve essere usato per interpretare l’immagine e a quale spazio di colore essa deve essere trasformata per la modifica.
Presumi che stia usando lo spazio dei colori sRGB: questa è l’opzione migliore se l’immagine è destinata all’uso in Internet. L’opzione e convertilo allo spazio dei colori di lavoro ti permette di forzare la conversione allo spazio dei colori di lavoro definito in precedenza.
Presumi che stia usando lo spazio dei colori di lavoro: in questo caso l’immagine non è destinata a un uso specifico e lo spazio dei colori di lavoro viene utilizzato per la conversione.
Convertilo dallo spazio dei colori di input predefinito allo spazio di lavoro: in questo caso la conversione allo spazio dei colori di lavoro verrà eseguito per includere il profilo dei colori di input predefinito definito nella vista Profili (paragrafo successivo).
Quando si carica un file RAW con colori non calibrati - digiKam fornisce le tre opzioni:
Chiedi un profilo di input: digiKam domanda all’utente di selezionare il corretto profilo dei colori di input da utilizzare.
Correzione automatica del colore: digiKam eseguirà una correzione automatica dei colori basata su un’analisi dell’istogramma dell’immagine.
Convertilo dal profilo di input predefinito: digiKam userà il profilo dei colori di input predefinito definito nella vista Profili.
Impostazioni dei profili
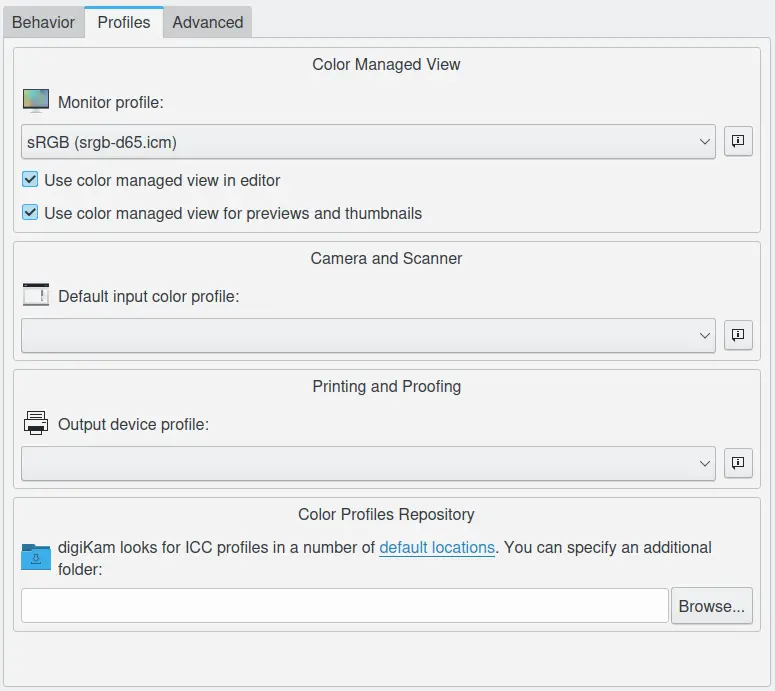
La scheda Profili include le opzioni per le impostazioni dei profili dei colori ICC per il tuo monitor, il dispositivo di ingresso (fotocamera o scanner) e i dispositivi di uscita (stampante o sistema di prova colore). Qui imposti le scelte predefinite per i tuoi profili. Ogni cosa è regolabile in un momento successivo, incluso quando vengono caricati i file RAW.

La pagina di configurazione dei profili della Gestione dei colori di digiKam
L’opzione Profilo del monitor ti consente di selezionare il profilo dei colori per il tuo schermo.
L’opzione Usa la vista di gestione dei colori nell’editor è un’alternativa per utilizzare la gestione dei colori del desktop. Verranno gestiti i colori nell’editor dell’immagine e non dell’immagine nel monitor. Puoi cambiare questa opzione in qualsiasi momento. Può rallentare la resa dell’immagine, a seconda della velocità del tuo computer.
Usa la vista con la gestione dei colore per le anteprime e le miniature: abilita questa opzione per utilizzare anche la gestione dei colori per rendere le anteprime e le miniature nella vista a icone, nel tavolo luminoso e nello strumento di importazione.
Il Profilo di colore di input predefinito deve corrispondere al produttore della fotocamera e al modello in uso. Non tutti i profili vengono creati uguali, ne esistono alcuni che non includono una mappatura dei toni/correzione di gamma, per esempio, le fotocamere Canon. Sotto certe condizioni, la gamma non può essere corretta in una conversione con profondità a 16 bit, il che significa che dovrai mappare i toni personalmente.
Il Profilo del dispositivo di output deve corrispondere al profilo per il tuo dispositivo di output, in genere la stampante. Questo profilo è anche utilizzato per eseguire una prova colore; sarai in grado, dunque, di creare un’anteprima della resa dell’immagine su un dispositivo di output. Supponendo che hai i giusti profili, ti permette di emulare come sarà la resa dell’immagine per un dispositivo specifico. È particolarmente utile prima della stampa, perché la tua stampante possiede un gamut più piccolo della tua fotocamera e alcuni colori stampati potrebbero apparire saturati. La prova colore ti permette di osservare e correggere manualmente qualsiasi problema, prima di sprecare il tuo inchiostro.
Deposito dei profili dei colori: digiKam cerca i profili ICC in diverse posizioni predefinite, per esempio /usr/share/color/icc. Imposta questo percorso alla cartella in cui memorizzerai i profili aggiuntivi, per esempio /home/user/.color/icc, e digiKam analizzerà queste cartelle all’avvio.
Impostazioni avanzate
La scheda Impostazioni avanzate include opzioni per la compensazione del punto nero e gli obbiettivi di resa.
Usa la compensazione del punto nero: è un modo di effettuare delle regolazioni tra i livelli massimi del nero dei file digitali e le capacità dei vari dispositivi digitali per rendere il nero.
Obbiettivi di resa - questa impostazione fornisce quattro opzioni:
Percettivo: fa comprimere o espandere tutto il gamut dell’immagine alle dimensioni del gamut del dispositivo di destinazione, in modo che il bilanciamento del grigio sia mantenuto, ma l’accuratezza colorimetrica potrebbe non esserlo. Ciò vuol dire che se certi colori di un’immagine sono al di fuori dei colori che il dispositivo di output può rendere, l’obiettivo farà regolare tutti i colori dell’immagine in modo che ogni colore sia all’interno dei colori rappresentabili e che le relazioni tra i colori siano mantenute per quanto possibile. Questo obiettivo è adatto soprattutto per la visualizzazione di fotografie e immagini, ed è l’obiettivo predefinito.
Colorimetrico relativo: fa regolare ogni colore che sia al di fuori di quelli rendibili dal dispositivo di output al colore rendibile più vicino, mentre tutti gli altri colori vengono mantenuti inalterati. Questo obiettivo non mantiene il punto bianco.
Colorimetrico assoluto: fa regolare ogni colore che sia al di fuori di quelli rendibili dal dispositivo di output al colore rendibile più vicino, mentre tutti gli altri colori vengono mantenuti inalterati. Questo obiettivo mantiene il punto bianco ed è adatto soprattutto per le tinte piatte (Pantone, TruMatch, colori di loghi, …).
Saturazione: mantiene la saturazione dei colori nell’immagine, se necessario a spese della tonalità e della luminosità. L’implementazione di questo obiettivo rimane un po” problematica, e l’ICC sta ancora lavorando sui metodi per ottenere gli effetti desiderati. Quest’obiettivo è adatto soprattutto alla grafica professionale, tipo i grafici, dove è più importante che i colori siano vividi e di contrasto sufficiente l’uno rispetto agli altri, piuttosto che corrispondere a colori specifici.

La pagina di configurazione avanzata della Gestione dei colori di digiKam
Nota
In generale, è abbastanza ovvio qual è profilo di colore che il produttore propone per una determinata fotocamera, ma non è così per Canon. Di seguito presentiamo una tabella non ufficiale degli abbinamenti fotocamera/profili:
Fotocamera |
Serie di profilo |
|---|---|
Canon 1D mark II |
6051 |
Canon 1D mark II |
6111 |
Canon 1Ds |
6021 |
Canon 1Ds mark II |
6081 |
Canon 5D |
6091 |
Canon 10D |
6031 |
Canon 20D |
6061 |
Canon 30D |
6112 |
Canon 40D |
6101 |
Canon 300D |
6031 |
Canon 350D |
6111 o 6071 |
Canon 400D |
6131 |
L’estensione per il profilo Canon tradisce lo stile dell’obiettivo: F sta per Faithful Style (fedele), L sta per Landscape (panorama), N per Neutral (neutrale). P per Portrait (ritratto), S per Standard.
Il paragrafo collegato fornisce lo scenario tipico di un flusso di lavoro RAW con l’Editor delle immagini.