Impostazioni dei modelli
Le opzioni dei Modelli di digiKam vengono configurate da .
Panoramica
Il gestore dei modelli di metadati è pensato per creare e gestire i modelli di metadati, che possono essere usati:
nella scheda Informazioni della vista Didascalie nella barra laterale destra.
Nella sezione Operazioni al volo (solo JPEG) della vista Impostazioni nella barra laterale destra nella finestra .
Lo scopo dei modelli è di applicare più parti dei metadati a uno o più elemento alla volta. Puoi creare molti profili diversi che corrispondono ai diversi aspetti del tuo flusso di lavoro. In ogni caso, le informazioni saranno memorizzate nel file come metadati XMP o IPTC. Ricorda che XMP è una sostituzione di IPTC, come spiegato in questo capitolo del manuale.
La porzione superiore della vista dei modelli mostra un elenco dei modelli già esistenti. La prima colonna mostra il titolo del modello, la seconda il nome degli autori, nel campo Nomi degli autori: di quel modello. A destra ci sono tre pulsanti di modifica, sotto un campo di immissione per il titolo del modello. Per creare un nuovo modello scrivi il titolo nel campo di immissione, e fai clic sul pulsante Aggiungi: il nuovo modello apparirà nell’elenco. Per modificare un modello esistente selezionalo nell’elenco, modifica i suoi campi (vedi il paragrafo successivo), quindi fai clic sul pulsante Sostituisci. Puoi anche inserire un nuovo titolo per il modello modificato, e salvare la nuova versione con il pulsante Aggiungi. Per eliminare un modello, selezionalo nell’elenco e fai clic sul pulsante Rimuovi.
Avvertimento
Nota che tutti le modifiche che apporti ai modelli saranno memorizzate nel file del modello se chiudi la finestra delle impostazioni con il pulsante OK. I pulsanti Aggiungi e Rimuovi cambiano solamente l’elenco dei modelli salvato in memoria.
Suggerimento
Il file del modello può essere trovato in ~/.local/share/digikam/ per la copia di sicurezza manuale o per gestire diversi insiemi di modelli per mezzo del filesystem.
Il resto della finestra è diviso in quattro schede, che raggruppano i campi dei metadati in Diritti, Posizione, Contatto e Soggetti.
Informazioni sui diritti

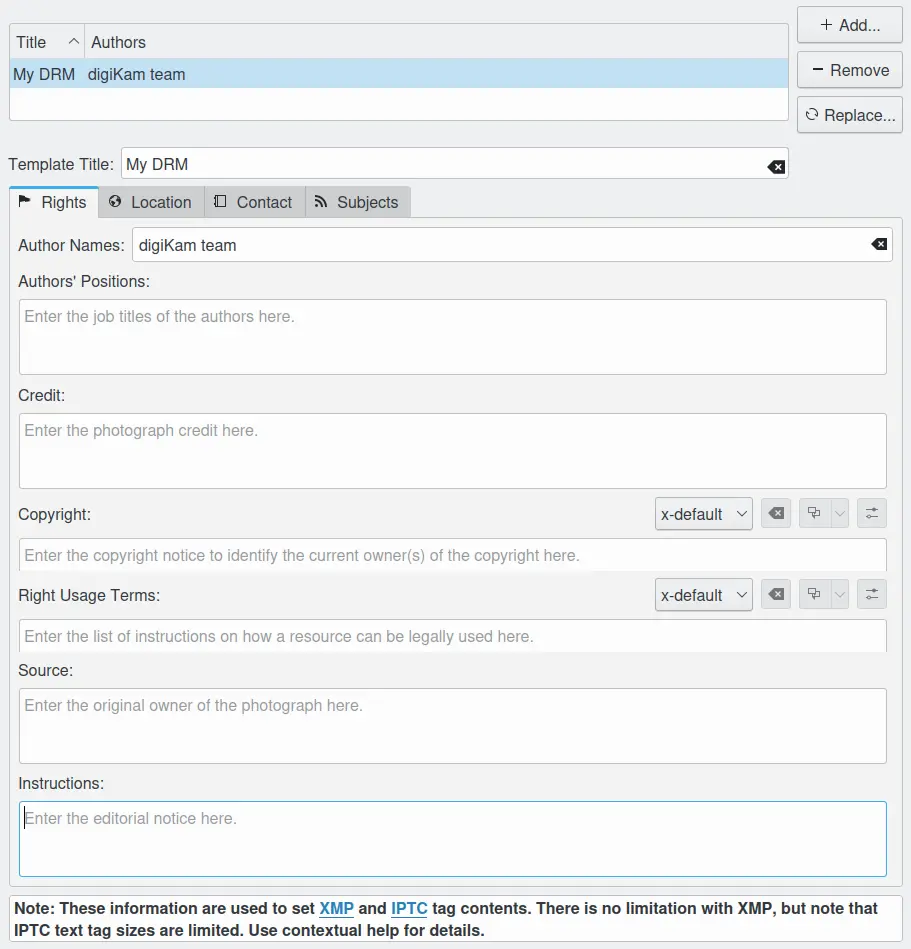
La pagina di configurazione Diritti del modello di digiKam
La scheda Diritti contiene l’identità predefinita e i dati sul copyright. Questo è un estratto delle specifiche IPTC/XMP per questi campi:
Autori (sinonimo di Creatore e Intestazione): questo campo deve contenere il tuo nome o quello della persona che ha creato la fotografia. Se non è corretto aggiungere il nome del fotografo (per esempio, se l’identità del fotografo deve essere protetta), può essere anche utilizzato il nome di un’azienda o di un’organizzazione. Una volta salvato, questo campo non dovrebbe essere modificato da nessuno. Il campo accetta l’uso di punti e virgola come separatori. Con IPTC, questo campo è limitato a 32 caratteri.
Posizioni degli autori (sinonimo di Titolo dell’intestazione): questo campo deve contenere il titolo di lavoro del fotografo. Esempi potrebbero includere titoli quali: fotografo dello staff, fotografo freelance o commerciale indipendente. Dato che è un qualificatore del campo Autore, anche quest’ultimo deve essere compilato. Con IPTC, questo campo è limitato a 32 caratteri.
Riconoscimenti (sinonimo di Fornitore): usa il campo Riconoscimenti per identificare chi fornisce la fotografia. Non dev’essere necessariamente l’autore. Se un fotografo lavora per un’agenzia di stampa, come la Reuters o la Associated Press, questa potrebbe essere elencata come «fornitore» dell’immagine agli utenti. Se l’immagine è una fotografia di repertorio, il gruppo (agenzia) che la fornisce dovrebbe essere indicato qui. Con IPTC, questo campo è limitato a 32 caratteri.
Diritto d’autore: la nota del diritto d’autore deve contenere tutti i dettagli legali per far valere la proprietà intellettuale, e deve identificare l’attuale proprietario (o proprietari) del diritto d’autore della fotografia. Di solito questo è il fotografo, ma se l’immagine è stata creata da un’impiegato o un esterno a pagamento, allora deve essere elencato l’agenzia o l’azienda. Usa la forma idonea al tuo paese. Per gli Stati Uniti la forma segue in genere (c) {data della prima pubblicazione} none del proprietario del diritto d’autore, come in (c) 2005 John Doe. Nota che può essere utilizzata la parola copyright o la sua abbreviazione copr al posto del simbolo (c). In alcuni paesi stranieri viene riconosciuto solo il simbolo del copyright e l’abbreviazione non vale. Inoltre, il simbolo del copyright deve essere un cerchio intero con una c al suo interno; non è sufficiente qualcosa di simile a una (c) in cui le parentesi formano un cerchio parziale. Per protezione aggiuntiva a livello mondiale, è consigliato l’uso della frase «tutti i diritti riservati»» di seguito alla notifica. In Europa, utilizzare: Copyright {Anno} {proprietario del diritto d’autore}, tutti i diritti riservati. In Giappone, per la massima protezione, devono apparire i seguenti tre elementi nel campo del diritto d’autore del IPTC Core: (a) la parola, Copyright; (b) anno della prima pubblicazione; e (c) nome dell’autore. Potresti anche voler includere la frase tutti i diritti riservati.
Il contrassegno del copyright per una licenza Creative Commons Share-alike potrebbe recitare:
Quest’opera è copyright {Anno} di {Autore} ed è sotto licenza CC BY-SA 4.0
Vedi https://creativecommons.org/licenses/by-sa/4.0/ per i dettagli su cosa significa la licenza Share-Alike.
Con XMP, puoi includere più di una stringa di diritto d’autore, in lingue differenti. Con IPTC, questo campo è limitato a 128 caratteri.
Termini di utilizzo: questo campo dovrebbe essere usato per elencare le istruzioni su come una risorsa possa essere usata legalmente. Con XMP puoi includere più di una stringa di termini di utilizzo, in lingue differenti. Questo campo non esiste in IPTC.
Fonte: questo campo dovrebbe essere usato per identificare il proprietario originale o il possessore del diritto d’autore della fotografia. Il valore di questo campo non deve mai essere cambiato dopo che l’informazione è stata inserita, a seguito della creazione dell’immagine. Sebbene non sia ancora imposto dai pannelli personalizzati, dovresti considerare questo campo come a «scrittura singola». La fonte può essere una persona, un’agenzia, o il membro di un’agenzia. Per facilitare le ricerche successive, suggeriamo di separare le barre / con uno spazio. Usa la forma fotografo / agenzia anziché fotografo/agenzia. La fonte potrebbe inoltre essere diversa dal Creatore e dai nomi elencati nella Nota del diritto d’autore. Con IPTC, questo campo è limitato a 32 caratteri.
Istruzioni: questo campo dovrebbe essere usato per elencare istruzioni editoriali che riguardino l’uso della fotografia. Con IPTC, questo campo è limitato a 256 caratteri.
Informazioni sulla posizione

La pagina di configurazione Posizioni del modello di digiKam
La scheda Posizione contiene i dati predefiniti sul luogo nel mondo che descrive il contenuto. Questo è un estratto delle specifiche IPTC/XMP per questi campi:
Città: questo campo deve contenere il nome della città in cui è stata scattata la fotografia. Con IPTC, questo campo è limitato a 32 caratteri.
Posto: questo campo deve contenere il nome del posto in cui è stata scattata la fotografia. Con IPTC, questo campo è limitato a 32 caratteri.
Regione o provincia: questo campo deve contenere il nome della regione o provincia in cui è stata scattata la fotografia. Con IPTC, questo campo è limitato a 32 caratteri.
Nazione: questo campo deve contenere la nazione in cui è stata scattata la fotografia. Con IPTC, questo campo è limitato a 64 caratteri.
Informazioni sul contatto

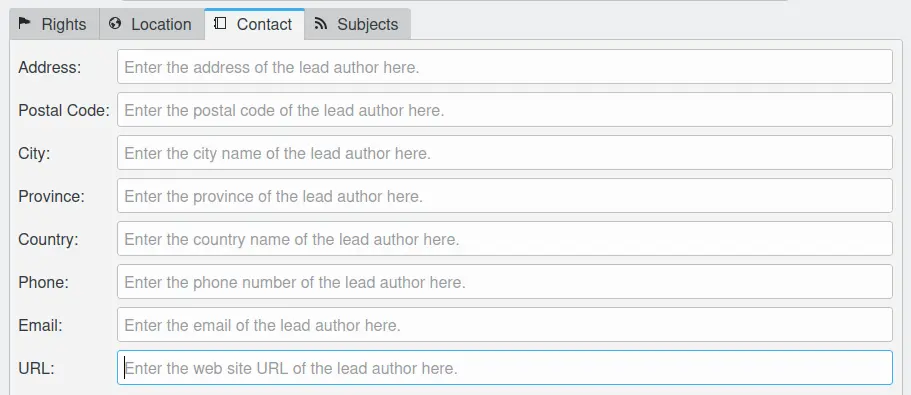
La pagina di configurazione Contatto del modello di digiKam
I dati nella scheda Contatto si riferiscono al fotografo (principale) che si trova in Nomi degli autori nella scheda Diritti. Poiché questi campi non esistono in IPTC, sotto viene elencato un estratto delle specifiche XMP per questi campi:
Indirizzo: questo campo dovrebbe contenere l’indirizzo dove l’autore principale vive.
Codice postale: questo campo dovrebbe contenere il codice postale dove l’autore principale vive.
Città: questo campo dovrebbe contenere il nome della città dove l’autore vive.
Provincia: questo campo dovrebbe contenere la provincia dove l’autore principale vive.
Nazione: questo campo dovrebbe contenere il nome di nazione dove l’autore principale vive.
Telefono: questo campo dovrebbe contenere il numero di telefono dell’autore principale.
Posta elettronica: questo campo dovrebbe contenere l’indirizzo di posta elettronica dell’autore principale.
URL: questo campo dovrebbe contenere l’indirizzo del sito internet dell’autore principale.
Informazioni sui soggetti

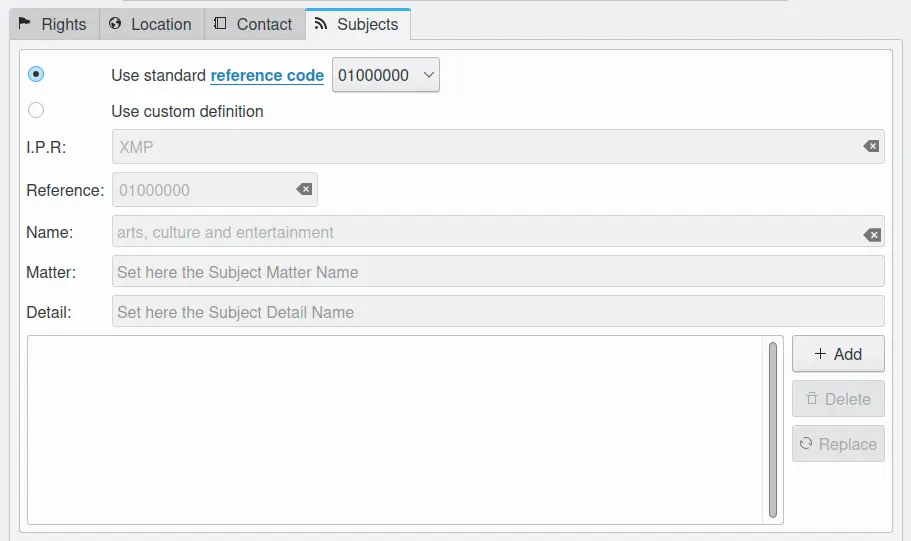
La pagina di configurazione Soggetti del modello di digiKam
Nella scheda Soggetti puoi assegnare uno o più Codici di soggetto, in base allo standard dei metadati IPTC del modello. Se è selezionata la prima opzione, Usa un codice di riferimento standard, puoi scegliere un codice da un campo a tendina, e il suo significato apparirà quindi nel campo della sezione Usa definizione personalizzata. Questa modalità è un po” noiosa se non conosci il codice per il soggetto a cui lo vuoi assegnare, dato che ci sono 1400 soggetti nello standard. Un sistema migliore è quello di cercare il tuo soggetto in quest’URL. Qui selezioni i Codici di soggetto e la tua lingua (è raccomandato l’inglese), poi fai clic su Mostra. Puoi scorrere attraverso il diagramma ed entrare negli ulteriori livelli facendo clic su uno dei campi. Nel campo alla destra del diagramma è possibile trovare il codice del soggetto selezionato.
In generale, i Codici di soggetto IPTC sono abbastanza esaurienti, ma d’altro lato un po” incompleti in alcuni campi: per esempio, sotto Tempo libero/Giochi trovi solo Go, Scacchi, Bridge e Shogi. Potresti dunque voler aggiungere dei soggetti personalizzati, sebbene restino sempre soggetti privati (o aziendali). Un modo per farlo in digiKam è spuntare prima Usa un codice di riferimento standard, quindi scegliere 10001004, che ti porta a Tempo libero/Giochi/shogi (tanto per continuare col nostro esempio). Spunta quindi Usa definizione personalizzata, cambia l’ultima cifra di Riferimento in 5 e il testo nel campo Dettagli con, per esempio, domino. Salva questa definizione personalizzata nel modello, facendo clic sul pulsante Aggiungi, a destra dell’elenco dei soggetti. Scrivi quindi un titolo per il modello (se è nuovo) e salvalo facendo clic sul pulsante Aggiungi, a destra dell’elenco dei modelli. Non mischiare questi due.