La vista etichette ti permette di selezionare le fotografie in base alle etichette Valutazione, Scelta ed etichette colorate assegnate all’immagine.
Le valutazioni sono rappresentate da stelle.
Le scelte sono rappresentate da bandierine.
I colori sono rappresentati da linee colorate sotto l’immagine.
La vista etichette della barra laterale sinistra di digiKam
Per filtrare la tua raccolta in base a un’etichetta, fai clic su un’etichetta nella barra laterale sinistra. Tutte le immagini che contengono un’etichetta che corrisponde saranno visualizzate nella vista principale. Per rimuovere il filtro, fai clic sul titolo dell’etichetta che vuoi rimuovere, per esempio Valutazione, Scelta o Colore.
Con kbd:Ctrl+clic sinistro puoi selezionare più di un’etichetta. Le etichette selezionate all’interno dello stesso tipo sono collegate da O logico, per esempio selezionando tre stelle e quattro stelle verranno visualizzate tutte le fotografie che hanno l’una o l’altra etichetta assegnata. I tipi diversi di etichette sono collegate da un AND logico, cioè, se selezioni quattro stelle e il giallo verranno visualizzate solo le fotografie a cui sono state assegnate entrambe le etichette. Puoi eseguire anche ricerche più sofisticate, usando la sezione Filtri della barra laterale destra.
Utilizzando l’immagine sopra come esempio, digiKam visualizzerà tutte le immagini valutate 3 O 4 stelle, E con un’etichetta di scelta In sospeso O Accettata. Non è stata selezionata un’etichetta colorata, dunque tutte le etichette colorate vengono incluse nella ricerca, incluse le immagini senza un’etichetta colorata assegnata.
Suggerimento
La Valutazione e le etichette colorate possono essere utilizzate per ordinare gli elementi dalla tua raccolta durante il tuo processo di gestione dei beni (digitali). Vedi questa sezione per i dettagli.
Puoi rinominare le Etichette colorate direttamente nella vista ad albero delle etichette facendo doppio clic sul testo dell’etichetta.
Per impostazione predefinita, ciascuna etichetta colorata usa il nome del colore come descrizione. Puoi personalizzare questo testo in modo da adattarlo meglio alle tue esigenze.
Le etichette colorate di digiKam possono essere rinominate
Il nome dell’etichetta personalizzata apparirà:
nei suggerimenti degli elementi nella Vista a icona;
nelle schede Didascalie e Filtri della barra laterale destra;
nella finestra di dialogo Ricerca avanzata;
nella selezione dell’album virtuale negli strumenti di post-elaborazione.
Nota
I nomi delle etichette colorate sono limitate a 32 caratteri. Per ripristinare il nome di un’etichetta colorata al valore predefinito, cancella la stringa e convalida.
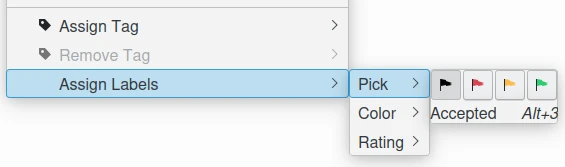
Ci sono due modi per assegnare etichette alle tue fotografie:
Fare clic col destro su un’immagine o su una miniatura visualizza il menu contestuale di una miniatura. Dal menu contestuale puoi assegnare un’etichetta di valutazione, di scelta o colorata.
Il menu contestuale della vista a icone di digiKam e le opzioni delle etichette
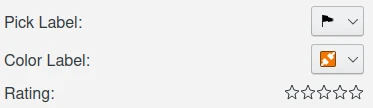
La scheda Descrizione della sezione Didascalie della barra laterale destra.
Le opzioni delle etichette dalla scheda della barra laterale destra delle didascalie di digiKam
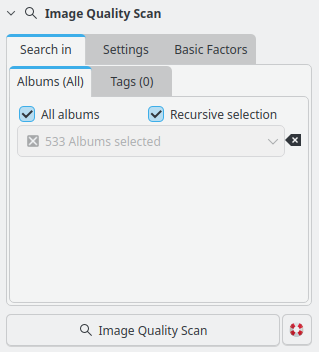
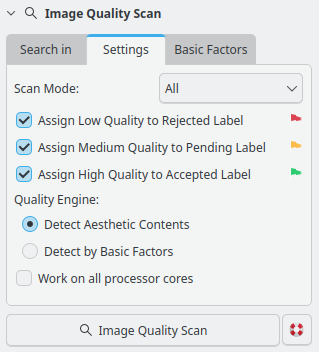
digiKam può assegnare automaticamente etichette di scelta alle tue immagini utilizzando lo strumento Analisi qualità dell’immagine nella vista Etichette. Lo strumento «Analisi qualità dell’immagine» valuta le immagini tramite una rete neurale di apprendimento profondo, oppure utilizzando fattori estetici di base. Dopo l’analisi di un’immagine, digiKam assegnerà una etichetta di scelta basata sulla qualità dell’immagine e sulle opzioni che hai selezionato nella scheda Impostazioni.
Bandiera rossa per Rifiutata.
Bandiera gialla per In sospeso.
Bandiera verde per Accettata
Per espandere e accedere allo strumento «Analisi qualità dell’immagine», fai clic su Analisi qualità dell’immagine nella parte inferiore della vista Etichette.
Seleziona quali etichette di scelta assegnare alle immagini. Questa opzione è utile per fare in modo che digiKam rifiuti automaticamente le immagini che non soddisfano i tuoi standard di qualità, ma permette tuttavia di assegnare manualmente le altre etichette. Deselezionando tutte e tre le opzioni, la funzione di analisi di qualità delle immagini diventa praticamente inutile.
Rileva contenuti estetici: usa la rete neurale di apprendimento profondo per valutare la qualità estetica delle immagini.
Rileva per fattori di base: usa i fattori di base quali sfocatura, rumore ed esposizione per valutare la qualità dell’immagine.
Rileva contenuti estetici usa un motore di intelligenza artificiale basato su questo modello per predire un punteggio estetico. Dato che l’apprendimento profondo è una soluzione a 360°, non richiede impostazioni di iperparametri, il che lo rende l’approccio più semplice da utilizzare.
Importante
L’opzione Rileva contenuti estetici richiede un modello di apprendimento profondo, scaricabile dal web. Questo file può essere scaricato sia quando digiKam viene eseguito la prima volta (vedi il capitolo Avvio rapido per i dettagli), sia facendo clic sul pulsante Scarica i dati degli eseguibili richiesti nella pagina Impostazioni ‣ Varie ‣ Sistema.
A seconda della dimensione della tua raccolta e delle impostazioni di filtraggio selezionate in Ricerca in, l’operazione di analisi di qualità delle immagini può richiedere molto tempo Si consiglia di utilizzare tutti i core del processore. Ciò velocizzerà il processo, ma potrebbe potenzialmente rallentare gli altri processi e rendere il computer poco reattivo mentre le immagini vengono elaborate. Deseleziona l’opzione Lavora con tutti i core del processore se il tuo computer è lento e vuoi eseguire altre attività durante l’analisi.
Suggerimento
A causa di limitazioni tecniche in Windows, il supporto multi-core per banche dati Mysql/MariaDB non restituisce buone prestazioni. Per ottenere prestazioni migliori, consigliamo di utilizzare invece una banca dati SQlite.
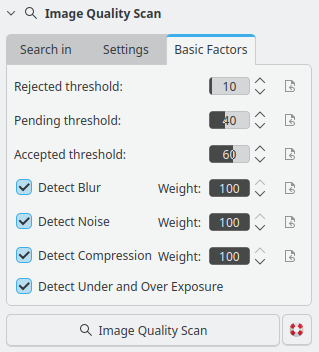
La scheda Fattori di base ti permette di controllare come le qualità selezionate influenzino la valutazione dell’etichetta di scelta. I fattori di base vengono usati soltanto quando il motore della qualità è impostato a Rileva per fattori di base.
La vista Fattori di base dell’Analisi qualità dell’immagine di digiKam
Il metodo Fattori di base utilizza quattro fattori di base per valutare le immagini: Sfocatura, Rumore, Esposizione e Compressione. L’uso dei fattori di base richiede, tuttavia, una regolazione precisa da parte dell’utente, e non include alcuna valutazione estetica dell’immagine. Deselezionando tutt’e quattro le opzioni nella modalità Fattori di base, la funzione di analisi di qualità delle immagini diventa praticamente inutile.