Main Window Menu

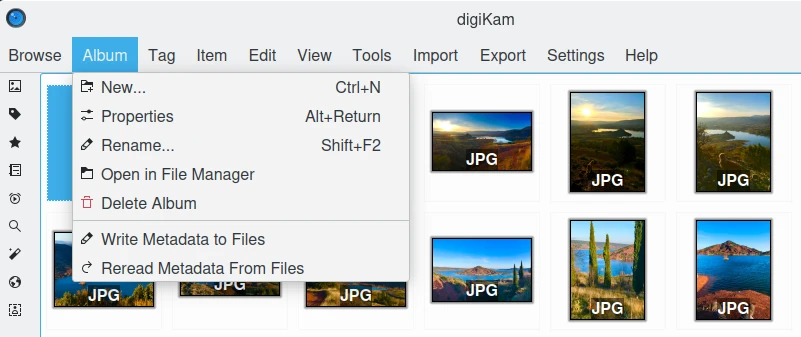
The digiKam Main Window Menu

Astuce

When switching in Full-Screen Mode Ctrl+Shift+F, or when you Hide Menubar Ctrl+M, the main menu will be available on the right side of tool-bar with the Hamburger Button icon_hamburger.

The Browse Menu

The Browse menu provides access to the same views you can see on the Left Sidebar, accessible through Ctrl+Shift+Fn (with Fn equals F1, F2, F3, etc.). In addition there are Back Alt+Left and Forward Alt+Right menu items that will lead you through the history of your digiKam use in the same way you are used to from an internet browser for example. And finally there is the Quit Ctrl+Q item to leave digiKam.

The Album Menu

The first five items of this menu (above the separator) are only active if you are in the Albums View.

Album ‣ New... Ctrl+N

Opens a dialog to create a new album folder similar to the album properties dialog described there. It just has an additional drop down field where you can choose whether the new album is created as a child of the current one or at the root of the current collection.

Album ‣ Properties

Edit the currently selected album title, caption and collection as described here.

Album ‣ Rename F5

Rename the current album.

Album ‣ Open in File Manager

Open the default file manager with the current Album path.

Album ‣ Delete Album

Delete/Move to trash selected Album and all items in it.

Album ‣ Write Metadata to Images

Write the metadata in the database to the file's metadata of all items in the current album. The images will inherit the database metadata, not the other way round as in the next menu item.

Album ‣Reread Metadata From Images

Write the metadata of all items in the current album to the database. The database will inherit the images metadata, not the other way round as in the previous menu item.

The Tag Menu

The items below the separator are only active if you are in the Tags View.

Tag ‣ Tag Manager

Opens the digiKam Tag Manager.

Tag ‣ New...

A dialog will open where you can type in the tag name (or even a whole hierarchy branch), assign an icon and/or a shortcut to the tag. The new tag will be created as a sub-tag of the selected tag.

Tag ‣ Properties

The Tag Properties allow you to change the name of the tag, the icon used in the Tags tree and the shortcut.

Tag ‣ Delete

Remove the currently selected Tag from the Album's Database. This doesn't delete the images the tag was assigned to.

The Item Menu

Item ‣ Open... F4

Opens the selected image in the digiKam Image Editor.

Item ‣ Open With Default Application Meta-F4

Opens the selected item in the default application according to the mime-type set in your desktop.

Item ‣ Rename F2

Renames the currently selected item(s). See description here.

Item ‣ Move to trash Del

Moves selected item(s) to the digiKam Trash (recoverable delete).

Note

To Delete permanently a file, use Shift+Del

Item ‣ Place onto Light Table Ctrl-L

Inserts selection into the Light Table thumbbar and puts the Light Table into the foreground.

Item ‣ Add to Light Table Ctrl-Shift-L

Adds selection to the Light Table thumbbar and puts the Light Table into the foreground.

Item ‣ Add to Current Queue Ctrl-B

Opens the digiKam Batch Queue Manager and adds selection to the current queue or, if there is no queue yet, to a new queue.

Item ‣ Add to New Queue Ctrl-Shift-B

Opens the digiKam Batch Queue Manager and puts selection into a new queue.

Item ‣ Find Similar...

Puts the selected item from the Image tab in the Similar View.

See the dedicated Similarity Search Tool for more information.

Item ‣ Write Metadata to Image

When editing files outside digiKam, the database will not be triggered to update information. If you want to scan items and backport changes in the database you got to use this function first.

Item ‣ Reread Metadata from Image

When editing metadata using the Metadata Editor the data will be written to the image only. If you want them to appear in the Metadata Tab of the Right Sidebar you got to use this function first.

Item ‣ Rotate

Menu entry for rotating the currently selected images lossless Left Ctrl-Shift-Left or Right Ctrl-Shift-Right in 90 degree steps (see sub-menu).

Item ‣Flip

Menu entry for flipping the currently selected images lossless Horizontally Ctrl-* or Vertically Ctrl-/ (see sub-menu).

Item ‣ Auto Rotate/Flip using Exif information

Menu entry to manually activate the auto rotate/flip feature for the currently selected images using the Exif orientation tag. For a more detailed description see Lossless Image Rotation.

Item ‣ Adjust Exif Orientation Tag

The Exif Orientation Tag of the current selection will be changed depending on the option you choose from the sub-menu. The thumbnail(s) and preview(s) will be rotated accordingly if Show images/thumbnails rotated according to orientation tag is checked in Settings ‣ Configure digiKam... ‣ Metadata ‣ Rotation ‣ Rotate actions, but not the actual image file. If you want to rotate that as well you got to use the function Item ‣ Auto Rotate/Flip using Exif information described above additionally. If you open the file in the digiKam Image Editor it will also come up in the rotated version and will be stored that way on disc if you save it. But be aware of the fact that this would be a lossy operation as long as it is not a lossless file format.

Item ‣ Edit Metadata...

Opens the digiKam Metadata Editor to handle metadata of the image (Exif, IPTC, XMP).

See the dedicated Metadata Editor chapter for more information.

Item ‣ Edit Geolocation...

Opens the digiKam Geolocation Editor to handle GPS meta data of the image.

See the dedicated Geolocation Editor for more information.

Item ‣ Print

Calls standard print dialog.

Item ‣ Print Assistant...

Tool to print grouped images from Album.

See the dedicated Print Creator for more information.

Note

Another very useful function on items is grouping which is at the time of writing only available through the context menu on a selection of items. For details see Grouping Photographs in the chapter about the digiKam Main Window.

The Edit Menu

Beside the usual Cut, Copy and Paste the Edit Menu contains the following items:

Edit ‣ Select All Ctrl+A

Select all images currently shown.

Edit ‣ Select None Ctrl+Shift+A

Un-select all items in the current view.

Edit ‣ Invert Selection Ctrl+I

Invert the current selection.

The View Menu

Shows thumbnails in the Image View.

Shows additionally a Preview in the Image View.

The preview has Back and Forward buttons at the top left corner to navigate through all the images currently shown.

Shows images on a map.

Shows images in a table where you can choose by right clicking on the title bar which information you want to be displayed.

By default you have these four items also on the main toolbar.

Slide-Show including RAW files.

View ‣ Slideshow ‣ All F9

Start Slide-Show of all images in current window.

View ‣ Slideshow ‣ Selection Alt+F9

Start Slide-Show on selected images.

View ‣ Slideshow ‣ With All Sub-Albums Shift+F9

Slide-Show that recurses through the current album tree.

Tool to display an advanced slide show with Album items.

See the dedicated Presentation Tool for more information.

Tool to display images using OpenGL compatible device.

See the dedicated OpenGL Viewer for more information.

Switch to full screen (Return with the same keyboard shortcut).

Note

You can access to the application menu using the Hamburger Button on the right side of tool-bar.

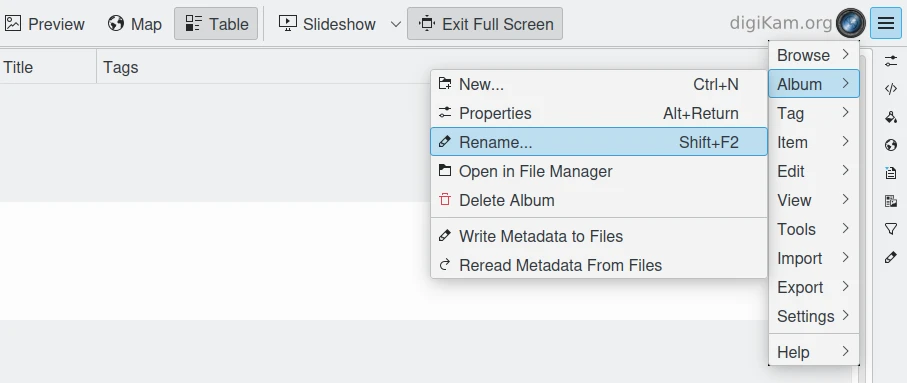
The Hamburger Menu Available in Full-Screen Mode

Increase preview or the thumbnail size of the currently selected Album.

Decrease preview or the thumbnail size of the currently selected Album.

View ‣ Fit to Window Ctrl+Alt+E

Will size the image as to fit snug into the window.

View ‣ Zoom to 100% Ctrl+,

Will show the image 1:1 (meaning 1 image pixel is mapped exactly to 1 screen pixel) in preview mode.

View ‣ Sort Albums

Sort all digiKam Albums by Folder, by Category or by Date.

View ‣ Sort Images

Sort all images in current Album by:

  • Name.

  • Path.

  • Creation Date.

  • Modification Date.

  • File Size.

  • Rating.

  • Image Size.

  • Aspect Ratio.

  • Face Type.

  • Similarity (only in the Similarity Search View).

  • Manual and Name.

  • Manual and Date.

View ‣ Image Sorting Order

Select whether images should be sorted in ascending or descending order.

View ‣ Group Images

Select whether images should be shown un-grouped (Flat List) or grouped by album or by format.

View ‣ Group Sorting Order

Select whether groups should be sorted in ascending or descending order.

View ‣ Include Album Sub-Tree

If a hierarchical album structure exists, the currently selected branch will be displayed in full depth.

View ‣ Include Tag Sub-Tree

If a hierarchical tag structure exists, the currently selected branch will be displayed in full depth.

Toggles between showing thumbnails and preview in color-managed mode or not.

For more information about color management see this lengthy chapter.

The Tools Menu

Tools ‣ Image Editor

Opens the digiKam Image Editor.

Tools ‣ Light Table L

Switches to the Light Table window.

Tools ‣ Batch Queue Manager B

Opens the Batch Queue Manager window.

Tools ‣ Search... Ctrl+F

Switches to the Search View with focus on the simple search field.

Tools ‣ Advanced Search... Ctrl+Alt+F

Switches to the Search View and launches the advanced search dialog.

Tools ‣ Find Duplicates Ctrl+D

Leads to the Duplicates tab in the Similarity Search View.

See Similarity Search Tool for more information.

Tools ‣ Maintenance...

Opens the maintenance tool.

For a detailed description see this Chapter.

Tools ‣ Blend Bracketed or Focus Stack Images...

This tool allows users to blend bracketed images together to create pseudo HDR photo.

Tools ‣ Create Panorama...

This tool allows users to assemble images together to create large panorama.

Tools ‣ Create Calendar...

Tool to create a calendar with Album items.

See the dedicated Calendar Tool for more information.

Tools ‣ Email Images...

Tool to send images with your favorite email client.

See the dedicated Send Images Tool for more information.

The Import Menu

Import ‣ Cameras

Any configured digital camera will be listed here. You can use the Add Camera Manually... menu entry to add a new camera to the list. Please, read the Camera Settings for more information.

Once you choose a camera from the list the Camera Interface will open. For a detailed description see digiKam Import Tool.

Import ‣ USB Storage Devices

All currently mounted USB storage devices will be listed here. The function will open the same interface as the Import/Cameras menu item.

Import ‣ Card Readers

All currently mounted card readers will be listed here. The function will open the same interface as the Import/Cameras menu item.

Import ‣ Add Images... Ctrl+Alt+I

After asking for the source folder with the standard Open dialog of your OS the function will display the images in that folder in the same interface as the Import/Cameras menu item.

This item is only active in the Albums View.

Import ‣ Add Folders...

Navigate to a folder and import it entirely

This item is only active in the Albums View.

Import ‣ Import from Google Photos Alt+Shift+P

Tool to download files from Google Photos web-service.

See the dedicated Google Photos Import Tool for more information.

Import ‣ Import from SmugMug Alt+Shift+S

Tool to download files from SmugMug web-service.

See the dedicated SmugMug Import Tool for more information.

Import ‣ Import from remote storage Alt+Shift+K

Tool to download files from another computer using network.

See the dedicated Remote Storage Import Tool for more information.

Import ‣ Import from Scanner...

Opens a scanner dialog

See the dedicated Acquire Images Tool for more information.

The Export Menu

Export ‣ Export to Box... Ctrl+Alt+Shift+B

Tool to upload or update files to Box web-service.

See the dedicated Box Export Tool for more information.

Export ‣ Export to Dropbox... Ctrl+Alt+Shift+D

Tool to upload or update files to Dropbox web-service.

See the dedicated Dropbox Export Tool for more information.

Export ‣ Export to Flickr... Ctrl+Alt+Shift+R

Tool to upload or update files to Flickr web-service.

See the dedicated Flickr Export Tool for more information.

Export ‣ Export to Google Drive... Ctrl+Alt+Shift+G

Tool to upload or update files to Google Drive web-service.

See the dedicated Google Export Tool for more information.

Export ‣ Export to Google Photos... Ctrl+Alt+Shift+P

Tool to upload or update files to Google Photos web-service.

See the dedicated Google Export Tool for more information.

Export ‣ Export to Imageshack Ctrl+Alt+Shift+M

Tool to upload or update files to Imageshack web-service.

See the dedicated Imageshack Export Tool for more information.

Export ‣ Export to Imgur

Tool to upload or update files to Imgur web-service.

See the dedicated Imgur Export Tool for more information.

Export ‣ Export to INaturalist Ctrl+Alt+Shift+N

Tool to upload or update files to INaturalist web-service.

See the dedicated INaturalist Export Tool for more information.

Export ‣ Export to Onedrive Ctrl+Alt+Shift+O

Tool to upload or update files to Onedrive web-service.

See the dedicated Onedrive Export Tool for more information.

Export ‣ Export to Pinterest Ctrl+Alt+Shift+I

Tool to upload or update files to Pinterest web-service.

See the dedicated Pinterest Export Tool for more information.

Export ‣ Export to Piwigo

Tool to upload or update files to Piwigo web-service.

See the dedicated Piwigo Export Tool for more information.

Export ‣ Export to SmugMug Ctrl+Alt+Shift+S

Tool to upload or update files to SmugMug web-service.

See the dedicated SmugMug Export Tool for more information.

Export ‣ Export to Twitter

Tool to upload or update files to Twitter web-service.

See the dedicated Twitter Export Tool for more information.

Export ‣ Export to local storage Ctrl+Alt+Shift+L

Tool to copy files somewhere in your computer outside your collections.

See the dedicated Local Storage Export Tool for more information.

Export ‣ Export to MediaWiki

Tool to upload or update files to MediaWiki web-service.

See the dedicated MediaWiki Export Tool for more information.

Export ‣ Export to remote storage Ctrl+Alt+Shift+K

Tool to upload files to another computer using network.

See the dedicated Remote Storage Export Tool for more information.

The Settings Menu

Settings ‣ Show Toolbar

Enable or disable the main digiKam toolbar.

Settings ‣ Show Menubar Ctrl+M

Enable or disable the main digiKam menu bar.

Remind the keyboard shortcut in order to be able to get it back. Another way is the context menu within the Icon-View.

Settings ‣ Show Statusbar

Enable or disable the main digiKam status bar.

Settings ‣ Show Thumbbar Ctrl+T

Enable or disable the thumb-bar in the digiKam Icon-View.

This item is only active while a preview is displayed because it is meant to make more space for the preview in the Image Area.

Settings ‣ Themes

Choose from a list (sub-menu) of predefined color themes for the appearance of digiKam.

For a detailed description see digiKam Themes Configuration section.

Settings ‣ Configure Languages...

Launch digiKam languages configuration dialog.

For a detailed description see digiKam Languages Configuration section.

Settings ‣ Configure Shortcuts... Ctrl+Alt+,

Configure the digiKam shortcuts and manage different schemes of shortcuts.

For a detailed description see digiKam Shortcuts Configuration section.

Settings ‣ Configure Toolbars...

Configure the digiKam toolbars.

For a detailed description see digiKam Toolbars Configuration section.

Settings ‣ Configure Notifications...

Configure the digiKam notifications including actions like Play a sound, Log to a file or Run command.

For a detailed description see digiKam Notifications Configuration section.

Settings ‣ Database Migration...

Launch tool to migrate the digiKam databases from SQLite to MySQL or vice versa.

Find more information about the databases and database migration in the setup section about digiKam databases.

Settings ‣ Configure digiKam... Ctrl+Shift+,

Launch digiKam configure dialog.

For a detailed description see digiKam Configuration section.

The Help Menu

Help ‣ What's this? Shift+F1

Show Contextual help.

Help ‣ Find Action Ctrl+Alt+I

Search a menu action in application window.

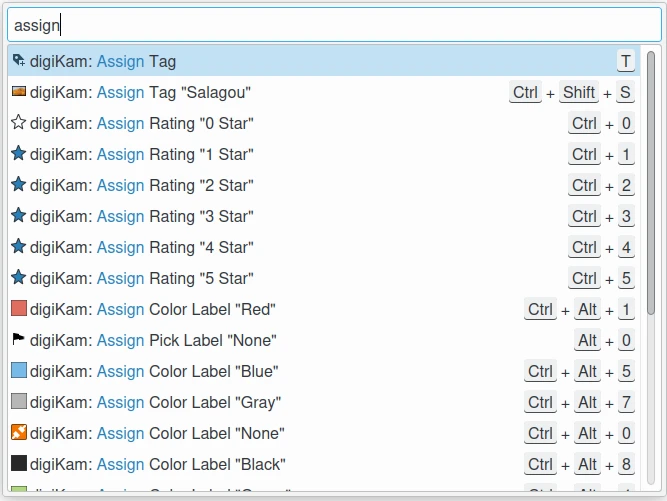
The Dialog to Find Action in Menu

Help ‣ Supported RAW Camera

Displays a list of all supported RAW camera.

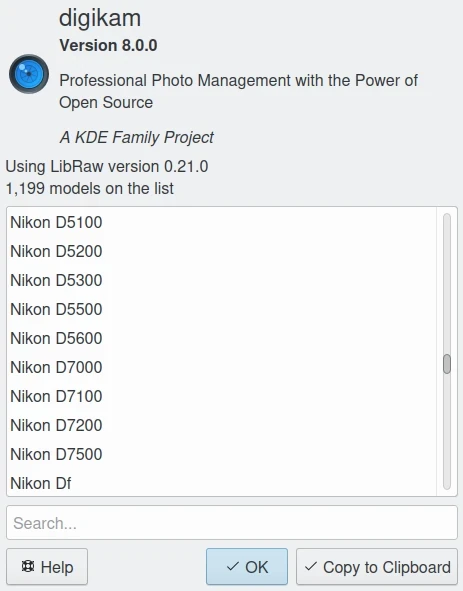
The List of Supported RAW Camera

Help ‣ Detected Hardware

Displays an information panel with the detected hardware from your computer.

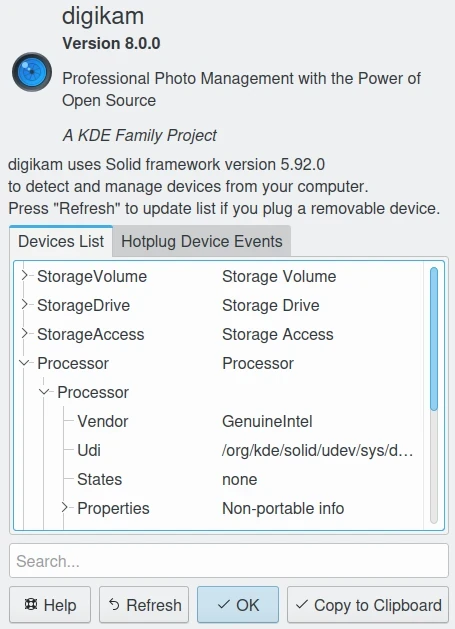
The List of Detected Hardware

Help ‣ Components Information

Displays an information panel with shared libraries and the component configurations used by the application.

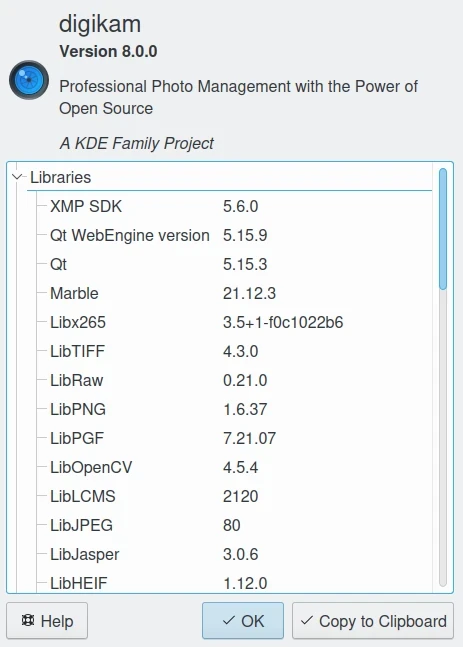
The List of Components Information

Help ‣ Database Statistics

Displays an information panel with a database summary.

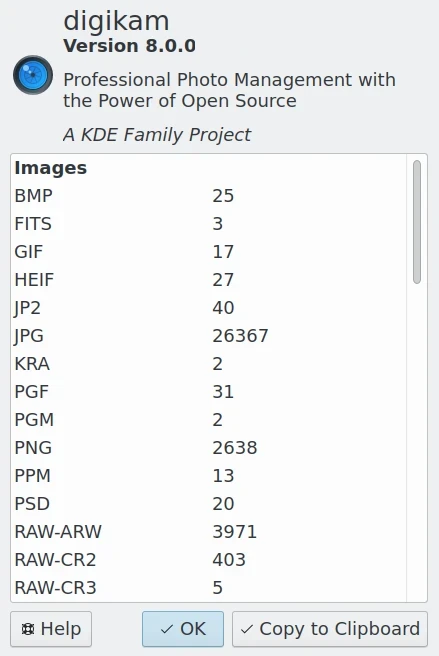
The Statistics from the Database

Help ‣ Donate

Open project Donation page.

Help ‣ Check from New Version

Check if new application version is available online. See this chapter from details.

Help ‣ Recipes Book

Help ‣ Contribute

Open project Contribute page.

Help ‣ Online Handbook

Help ‣ Report Bug

Open a dialog to report online a dysfunction.

Help ‣ About digiKam

Open a dialog to show application version and details.