Database Settings
The Database options for digiKam are set from .
Note
For an introduction to internal data storage, please refer to the Database section of the Getting Started chapter.
The SQLite Database
SQLite is a relational database management system, written in the C programming library. SQLite is not directly comparable to client/server SQL database engines such as MySQL, Oracle or PostgreSQL. Rather, it is an SQL database engine that is embedded in an end program. SQLite reads and writes directly to ordinary disk files. SQLite is almost always the best solution for device-local storage with low write-concurrency and less than a terabyte of content. SQLite is fast and reliable and it requires no configuration or maintenance. It keeps things simple. SQLite “just works”.
By default, digiKam uses SQLite as its back-end for storing important metadata and thumbnails. digiKam stores information into four SQLite files:
Database
File-Name
Core
digikam4.dbThumbs
thumbnails-digikam.dbSimilarity
similarity.dbFaces
recognition.db
To keep your application running fast and smooth, you should periodically check and optimize your databases: select and then Perform Database Cleaning. See the Database Cleaning section of the Maintenance Tools chapter for details.
The SQLite Browser, is a high quality and easy to use visual tool for managing database objects, that we highly recommend. For Ubuntu and its derivatives, it can be installed using sudo apt install sqlitebrowser. Then you can switch to the directory where the digiKam databases are stored in order to visualize the database contents.
Note
For best performance, store the digiKam databases on the fastest hardware (such as SSD or NVMe) with plenty of free space. This is especially important for the thumbnails database. A remote file system such as NFS cannot be used here. For performance and technical reasons, SQLite cannot use media from the network.
The SQLite database files can be found in the collection folder that you added to digiKam. (By default, if you add your “Pictures” collection, the database files will be present in the ~/Pictures folder).
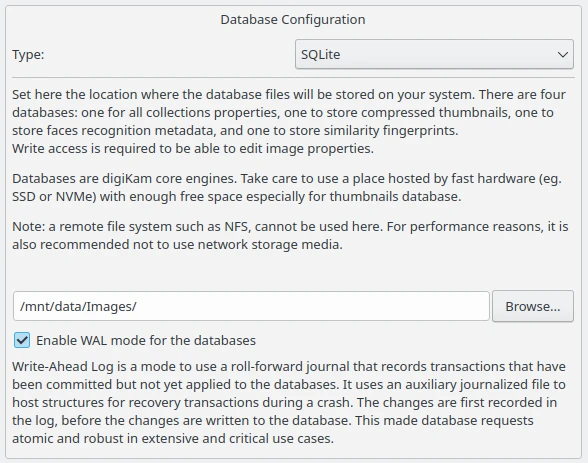
The digiKam SQLite Configuration Page
The WAL SQLite mode is a very important option that we recommend you turn on with large databases to optimize transactions and improve performance.
The MySQL Database
MySQL Versus SQLite
MySQL is an open-source, relational database management system, written in C and C++. Original development of MySQL by Michael Widenius and David Axmark began in 1994. Sun Microsystems acquired MySQL in 2008, which was later acquired by Oracle in 2010. MySQL currently works on almost all system platforms (Linux, Microsoft Windows, OS X, SunOS …).
MariaDB server is a community-developed fork of MySQL server. Started by core members of the original MySQL team, MariaDB actively works with outside developers to deliver the most featureful, stable, and sanely licensed open SQL server in the industry.
MariaDB use has overtaken MySQL for a few basic reasons:
MariaDB development is more open and vibrant.
More cutting edge features.
More storage engines.
Better performance.
Compatible and easy to migrate.
digiKam also provides support for the popular MySQL database engine. Of course, you might wonder why you’d want to switch to MySQL when SQLite already does a good job of managing the data? MySQL offers many advantages for storing digiKam data, especially when collections include more than 100,000 items. With such large collections, SQLite introduces latency which slows down the application.
Note
With WAL option enabled, SQLite can be easily used for more than 100,000 items especially with an SSD or NVMe storage. It may be even faster than MySQL and more stable. See this page for technical details.
Using MySQL as digiKam’s database back-end allows you to store the data on local as well as remote servers. MySQL Internal can be used to replace the local SQLite storage, and MySQL Server can be used on media stored on a remote server. This way, you can use multiple digiKam installations (for instance, on your notebook and PC) to access and manage your photo collections. You can also use MySQL tools to backup and analyze digiKam’s data.
To switch from SQLite to MySQL database, go to and then under Database section, select a database from the drop down list.
MySQL Internal: This allows to run an internal database server on your system. digiKam uses Unix socket for the connection.
MySQL Server: Use this if your data is on a remote server and you’re on a different machine trying to access the collection.
The MySQL Internal Server
digiKam tends to slow down when using a large collection (size greater than 100,000 items) hosted on a hard drive (HDD - not an SSD or NVMe device) with the SQLite database. To avoid the delay and maintain efficiency, digiKam provides the option of using MySQL Internal. To be clear, this isn’t an actual server, or a public network. Instead, it is a server that runs only while the application is running.
Internal server creates a separate database that can be accessed (only while application is running) using the command:
mysql --socket=/home/[user_name]/.local/share/digikam/db_misc/mysql.socket digikam
The internal server uses three MySQL Binary Tools: mysql_install_db, mysqladmin, and mysqld. You can configure their locations in the configuration dialog. digiKam will try to find these binaries automatically if they’re installed on your system.
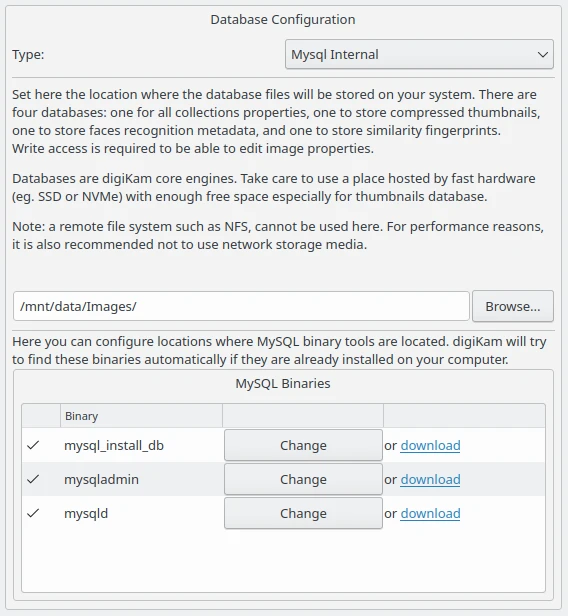
The digiKam MySQL Internal Configuration Page
The MySQL Remote Server
Obviously, access to a MySQL server is required to use digiKam with a remote MySQL. Alternatively, you can install MariaDB, which serves the purpose well. (Could be installed easily using this link.)
Follow the instructions below, if you don’t have a dedicated user account and a digiKam database already set up. Run the commands in MySQL server, after replacing password with the correct one.
Note
You can select any database name. (Here it is, digikam). Just remember to fill in the database name correctly in Core, Thumbs, Similarity, and Face database names from the dialog box shown below.
CREATE USER ''@'%' IDENTIFIED BY 'password';
GRANT ALL ON *.* TO ''@'%' IDENTIFIED BY 'password';
CREATE DATABASE digikam;
GRANT ALL PRIVILEGES ON digikam.* TO ''@'%';
FLUSH PRIVILEGES;
Note
If you have an enormous collection, it’s recommended to start the MySQL server with mysql –max_allowed_packet = 128M
Tip
If you have problems with a MySQL server on a Ubuntu based Linux system, execute this additional command in the mysql prompt to enable the creation of MySQL triggers.
SET global log_bin_trust_function_creators=1;
Now, in digiKam, go to and then under the Database section, select MySQL Server from the drop down list.
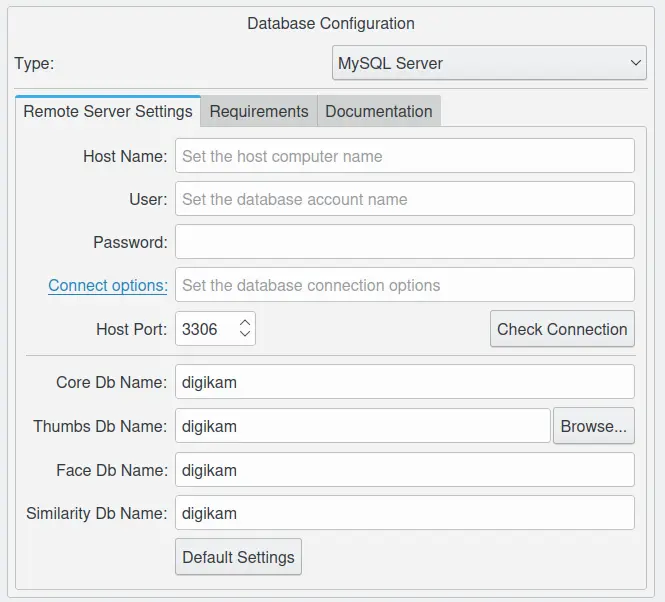
The digiKam Remote Mysql Configuration Page
Enter the IP address of your MySQL server in the Host Name field and specify the correct port in the Host Port field (the default port is 3306).
Set the Core Db Name field to the name of the first database that is used to store photo metadata.
Set the Thumbs Db Name field to the name of the second database that is used to store the wavelet-compressed thumbnails. The path to store the thumbnails data can be stored locally to prevent huge data exchange between the server and the application computer. Storing the thumbnails in remote can decrease the application performances and introduce time latency with large collections.
Set the Similarity Db Name field to the name of the third database that is used to store the similarity finger-prints produced by the fuzzy search engine.
Set the Face Db Name field to the name of the last database that is used to store the face histograms for facial recognition.
To safely connect to the remote server, enter your MySQL identification using the User and Password fields.
To check whether the database connection works properly, press the Check Connection button. If everything works as it’s supposed to, switch to the Collections sections, and add the directories containing your photos. Hit OK, and wait till digiKam populates the databases with data from your photos. This can take a while if you have a lot of items to register in the database.
There are some tips and recommendation to obtain the best results with a remote MySQL database server.
With a slow network, digiKam hangs a lot of the time, especially when the album contains many items (>1,000). This issue depends on network performances. For example, the problem has been reproducible using Wifi connections. Switching to Ethernet to solve the problem.
Also, if you have an enormous collection, you should start the MySQL server with mysql –max_allowed_packet = 128M. If you’re well acquainted with using MySQL, you could also change your settings in
my.inior~/.my.cnffiles.
Warning
The locale used in the Mysql server must be the same as the locale from the computer used to run digiKam to prevent problems with the common values saved in the tables of the database.
Database Type Criteria
See the summary below to choose the right database type depending on your use case.
Storage
Type
Items
Remarks
HDD
SQLite
< 100K
Warning: WAL is mandatory.
HDD
MySQL-Internal
> 100K
SSD
SQLite
WAL is optional.
SSD
MySQL-Internal
NVME
SQLite
WAL is optional.
NVME
MySQL-Internal
Removable
SQLite
< 100K
Warning: WAL is mandatory. USB 3.1 minimum with NVMe drive.
Removable
MySQL-Internal
> 100K
Warning: USB 3.1 minimum with NVMe drive.
Network FS
SQLite
Prohibited: SQLite databases must be stored on local file system.
Network FS
MySQL-Internal
Prohibited: MySQL databases must be stored on local file system.
Remote
MySQL-Server
MariaDB server is supported. Gigabit Ethernet or higher is recommended.
- HDD
Hard Disk Drive.
- SSD
Solid State Drive.
- NVMe
Non-Volatile Memory.
- Removable
External USB HDD/SSD/NVMe drive.
- Network FS
Network File System mounted locally.
- Remote
Network server as NAS (Network Attached Storage).
- WAL
Write-Ahead Lock (SQLite database only).
Note
Refer the Digital Asset Management chapter for more details about media and data protection.
Also refer to the Collection Settings chapter for more details about how to configure your collections depending on your storage policy.
Important
If you share the same Removable media for host databases and/or collections between different computers, you must have the same kind of operating system, the same mount paths everywhere (use symbolic links to resolve paths), and the same digiKam version everywhere to prevent conflicts with the database schema.
If you use a common Remote server to host databases and collections, you must use the same digiKam version everywhere to prevent conflicts with database schema. Computers running different instantiations of digiKam cannot access a common database and collection at the same time.
If you use a common Remote server to host collections, with the databases stored on individual computers, then different versions of digiKam can be used and digiKam sessions can run at the same time, accessing the common collections. But you’ll need to take a care about concurrent accesses to file metadata, if you have turned this option on from the Metadata Setup page.
Database Migration
digiKam comes up with an exclusive tool named Database Migration, that allows users to migrate their data. For example, the migration tool can help you move all your data from a SQLite database into a MySQL database, or vice versa.
To migrate to another database, go to . A dialog box appears:
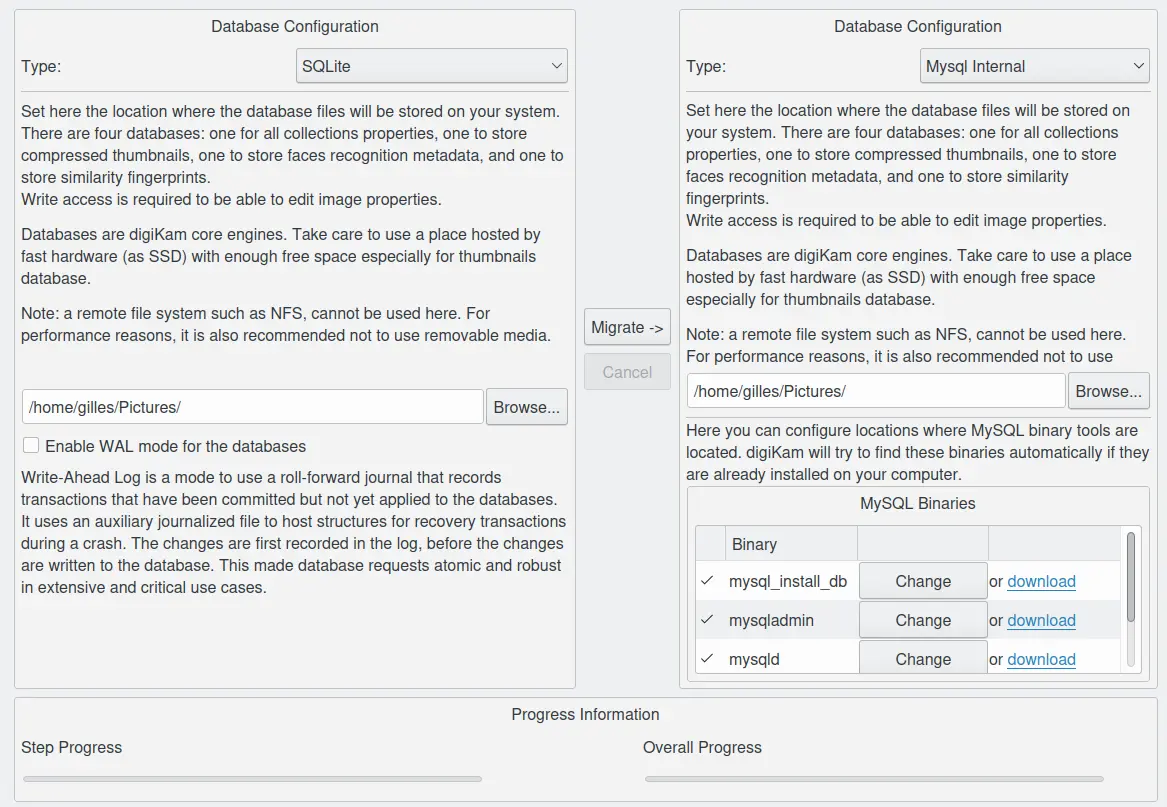
The digiKam Database Migration Tool
Now choose the appropriate database types you want to convert to. Finally, click on Migrate button to convert the database from SQLite to MySQL (or vice versa). Depending on the database size, this operation can take a while.
Note
Only the digiKam Core database will be migrated by this conversion process. All of the other databases needs to be rebuilt using post-processing with the Maintenance Tools. The Thumbs and Similarity databases will need to be created from scratch, and the Face database includes the option Rebuild the Training Data.
Database Backup Recommendation
For security reasons, planning a database backup using crontab over the network can help against device failures. A NAS or an external drive can also be used for backup.
Each database can be renamed with a different, unique name. This allows users to backup only what is needed. For instance, renaming Core database as digiKam_Core, allows you to backup only this database, which is the most important file. Thumbnails, Similarity and Face Recognition databases can always be regenerated from scratch.
The chapter about digiKam Maintenance Tools will explain how to maintain the database contents and how to synchronize the collections with information in the databases (and vice versa).
Database Statistics
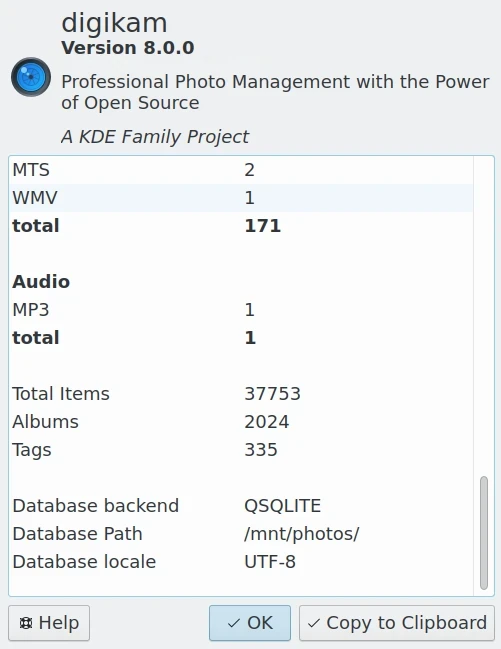
digiKam provides a unique tool to show the statistics from your collections. It includes count of images, videos (including individual count by image format), tags etc. this also includes the Database Backend (QSQLITE or QMYSQL) and the Database Path (where your collection is located).
You can view your statistics by going to . A dialog box like this will appear:
The digiKam Database Statistics Dialog