Color Management Settings
The Color Management options for digiKam are set from .
Overview
digiKam is color-management enabled application. RAW files coming straight out of a camera without having the benefit of any color processing. Your camera provides the data it has captured in a raw format, and lets you manage all the processing. Every camera has unique aspects about how it captures color information, therefore you will need to apply a camera-specific profile to the images you want to process. Please refer to the ICC color profile management section of this manual for more details and explanations.
Basically, a profile maps the raw color information from the camera into a uniform array of color pixels, with information on how the image should be rendered. It also provides information to Lcms backend and digiKam on how to translate the color information from one color space to another in order to keep the colors as accurate as possible across all rendering media.
Behavior Settings
The Behavior tab contains many of the options for color management within digikam.

The Color Management Behavior Configuration Page
Enable Color Management is the first option, and it is used to turn on or off automatic color management within digiKam. You can leave this off if you are working exclusively in the sRGB color space.
If color management is enabled, then you must select a Working Color Space profile. Choices include linear profiles such as sRGB, ECI-RGB, LStar-RGB, Adobe-RGB and CIE-RGB, among others. If you want to print your images, you may want to opt for Adobe RGB. If your images are only for display on the web, sRGB is a better choice. (Adobe RGB will be displayed slightly dull in non-color managed enabled software such as browsers.) However, you can change this profile at any time by selecting another profile, therefore Adobe RGB can be a good choice for storing and image handling as you can always change it to sRGB before releasing an image for your blog. Note: Do not use non-linear profiles as they will change the color balance of your images.
The three next sections of this view set digiKam’s color management behaviors for when an image is loaded:
When the profile of an image does not match the working color space: digiKam provides two options:
Ask when opening the image: If an image has an embedded color profile that does not match the working space profile, digiKam will ask if you want to convert to the working space, keep the embedded profile or discard the embedded profile and assign a different one.
Convert the image to the working color space: If an image has an embedded color profile that does not match the working space profile, digiKam will automatically convert the image’s color information to the working color space. This changes the pixel data to match the working color space, but not the appearance of the image.
When an image has no color profile information: digiKam provides four options:
Ask when opening the image: If an image has no embedded color profile, digiKam will ask which color space should be used to interpret the image and to which color space should it be transformed for editing.
Assume it is using the sRGB color space: This is the best option if the image is targeted for Internet usage. The and convert it to the working color space allows you to force conversion to the Working Color Space previously defined.
Assume it is using the working color space: In this case, the image is not targeted for a specific usage, and Working Color Space is used for the conversion.
Convert it from default input color space to working space: in this case, the conversion to the Working Color Space will be done to include the Default input color profile defined in the Profiles view (next section).
When loading a RAW file with uncalibrated colors: digiKam provides three options:
Ask for the input profile: digiKam prompts the user to select the correct Input color profile to use.
Automatic color correction: digiKam will perform an automatic color auto-correction based on an analysis of the image histogram.
Convert it from the default input profile: digiKam will use the Default input color profile defined in the Profiles view.
Profiles Settings
The Profiles tab includes options for setting the ICC Color Profiles for your monitor, input device (camera or scanner), and output devices (printer or proofing system). This is where you set the default choices for your profiles. Everything is adjustable later-on, including when RAW files are loaded.
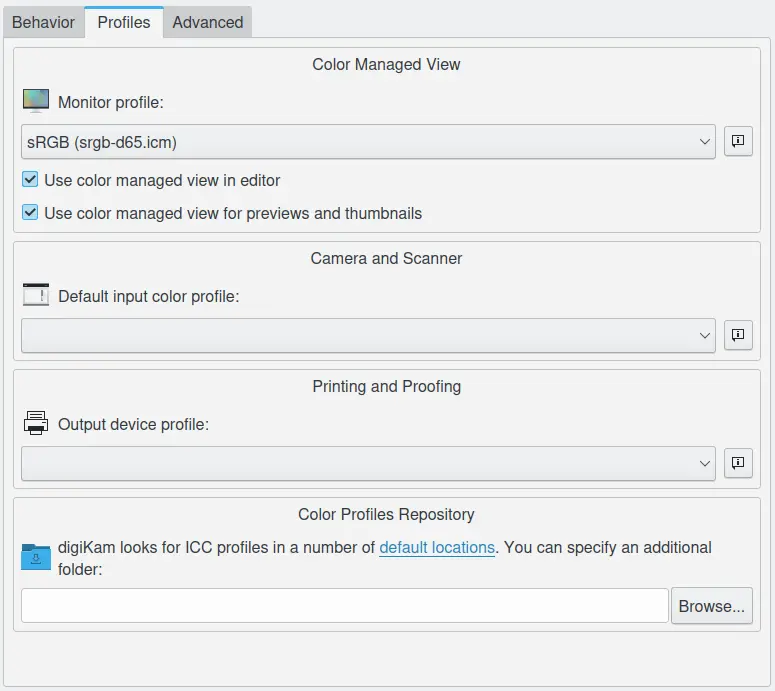
The Color Management Profiles Configuration Page
The Monitor profile option allows you to select the color profile for your screen.
The Use color managed view is an alternative to using desktop color management. Your image in the editor will be color managed, not your image on the monitor will not be color managed. You can change this option at any time. This can slow down rendering of the image, depending on the speed of your computer.
Use color managed view for previews and thumbnails: Enable this option to also use color management to render previews and thumbnails in Icon-View, Light-Table, and the Import Tool.
The Default Input color profile should match the camera make and model you are using. Not all profiles are created equal, there are some that have no tone mapping/gamma correction included, for example Canon cameras. Under some conditions, gamma cannot be corrected for in a 16-bit depth conversion, which means that you’ll have to do the tone mapping yourself.
The Output device profile should match the profile for your output device, usually your printer. This profile is also used to do a soft proof, so you will be able to preview how an image will be rendered on an output device. Assuming you have the right profiles, it enables you to emulate how your image will render for a particular device. It is particularly useful before printing, because your printer has a smaller gamut than your camera and some printed colors might look saturated. Soft proofing allows you to see and fix any problems manually, before wasting your ink.
The Color Profiles Repository: digiKam looks for ICC profiles in a number of default locations e.g. /usr/share/color/icc. Set this to the folder where you store extra profiles e.g. /home/user/.color/icc, and digiKam will scan these folders when starting up.
Advanced Settings
The Advanced Settings tab includes options for black point compensation and rendering intents.
Use black point compensation: This setting is a way to make adjustments between the maximum black levels of digital files and the capabilities of various digital devices to render black.
Rendering Intents: This setting provides four options:
Perceptual: causes the full gamut of the image to be compressed or expanded to fill the gamut of the destination device, so that gray balance is preserved but colorimetric accuracy may not be preserved. In other words, if certain colors in an image fall outside of the range of colors that the output device can render, the image intent will cause all the colors in the image to be adjusted so that every color in the image falls within the range that can be rendered and so that the relationship between colors is preserved as much as possible. This intent is most suitable for display of photographs and images, and is the default intent.
Relative Colorimetric: is defined such that any colors that fall outside the range that the output device can render are adjusted to the closest color that can be rendered, while all other colors are left unchanged. This intent does not preserve the white point.
Absolute Colorimetric: causes any colors that fall outside the range that the output device can render to be adjusted to the closest color that can be rendered, while all other colors are left unchanged. This intent preserves the white point and is most suitable for spot colors (Pantone, TruMatch, logo colors, etc.).
Saturation: preserves the saturation of colors in the image at the possible expense of hue and lightness. Implementation of this intent remains somewhat problematic, and the ICC is still working on methods to achieve the desired effects. This intent is most suitable for business graphics such as charts, where it is more important that the colors be vivid and of sufficient contrast with respect to each other, rather than matching specific colors.

The Color Management Advanced Configuration Page
Note
In general, it is pretty obvious what color profile the manufacturer proposes for a given camera, but not so for Canon. Here is a non-authoritative table of camera/profiles matches:
Camera |
Profile series |
|---|---|
Canon 1D mark II |
6051 |
Canon 1D mark II |
6111 |
Canon 1Ds |
6021 |
Canon 1Ds mark II |
6081 |
Canon 5D |
6091 |
Canon 10D |
6031 |
Canon 20D |
6061 |
Canon 30D |
6112 |
Canon 40D |
6101 |
Canon 300D |
6031 |
Canon 350D |
6111 or 6071 |
Canon 400D |
6131 |
The Canon profile extension betrays the target style: F for Faithful Style, L for Landscape Style, N for Neutral Style, P for Portrait Style, S for Standard Style.
The linked section provide a typical RAW workflow scenario with Image Editor.