Інструменти редагування кольорів
Глибина кодування
За допомогою інструментів digiKam Перетворити на 8-бітове і Перетворити на 16-бітове ви можете змінити кількість бітів (глибину) для кодування кожного з каналів кольорів зображення. 8-бітове кодування є типовим для формату JPEG, 16-бітове кодування відповідає зображенням високої якості, але для зберігання таких зображень потрібен більший об’єм пам’яті, більший час на обчислення, крім того, у поточній версії 16-бітове кодування можна застосовувати лише для зображень у форматах PNG, PGF, TIFF і JPEG-2000. Для коригування роботи цих інструментів не передбачено жодних параметрів, тому програма не показуватиме жодного діалогового вікна.
Примітка
При перекодуванні зображення з 8-бітового на 16-бітове на зображенні з’явиться однорідно розподілений шум, як наслідок заповнення дірок у гістограмі через розширення діапазону кольорів.
Важливо
Дані у форматах HEIF, AVIF, JPX можна кодувати у 8-бітовому та 12-бітовому режимах. WEBP обмежено 8-бітовим режимом. Ці обмеження може бути змінено у майбутньому.
Інструмент перетворення простору кольорів
За допомогою інструменту digiKam Перетворювач просторів кольорів ви зможете перетворити дані зображення з одного простору кольорів до іншого простору. Ви також можете пов’язувати із зображенням профілі кольорів. Докладні настанови щодо використання профілів кольорів можна знайти у розділах щодо керування кольорами та параметрів керування кольорами цього підручника.
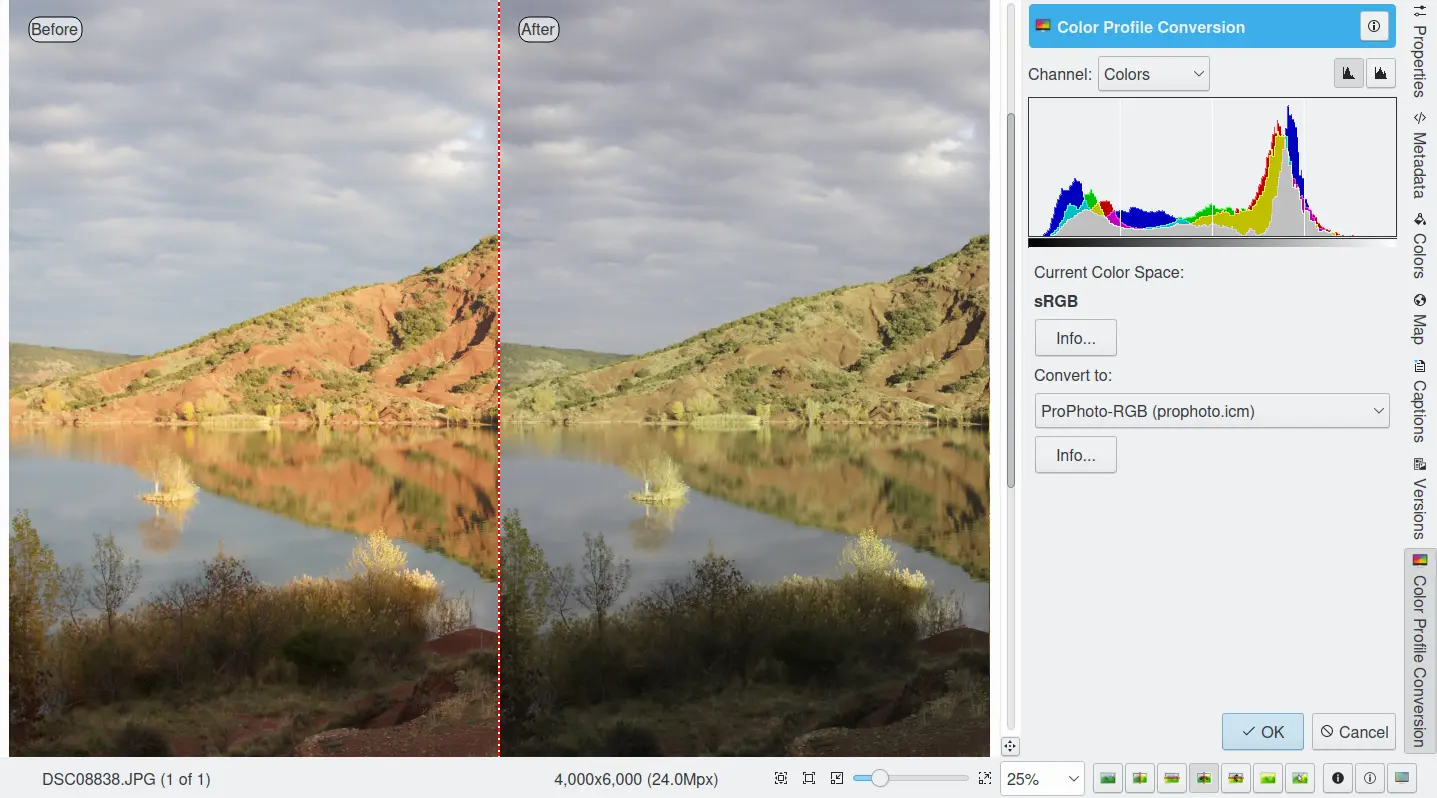
Інструмент перетворення просторів кольорів редактора зображень
Автоматичне виправлення кольорів
В інструменті digiKam Автоматичне виправлення кольорів передбачено п’ять рівнів автоматичного виправлення, які, зазвичай, покращують вигляд зображення. Скористайтеся цим інструментом до застосування інших виправлень, які буде виконано вручну.
У підменю, яке можна відкрити за допомогою пункту меню , ви знайдете пункти Нормалізувати, Зрівняти, Авторівні, Розтягнути контрастність та Автоекспозиція. За допомогою цих пунктів можна спробувати виконати автоматичну обробку рівнів кольорів. Для того, щоб вибрати найкращий варіант виправлення кольорів на вашій фотографії, вам варто ознайомитися з результатами застосування кожного з них.
Авторівні: За допомогою цього пункту можна зробити діапазон тонів Червоного, Зеленого та Синього каналів максимальним. Буде обшукано тіні зображення і зібрано граничні значення, а потім налаштовано Червоний, Зелений і Синій канали на повний діапазон гістограми.
Нормалізувати: за використання цього варіанта значення яскравості вибраного зображення буде масштабовано таким чином, що найтемніша точка зображення стає чорною, а найяскравіша точка стає настільки яскравою, наскільки це дозволено без зміни відтінку. Ця операція часто є «магічним виправленням» для зображень, які є тьмяними або розмитими.
Зрівняти: за використання цього варіанта програма виправляє яскравість кольорів у вибраному зображенні таким чином, що гістограма для значень каналів стає якомога прямішою, тобто, кожне можливе значення яскравості стає у майже таким самим як і для інших значень яскравості. Іноді операція «Зрівняти» ідеально працює для збільшення контрастності зображення. У інших випадках ви отримаєте замість зображення мотлох. Ця операція є дуже потужною, яка може як спрацювати, так і знищити зображення.
Розтягнути контрастність: за використання цього варіанта програма підвищує контрастність і яскравість значень RGB зображення шляхом розтягування найнижчого і найвищого значень повного діапазону, з налаштуванням всіх проміжних значень. Зміни будуть помітними лише на вилинялих фотографіях. Використання цього пункту добре зарекомендувало себе у виправленні знімків, виконаних з помилками.
Автоекспозиція: Цей параметр підвищує контрастність і яскравість значень RGB зображення шляхом обчислення оптимальної експозиції і рівня чорного з використанням властивостей гістограми зображення.
Результати будь-якого виконаного вами коригування не буде записано до того часу, коли ви вирішите зберегти зображення.
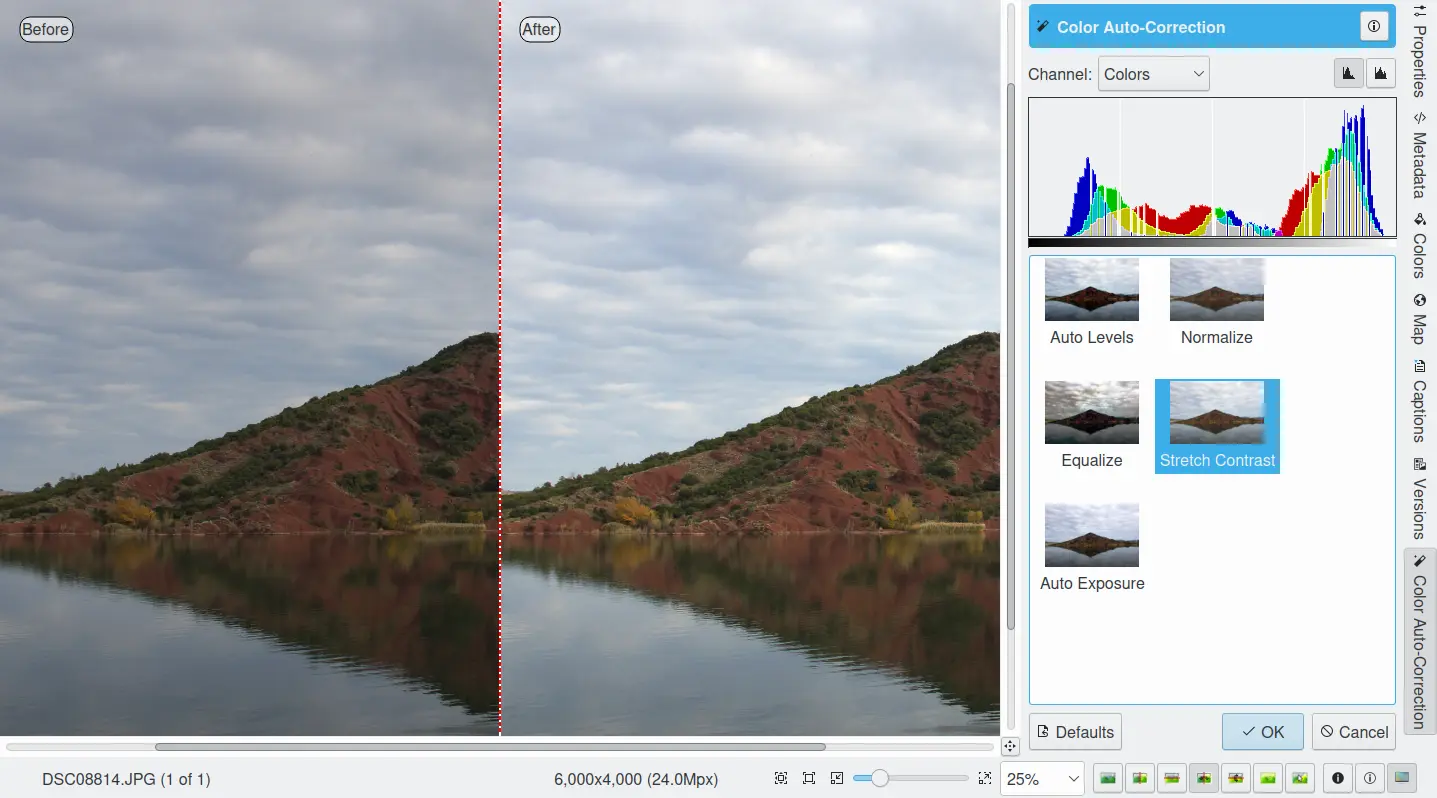
Виправлення кольорів у редакторі зображень
Чорно-білий
Інструмент digiKam Перетворити на чорно-біле може перетворювати ваші кольорові зображення на чудові чорно-білі. Чорно-біла фотографія завжди захоплювала митців своїми можливостями абстрагування. З приходом доби цифрової фотографії чорно-біла фотографія перейшла з практичної сфери до сфери певних маніпуляцій над кольоровим зображенням, оскільки кольорові зображення з легкістю може бути перетворено за допомогою комп’ютера на чорно-білі. Для такого перетворення навіть передбачено набір фільтрів, що імітують ефекти застарілих касет з плівкою, і ваші знімки стають подібними до кадрів чорно-білої плівки. Цей фільтр також здатен імітувати традиційні матеріали інфрачервоної плівки.
Імітація давніх плівок
У digiKam передбачено декілька чорно-білих фільтрів, які ви можете використати для перетворення ваших фотографій до класичного чорно-білого хімічного тонування аналогової фотографії. Панель відповідного інструменту поділено на чотири пункти: Плівка, Фільтри об’єктива, Тон і Яскравість світла, як це показано на знімку вікна, наведеному нижче. Фільтри плівки, об’єктива і тонування кольорів може бути застосовано незалежно один від одного, що означає, що їх можна використовувати у поєднанні. Насправді фільтри впливають на змішування каналів RGB, а тонування просто додає однорідний монохроматичний відтінок до чорно-білого зображення на фотографії. За допомогою панелі «Освітленість» ви зможете скористатися інструментом виправлення тональності (подібним до виправлення кривої), інструментом налаштування контрастності та індикатором надмірної експозиції, призначеними для покращення вигляду чорно-білого зображення.
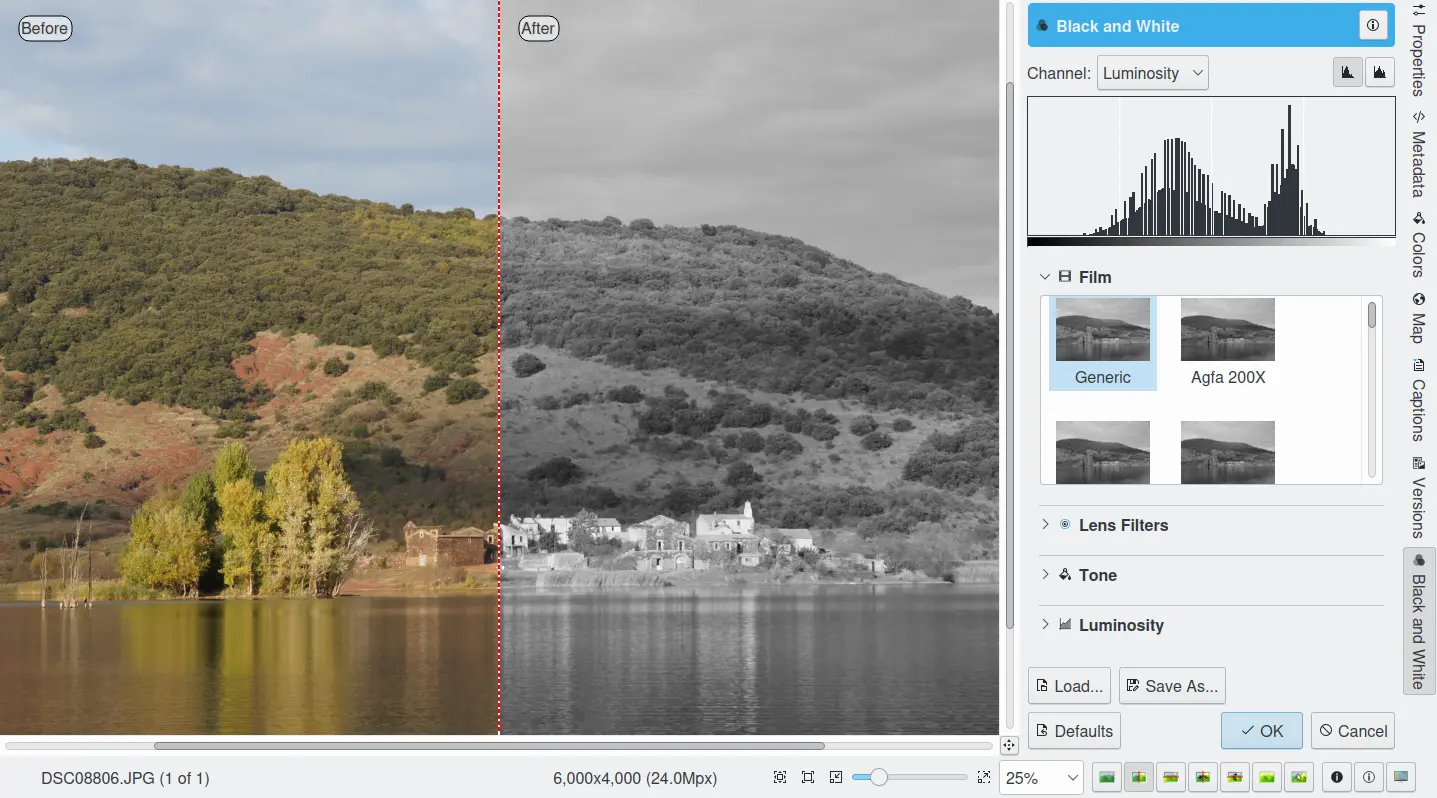
Імітація чорно-білої плівки у редакторі зображень
За допомогою параметра Плівка ви можете імітувати декілька відомих чорно-білих фотографічних плівок:
Загальні.
Agfa: 200X, Pan 25, Pan 100, Pan 400.
Ilford: Delta 100, Delta 400, Delta 400 Pro 3200, FP4 Plus, HP5 Plus, PanF Plus, XP2 Super.
Kodak: Tmax 100, Tmax 400, TriX.
За допомогою параметра Фільтри об’єктива фільтр кольорів можна імітувати як розташований над об’єктивом:
Без лінзового фільтра: імітація експозиції чорно-білої нейтральної плівки.
Зелений фільтр: імітація експозиції чорно-білої плівки з зеленим фільтром об’єктива. Дає добрі результати для всіх сценічних зображень, особливо пасує для портретів на тлі неба (подібний до зеленого фільтра 004 Cokin(tm)).
Жовтогарячий фільтр: імітація експозиції чорно-білої плівки з жовтогарячим фільтром об’єктива. Покращує вигляд пейзажів, зображень моря та аерофотозйомки (подібний до жовтогарячого фільтра 002 Cokin(tm)).
Червоний фільтр: імітація експозиції чорно-білої плівки з червоним фільтром об’єктива. Створює вражаючі ефекти неба і може імітувати сцени з місячним світлом для знімків, виконаних вдень (подібний до червоного фільтра 003 Cokin(tm)).
Жовтий фільтр: імітація експозиції чорно-білої плівки з жовтим фільтром об’єктива. Найприродніше виправлення тонів, покращує контрастність. Ідеальний для пейзажів (подібний до зеленого фільтра 001 Cokin(tm)).
За допомогою параметра Відтінок до зображення можна застосувати відтінок кольору:
Оливково-брунатний фільтр: створює тепле підсвічування і проміжні тони з додаванням незначної холодності до тіні — ефекти дуже подібний до обробки відбитка знебарвленням або повторного проявлення у тонері з сепією (типово для фотографій часів наших бабусь). Подібний до оливково-брунатного фільтра 005 Cokin(tm).
Коричневий фільтр: подібний до фільтра оливково-брунатного кольору, але менш виразний.
Холодний фільтр: почати друк на тонкому копіювальному папері у холодних тонах чорного і білого, так як під час друку на бромідному збільшувальному папері.
Селеновий фільтр: цей ефект відтворює традиційне селенове хімічне тонування, проведене у темній кімнаті.
Платиновий фільтр: цей ефект відтворює традиційне платинове хімічне тонування, проведене у темній кімнаті.
Імітація інфрачервоної плівки
Імітація класичних зображень на інфрачервоній плівці (остаточне зображення буде чорно-білим) створює цікавий абстрактний ефект, навіть драматичніший за просте чорно-біле перетворення. Результат буде подібним до результату створення знімків з червоним фільтром об’єктива на чорно-білій плівці. Області, які відбиватимуть мало червоного світла, наприклад, небо, буде перетворено на області низької світності, темні області. Області, які мають чудові властивості щодо відбиття червоного світла, наприклад, рослинність, буде перетворено на області з високою світністю. Снігові пейзажі, перетворені за допомогою цього фільтра, набувають по-справжньому драматичного вигляду.
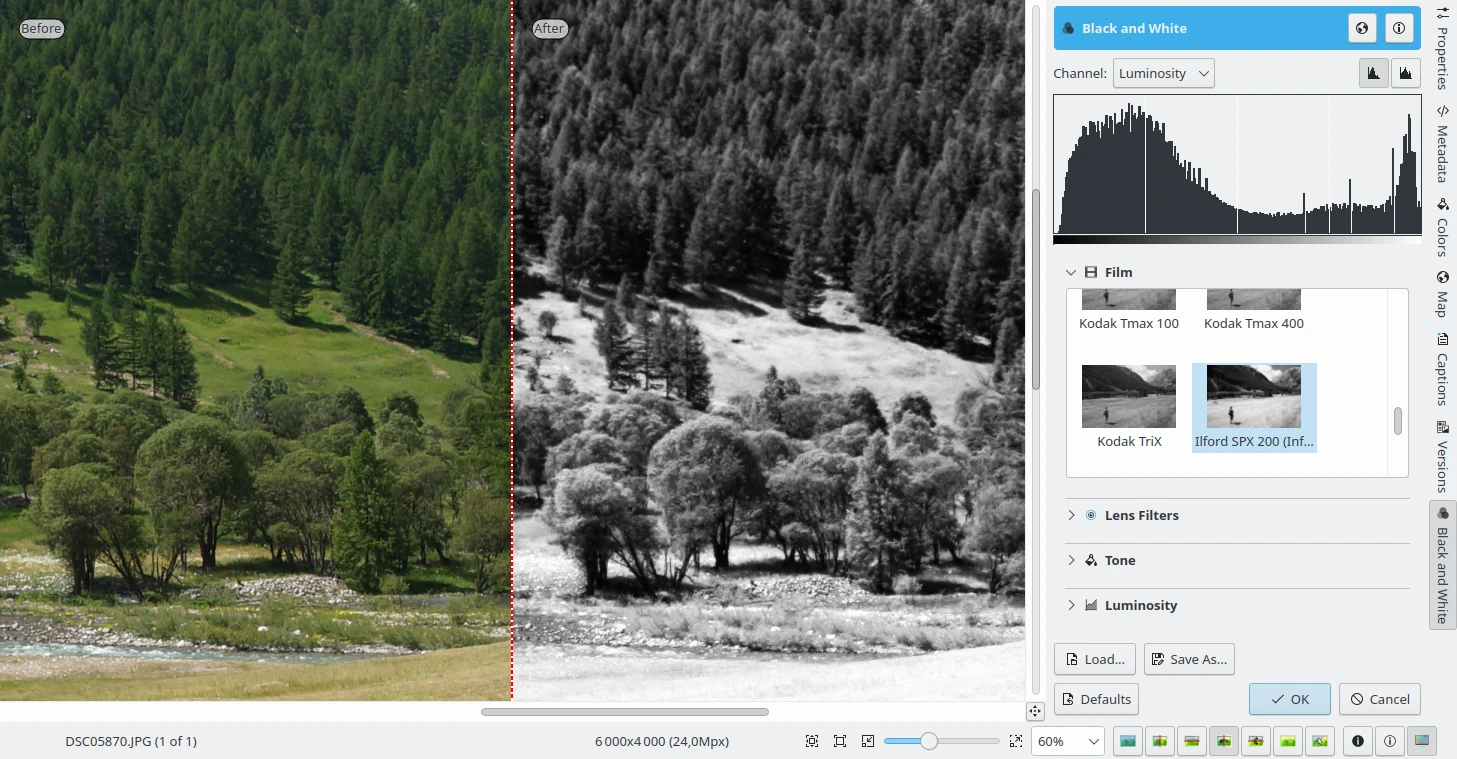
Імітація інфрачервоної плівки у редакторі зображень за допомогою інструменту чорно-білого зображення
У фільтрі виконано спробу відтворити знамениту інфрачервону плівку Ilford™ SFX та Kodak Tmax. Ця плівка має діапазон чутливості у 200-800 ISO.
Ilford: SPX 200, SPX 400, SPX 800.
Kodak: HIE.
Примітка
Оскільки фільтр змішує канали кольорів у спробі відтворити інфрачервону плівку (з акцентом на каналі зеленого), імітація інфрачервоного ефекту неможлива для чорно-білих фотографій, оскільки у них не міститься даних про кольори зображення.
Інверсія
Інструмент Інвертувати digiKam виконує інвертування зображення, створюючи його негатив. Хоча передусім digiKam є програмою для обробки та упорядковування цифрових фотознімків, у програмі також передбачено інструменти для роботи з плівковими негативами.
Перш ніж ви зможете обробляти негативи у digiKam, вам слід оцифрувати їх. Якщо у вас немає доступу до плівкового сканера або лабораторії, яка пропонує послуги зі сканування плівки, ви можете оцифрувати плівку за допомогою цифрового дзеркального фотоапарата (у мережі можна знайти безліч настанов щодо того, як це зробити, зокрема тут).
При оцифровуванні кольорових плівкових негативів кольори можуть виявитися інвертованими щодо справжніх. За допомогою цього інструмента можна обернути кольори до їхніх відповідних кольорів доповнення. Кольори доповнення розташовано у протилежних місцях щодо одне одного на колі кольорів: блакитний є протилежним до червоного, жовтий — до синього, а малиновий — до зеленого.
Інструмент Інверсія виконує обернення цих кольорів та інвертує яскравість, тому темні області стають яскравими, а яскраві — темними. По суті, це той самий процес, який відбувається, коли світло просвічує кольоровий негатив при отриманні позитивного відбитка.
Найпростішим способом обробки цифрового негатива у digiKam є відкриття файла цифрового негатива (RAW), що містить знімок плівкового негатива, у редакторі. Обріжте початковий файл і застосуйте, якщо потрібно, виправлення викривлення об’єктивом. Далі, скористайтеся пунктом меню для перетворення негатива на позитив. Хоча перетворене зображення тепер є позитивом, воно, найімовірніше, потребуватиме додаткової обробки. Перш за все, ймовірно, перетворене зображення матиме відчутний синюватий відтінок. Найпростішим способом його усування є використання інструмента Автовиправлення digiKam. Скористайтеся пунктом меню і виберіть один з наборів параметрів. У багатьох випадках чудові результати у виправленні кольорів можна отримати за допомогою шаблона Авторівні або Зрівняти. Якщо кольори після застосування шаблонів усе ще не виправлено, ви можете скоригувати їх за допомогою інструмента .
Кольоровий негатив
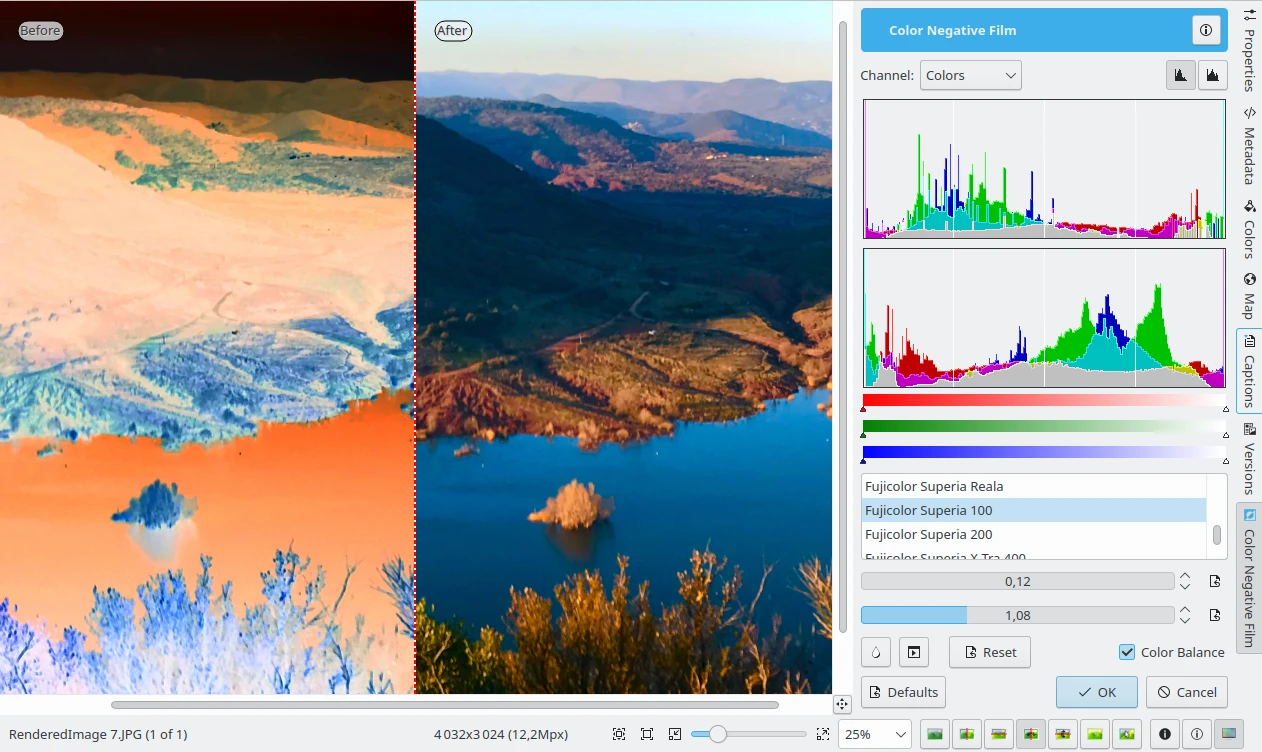
Інструмент кольорового негатива
Інструпент Кольоровий негатив є ще потужнішим інструментом, зокрема для обробки кольорових негативів. Інтерфейс кольорового плівкового негатива містить декілька зручних можливостей, які можуть допомогти вам перетворити негатив і скоригувати зображення-результат. Хоча інструмент Інвертувати використовує типовий профіль для перетворення негативів, інтерфейс кольорової негативної плівки пропонує профілі для багатьох популярних типів плівок. Отже, першим кроком є вибір відповідного профілю. Щоб отримати кращі результати, спробуйте позначити також пункт Баланс кольорів. Якщо використаної плівки немає у списку, ви можете скористатися резервним варіантом – профілем Нейтральний.
Хоча вибір відповідного профілю плівки може дати кращий результат, перетворене зображення може потребувати певної додаткової обробки. У більшості випадків вам може знадобитися коригування точки білого для усування залишкового синюватого відтінку. Зробити це можна або вручну, або в автоматичному режимі за допомогою відповідних інструментів. Зазвичай, достатньо автоматичного коригування точки білого, але зображення результат варто зробити яскравішим за допомогою коригування значень на повзунках Експозиція і Гама.
Баланс кольорів
Інструмент digiKam Баланс кольорів надає змогу налаштувати окремі канали кольорів у зображенні. Цей інструмент можна використовувати для виправлення відтінку кольору на зображенні. Ви можете побачити будь-які внесені вами зміни на зображенні попереднього перегляду.
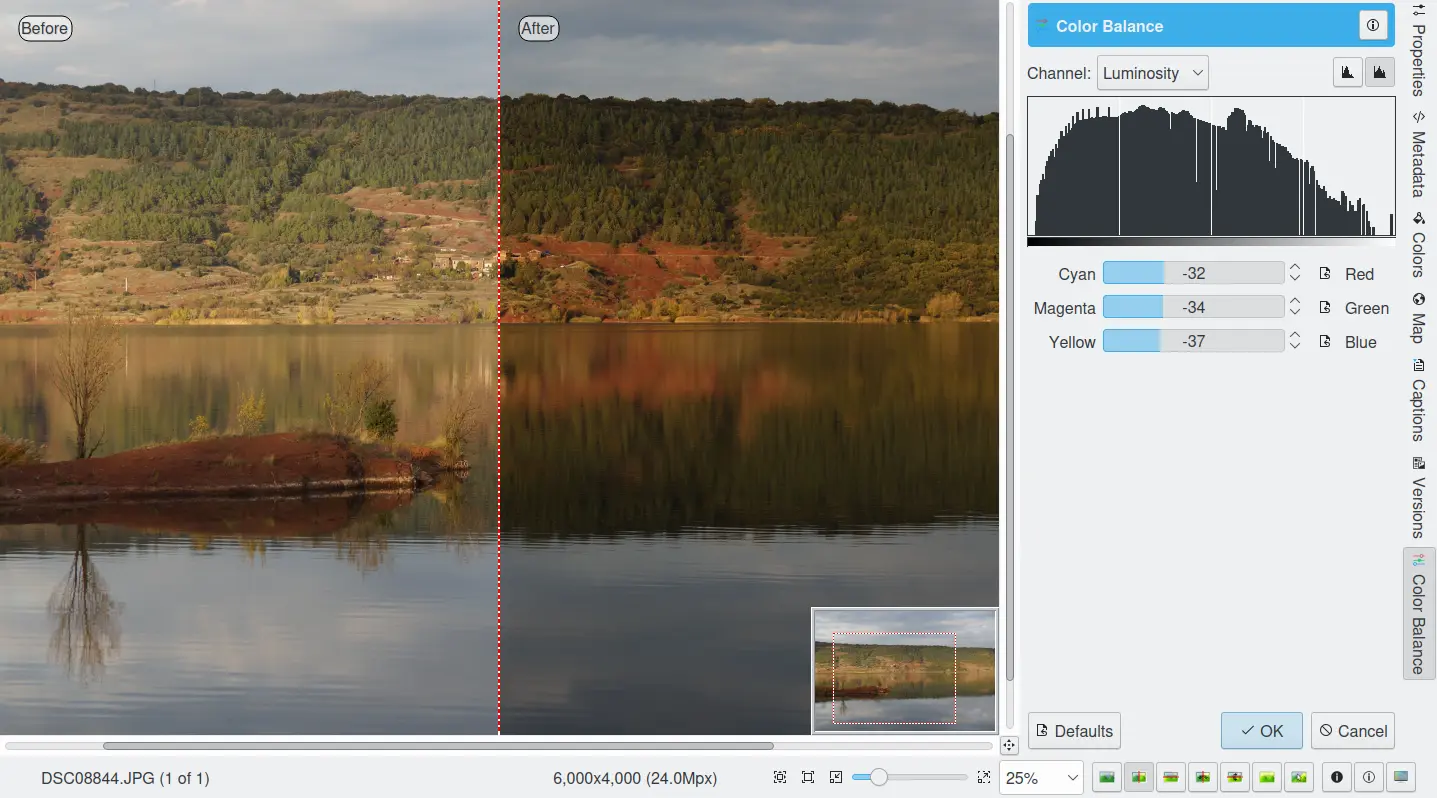
Інструмент балансу кольорів редактора зображень
Після встановлення потрібних вам параметрів натисніть кнопку Гаразд, щоб ці параметри набули чинності.
Виправлення кривих
Інструмент digiKam Коригування кривих є інструментом для нелінійного виправлення рівня освітленості і каналів кольорів.
Інструмент коригування кривих є найскладнішим з можливих інструментів для виправлення тональності зображень Запустити цей інструмент можна за допомогою пункту меню редактора зображень . Він надає вам змогу натискати і перетягувати точки керування на кривій для створення функції, що відображатиме вхідні рівні яскравості на вихідні рівні яскравості Інструмент коригування кривих може відтворити будь-який з ефектів, яких можна досягти за допомогою інструментів Яскравість/Контрастність/Гама або Налаштування рівнів, отже, є потужнішим за кожен з цих інструментів. Цей інструмент може виконати додаткові дії: він допоможе вам покращити тональну якість ваших фотографій до чудової покрокової шкали сірого. І не забудьте, що чим кращими є фотографії (добра експозиція, формат зберігання без втрати якості, 24- або 32-бітова глибина кольорів), тим більше ви можете його покращити.
Щоб дізнатися більше про можливості інструменту коригування кривих для удосконалення ваших фотографій, відвідайте розділ «Achieving ultimate tonal quality» (Як досягти остаточної тональної якості) цієї повчальної сторінки: Тональна якість і динамічний діапазон у цифрових фотоапаратах від Нормана Корена (Norman Koren). Скористайтеся інструментом виправлення кривих для виконати подібні дії!
Інструмент «Коригування кривих» змінює значення інтенсивності вказаного каналу на основі регульованої нелінійної кривої. Інструмент показує дві гістограми: гістограму вихідного зображення буде показано внизу, а гістограму вихідного зображення після повторної прив’язки – угорі. Регульована нелінійна крива, яка використовується для повторного показу даних, накладається на нижню гістограму у вигляді синьої кривої з червоними контрольними точками.
У режимі згладженої кривої ви змінюєте форму кривої, додаючи або вилучаючи контрольні точки з кривої або переміщуючи контрольні точки, включаючи кінцеві точки. Крім того, ви можете намалювати криву вручну в режимі Режим довільної кривої. У будь-якому випадку результат зміни кривої негайно буде показано в області попереднього перегляду зображення ліворуч і на верхній гістограмі, яку буде показано у вікні інструменту. Як і для всіх інших інструментів, область попереднього перегляду можна налаштувати, натиснувши піктограми стилю порівняння попереднього перегляду на смужці стану.
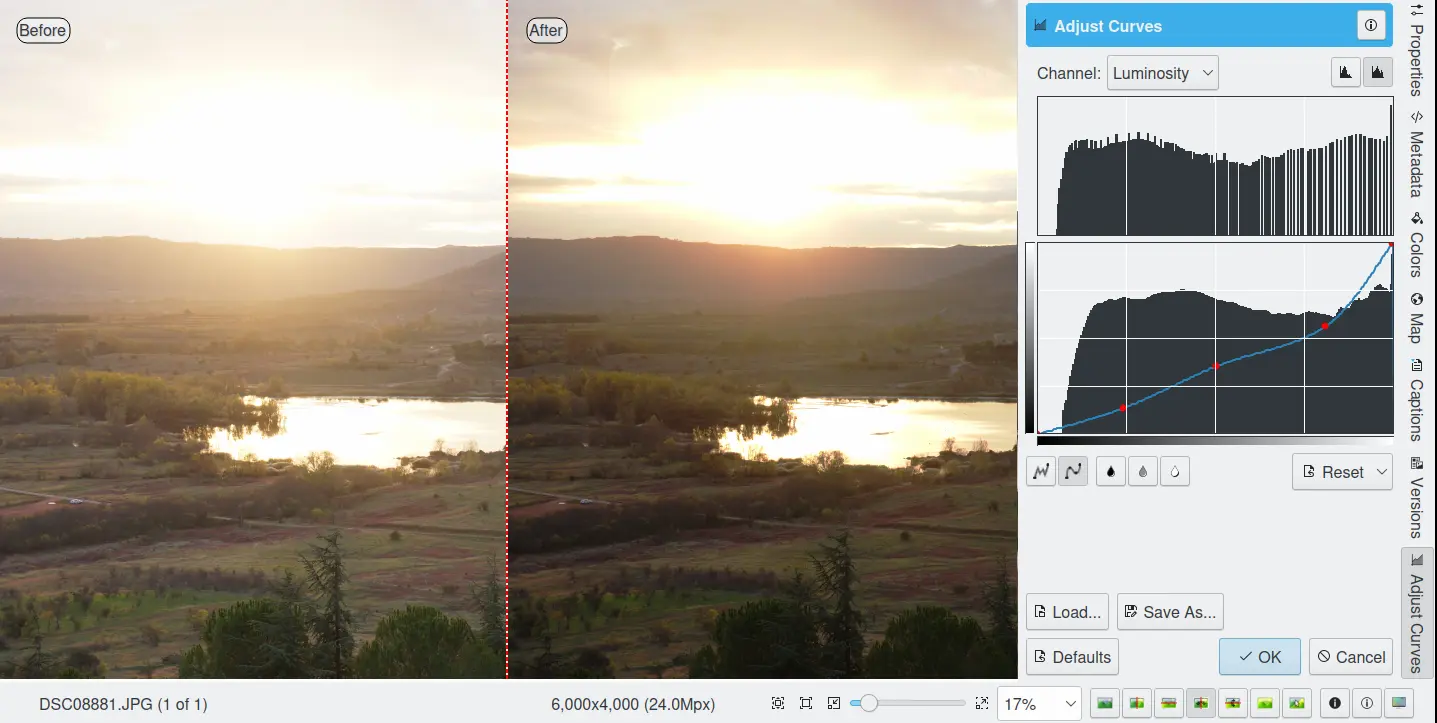
Інструмент коригування кривих редактора зображень
Передбачено декілька засобів керування, що містяться у вікні інструменту.
За допомогою спадного списку Канал можна вибрати окремий канал, який буде змінено за допомогою цього інструменту:
Яскравість світла: змінити інтенсивність всіх пікселів зображення.
Червоний: надає змогу змінити насиченість червоного кольору для всіх пікселів.
Зелений: надає змогу змінити насиченість зеленого кольору для всіх пікселів
Синій: надає змогу змінити насиченість синього кольору для всіх пікселів.
Альфа: надає змогу змінити прозорість всіх пікселів.
Для кожного з цих 5 каналів може бути визначено окрему криву.
Поряд з цією панеллю розташовано дві піктограми, призначені для вибору лінійного або логарифмічного показу гістограми. Для зображень, знятих цифровим фотоапаратом, зазвичай краще скористатися лінійним режимом. Але для зображень, на яких містяться значні однотонні області, краще скористатися логарифмічною гістограмою.
В Області редагування основних кривих міститься криву перенесення, нанесену на гістограму початкового зображення. Горизонтальна смуга (вісь х) відповідає вхідним значенням, як правило, у діапазоні від 0 до 255. Вертикальна смуга (вісь ординат) — це шкала вихідних значень вибраного каналу з тим самим діапазоном від 0 до 255. Контрольну криву буде накреслено над гістограмою за її діагоналлю. Кожна точка кривої представляє вхідне значення «x», перетворене на вихідний рівень «y».
Якщо клацнути на кривій, буде створено контрольну точку. Ви можете перемістити контрольну точку для вигинання кривої. Якщо клацнути за межами кривої, також буде створено контрольну точку і автоматично включено її до кривої. Клацання правою кнопкою миші на контрольній точці призведе до вилучення цієї точки. Розташування вказівника за x/y буде постійно постійно показано у нижньому правому куті гістограми.
Тип кривої для каналу: дві піктограми ліворуч під областю редагування визначають, чи можна редагувати криву за допомогою режиму довільної кривої або згладженого режиму кривої. Режим згладжування обмежує тип кривої до плавної лінії з натягом і забезпечує реалістичну обробку зображення. Довільний режим надає малювати криву від руки за допомогою миші. Ви можете використовувати цей режим, щоб розкидати сегменти кривої по всій сітці, що може дати напрочуд цікаві результати.
За допомогою трьох кнопок Піпеток відтінків кольорів можна автоматично створювати контрольні точки на кривій на всіх каналах для тіні, проміжного тону і тонів світлих ділянок. Натисніть кнопку піпетки кольору, якою бажаєте скористатися, а потім наведіть вказівник миші на область перегляду початкового зображення і клацніть лівою кнопкою миші, щоб встановити контрольні точки для кожної з кривих: червоного, зеленого, синього кольорів і яскравості світла.
Скинути: ця кнопка надає змогу або відновити всі початкові значення кривої для всіх каналів, або просто скинути криву лише для поточного вибраного каналу. Скидання кривої вилучає всі контрольні точки з кривої, за винятком обох кінцевих точок.
Зберегти як і Завантажити: ці кнопки виконують завдання, які зрозумілі з їх назв. Будь-які налаштовані вами криві можна зберегти до файлової системи і пізніше завантажити. Для збереження даних у файлі використовується формат кривих програми Gimp.
Типові: скидає усі параметри інструменту до типових значень.
У вікні інструменту кривих передбачено декілька додаткових можливостей, які полегшують розташування точок на керівних кривих.
На панелі перегляду зображення результату ви побачите червону позначку. Якщо ви розташуєте цю позначку у зоні, яку ви бажаєте змінити, на панелі кривої вертикальною лінією буде показано відповідне початкове значення. Для зміни кривої відповідно до ваших потреб, створіть точку на кривій та пересуньте її вгору або вниз.
Якщо навести вказівник миші на область перегляду початкового зображення і клацнути лівою кнопкою миші, на графіку кривої буде створено вертикальний стовпчик, обмежений пунктирною лінією. Позиція стовпчика відповідатиме значенню пікселя під вказівником миші на панелі зображення. Клацання з перетягуванням призведе до інтерактивного оновлення позиції вертикального стовпчика. Таким чином, ви зможете побачити, де на зображенні кривої розташовано пікселі з різними значеннями, отже вам легше буде визначити розташування пікселів тіні, проміжного тону та світлих областей.
Щоб зрозуміти потужність інструмента «Коригування кривих», просто пограйтеся з кривими та спостерігайте за результатами. Якщо ви перемістите сегмент кривої праворуч, тобто до світлих ділянок на зображенні, ви побачите, що ці світлі ділянки відповідно зсуваються до темніших вихідних тонів, і що пікселі зображення, які відповідають цьому сегменту кривої, стануть темнішими. Для каналів кольорів пересування праворуч зменшить насиченість до точки досягнення кольору-доповнення. Ви навіть можете додати ефект вицвітання зображення в частині його тонального діапазону, намалювавши криву, інвертовану в деякій частині.
Коригування рівнів
Інструментом digiKam Коригування рівнів користуються для налаштування каналів гістограми зображення вручну. Інструмент «Коригування рівнів» за складністю та потужністю знаходиться між складнішим інструментом «Коригування кривих» і простішим інструментом «Яскравість/Контрастність/Гама**. Хоча діалогове вікно для цього інструменту виглядає дуже складним, для базового використання потрібні лише три повзунки в області Вхідні рівні під гістограмою.
Інструмент працює шляхом послідовного застосування трьох повторних відображень вхідних даних: двопараметричного лінійного відображення вхідних даних, однопараметричної гамма-корекції та двопараметричного лінійного відображення вихідних даних. Ці п’ять параметрів визначають криву, яка використовується для відображення вхідних значень для вибраного каналу у вихідні значення. На рисунку нижче показано, як два вхідні параметри (мін. і макс. вхід), один гамма-параметр і два вихідних параметри (мін. і макс. вихід) впливають на криву відображення.

Різні криві переприв’язки, які можна отримати за допомогою інструменту налаштування рівнів
На лівій панелі буде продемонстровано вплив гамми на криву відображення, коли для мінімальних і максимальних значень для вхідних і вихідних даних установлено значення 0 і 255. На панелі показано, що параметр гами в основному впливає на середні тони зображення. Середня панель показує вплив налаштовування мінімальних і максимальних значень вхідних даних. Вхідні значення часто коригуються для центрування гістограм і збільшення контрастності. Права панель показує вплив коригування мінімального та максимального значень виходу. Параметри вихідних даних використовують рідше, але менший діапазон вихідних значень можна встановити для створення вицвілого зображення, яке буде використовуватися як фон для іншого об’єкта, розміщеного на передньому плані.
Інструмент показує дві гістограми: гістограму початкового зображення буде показано внизу, а гістограму вихідного зображення після налаштовування рівнів – угорі. Під гістограмами буде розташовано п’ять повзунків, які можна натиснути та перетягнути, щоб налаштувати параметри входу, гамми та виходу. Попередній перегляд результатів і гістограму буде динамічно оновлено залежно від позицій повзунків.
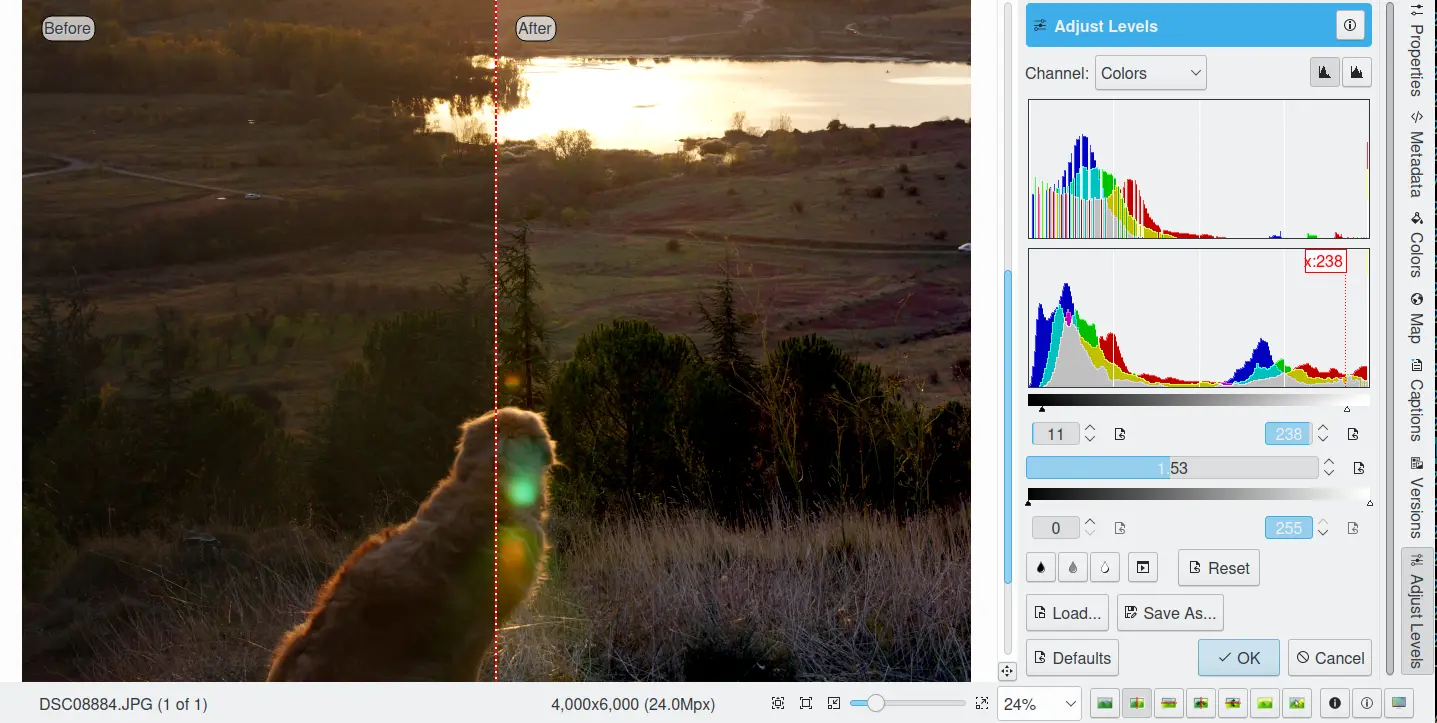
Інструмент коригування рівнів редактора зображень
Передбачено декілька засобів керування, що містяться у вікні інструменту.
За допомогою спадного списку Канал можна вибрати окремий канал, який буде змінено за допомогою цього інструменту:
Яскравість світла: змінити інтенсивність всіх пікселів зображення.
Червоний: надає змогу змінити насиченість червоного кольору для всіх пікселів.
Зелений: надає змогу змінити насиченість зеленого кольору для всіх пікселів
Синій: надає змогу змінити насиченість синього кольору для всіх пікселів.
Альфа: надає змогу змінити прозорість всіх пікселів.
Кольори: змінює насиченість усіх трьох каналів кольорів.
Для кожного з цих 5 каналів може бути визначено окрему криву.
Поряд з цією панеллю розташовано дві піктограми, призначені для вибору лінійного або логарифмічного показу гістограми. Для зображень, знятих цифровим фотоапаратом, зазвичай краще скористатися лінійним режимом. Але для зображень, на яких містяться значні однотонні області, краще скористатися логарифмічною гістограмою.
Вхідні рівні: верхній повзунок регулює два параметри мінімального-максимального значення, які визначають прив’язку вхідних даних. Будь-яке вхідне значення, що дорівнює або нижче мінімального значення, встановленого на повзунку діапазону, відображається на 0, будь-яке вхідне значення між мінімальним і максимальним значеннями лінійно відображається в діапазоні від 0 до 255, а будь-яке вхідне значення дорівнює або перевищує максимальне значення, встановлене на повзунку діапазону, відображається на 255. Таким чином, елементи керування повзунком введення використовуються для налаштування діапазону вхідних значень, які використовуються для покриття повного діапазону від 0 до максимальної інтенсивності.
Параметр мінімального значення можна налаштувати, перетягнувши суцільний чорний трикутник ліворуч або праворуч уздовж кольорової смуги, перетягнувши вказівником миші ліворуч або праворуч над лівим цифровим текстовим полем, ввівши число в ліве числове текстове поле або натискаючи розташованих ліворуч кнопок зі стрілками угору або вниз. Параметр максимального значення можна налаштувати таким же чином, використовуючи білий трикутник і праві елементи керування.

Повзунки інструменту коригування рівнів
Повзунок гамми: за допомогою середнього повзунка можна скоригувати єдиний параметр, який керує нелінійним виправленням гамми.
Вихідні рівні: нижній повзунок регулює два параметри мінімального-максимального значення, які визначають відображення вихідних даних. Будь-яке вихідне значення, що дорівнює або нижче мінімального значення, встановленого на повзунку діапазону, відображається на 0, будь-яке вихідне значення між мінімальним і максимальним значеннями лінійно відображається в діапазоні від 0 до 255, а будь-яке вихідне значення, що дорівнює або перевищує максимальне значення, встановлене на повзунку діапазону, відображається на 255. Таким чином, елементи керування повзунком виведення використовуються для регулювання діапазону вихідних значень. Якщо ви не хочете навмисно створювати зображення з обмеженим динамічним діапазоном, зазвичай достатньо лишити вихідні рівні у діапазоні від 0 до 255.
Керування рівнями виведення працює подібно до керування вхідними рівнями.
За допомогою цього режиму та трьох кнопок Піпеток кольорів можна автоматично налаштувати параметри вхідних рівнів на всіх каналах для тіні, проміжного тону і тонів світлих ділянок. Натисніть кнопку піпетки кольору, якою бажаєте скористатися, а потім наведіть вказівник миші на область перегляду початкового зображення і клацніть лівою кнопкою миші, щоб встановити вхідні рівні для кожного з параметрів.
Скоригувати всі рівні автоматично: ця кнопка автоматично встановлює рівні на основі аналізу інтенсивності пікселів на зображенні.
Скинути: натискання цієї кнопки відновлює всі значення «Вхідних рівнів» та «Вихідних рівнів» на позначеному каналі.
Кнопки Зберегти як» і Завантажити використовуються для виконання відповідних дій. Будь-які параметри рівнів, які ви встановили, може бути збережено у файловій системи, а потім знову завантажено. Для зберігання рівнів буде використано формат файлів, сумісний із форматом файлів рівнів Gimp.
Типові: натискання цієї кнопки відновлює всі типові значення «Вхідних рівнів» та «Вихідних рівнів» на всіх каналах.
У інструменті налаштування рівнів передбачено декілька можливостей полегшити позиціонування повзунків вхідних рівнів. Якщо навести вказівник миші на область перегляду початкового зображення і клацнути лівою кнопкою миші, на області графіка гістограми буде створено вертикальний стовпчик, обмежений пунктирною лінією. Позиція стовпчика відповідатиме значенню пікселя під вказівником миші на панелі зображення. Клацання з перетягуванням призведе до інтерактивного оновлення позиції вертикального стовпчика. Таким чином, ви зможете побачити, де на зображенні розташовано пікселі з різними значеннями на повзунках вхідних рівнів, отже вам легше буде визначити розташування пікселів тіні, проміжного тону та світлих областей.
Якщо ви позначите пункт Індикатор надмірної експозиції, програма перевірить всі канали кольорів, знайде пікселі з надмірною експозицією більше, ніж одного каналу і покаже змішаний колір на основі параметрів рівня каналу. Дію цього пункту буде застосовано лише до області попереднього перегляду, вона не вплине на вигляд остаточного зображення.
Яскравість/Контрастність/Гама
Інструментом digiKam Яскравість/Контрастність/Гами можна скористатися для коригування експозиції на зображенні. Це найпростіший інструмент. Крім того, цей інструмент є менш потужним, але у багатьох випадках може виконувати всі потрібні вам завдання. Цей інструмент часто виявляється корисним для виправлення зображень з надмірною або недостатньою експозицією. Він не зможе виправити проблеми з кольорами. На панелі інструменту передбачено три повзунки: Яскравість, Контрастність і Гама. Наслідки застосування набору параметрів можна бачити на панелі попереднього перегляду зображення. Після визначення потрібних вам параметрів натисніть кнопку Гаразд, щоб ці параметри набули чинності.
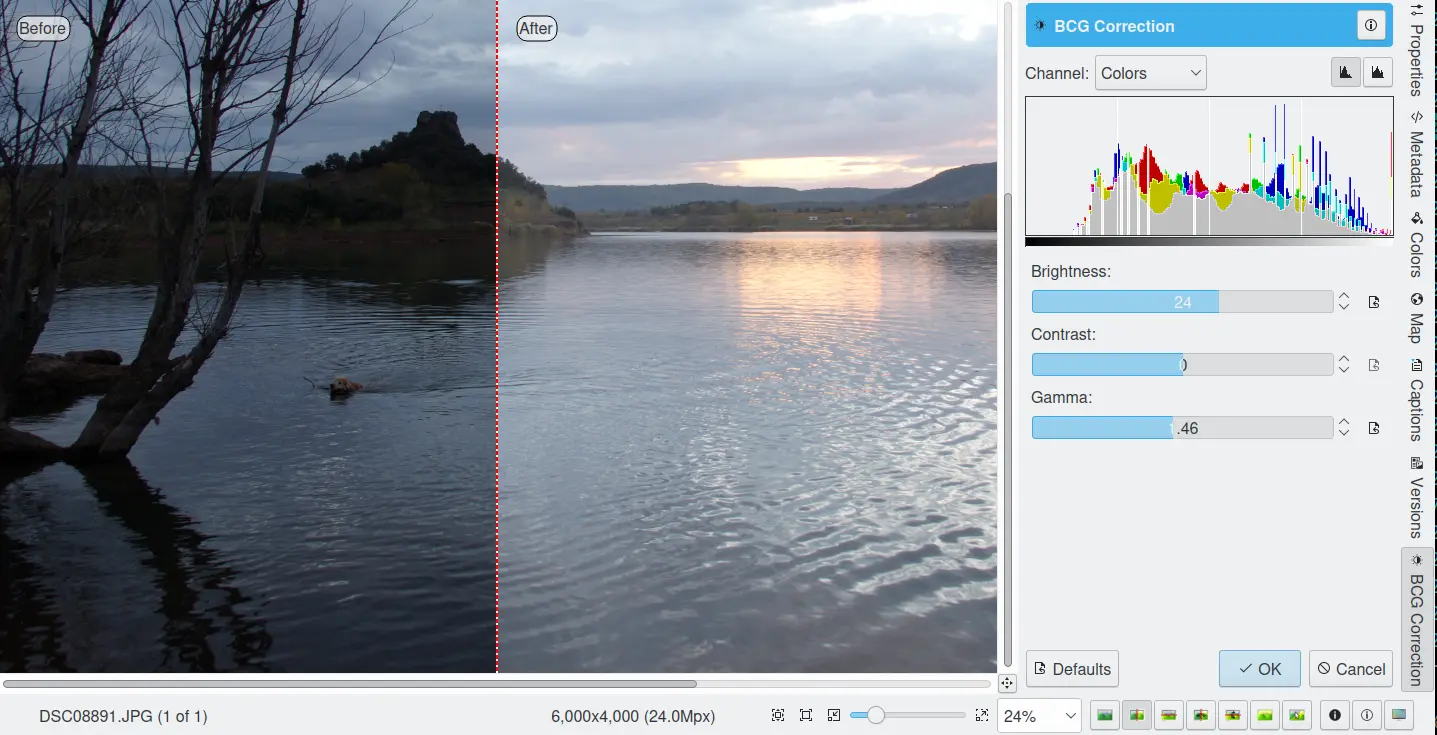
Виправлення експозиції у редакторі зображень
Примітка
У ще одному важливому інструменті із назвою Налаштування рівнів передбачено підтримку виправлення витримки та збереження і завантаження параметрів рівнів для наступного застосування до декількох фотографій. Остання можливість буде корисною, якщо ваш фотоапарат або сканер часто робить однакові помилки і вам доводиться застосовувати однакові виправлення. Докладніші відомості можна знайти у спеціалізованому розділі щодо налаштування рівнів. В інструменті Коригування кривих, який описано у розділі щодо коригування кривих підручника, передбачено ще потужніші можливості з виправлення витримки.
Відтінок/Насиченість/Освітленість
Інструмент digiKam Відтінок/Насиченість/Яскравість використовується для налаштовування рівнів відтінку, насиченості, яскравості та освітленості поточного зображення. (Інструмент мав називатися Відтінок/Насиченість/Яскравість/Освітленість, але це здалося надто довгим!)
Нижче наведено простий список параметрів інструмента:
Карта кольорів відтінку/насиченості, що складається із затіненого сірого прямокутника над тонкою кольоровою смугою. Натисніть і перетягніть заштрихований сірий прямокутник, щоб встановити значення Відтінок і Насиченість. Ці значення також буде показано на повзунках під картою.
Відтінок: за допомогою повзунка ви можете вибрати відтінок на колі кольорів (-180, 180) для коригування кольорів зображення.
Насиченість: цей повзунок регулює насиченість (-100, 100) кольорів зображення. Якщо ваше зображення розмите (що може статися під час зйомки при яскравому освітленні), збільшення насиченості, ймовірно, покращить зображення. У деяких випадках корисно одночасно регулювати освітленість. Коли ви знімаєте в умовах слабкого освітлення, спробуйте зменшити насиченість замість збільшення.
Резонанс: за допомогою повзунка ви можете скоригувати резонанс на зображенні. Резонанс вибірково коригує насиченість, працюючи в основному на збільшення насиченості малонасичених кольорів з метою уникнення обрізання. Цим засобом часто користуються для відтінків кольорів людської шкіри.
Освітленість: за допомогою повзунка ви можете вибрати значення світності (-100, 100). Тут зміни освітленості стосуються лише вибраного каналу кольору, на відміну від освітленості в інструментах Коригування кривих та Коригування рівнів, які працюють з усіма каналами кольорів. Якщо за допомогою цього інструменту ви зміните освітленість червоного кольору, буде змінено лише червоні пікселі.
За наслідками зміни параметрів можна спостерігати на панелі попереднього перегляду зображення. Після встановлення потрібних вам параметрів натисніть кнопку Гаразд, щоб ці параметри набули чинності.
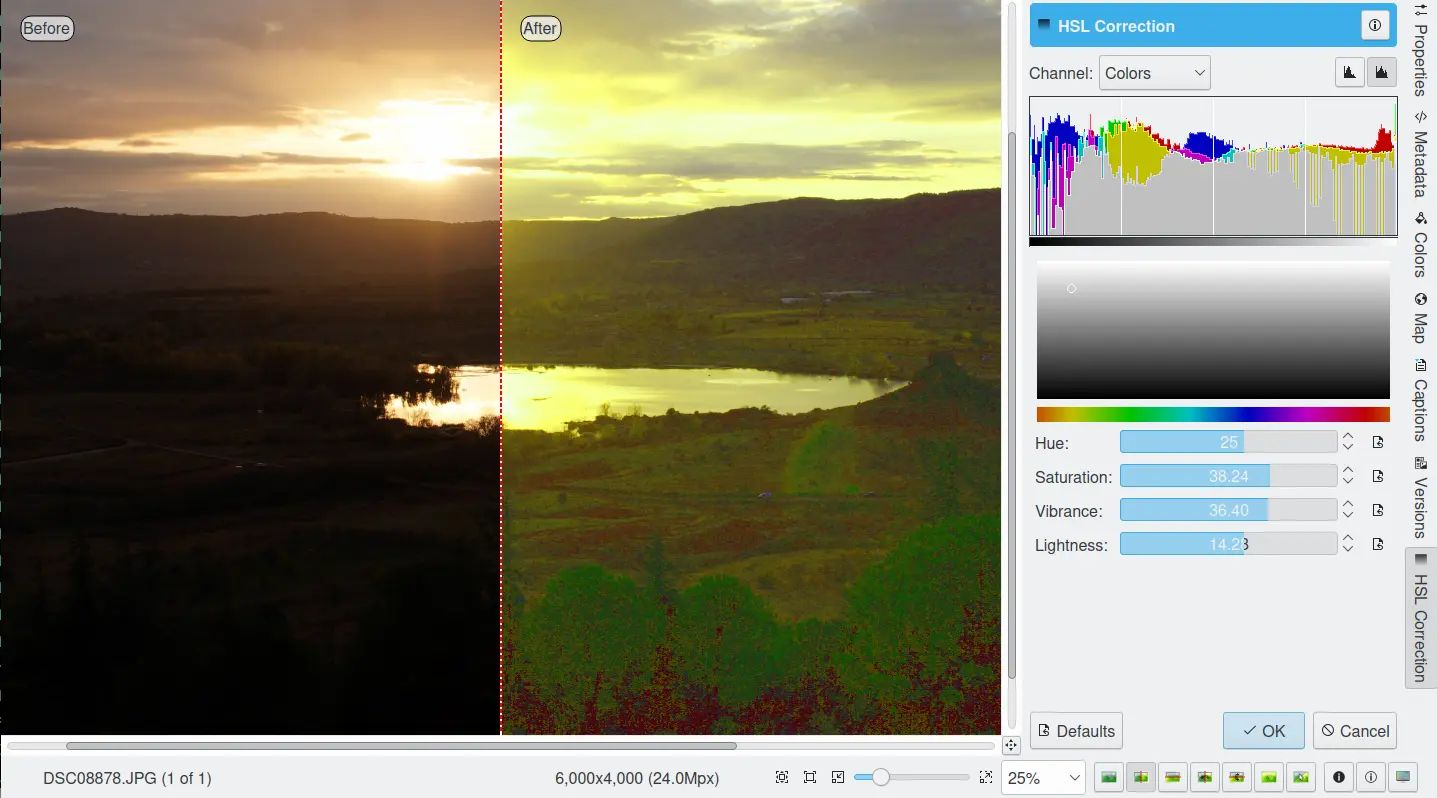
Виправлення кольорів у редакторі зображень
Змішувач каналів
«Змішувач каналів» зображення у digiKam — це інструмент для змішування каналів кольорів зображення з метою покращення або зміни тональності кольорів на фотографії.
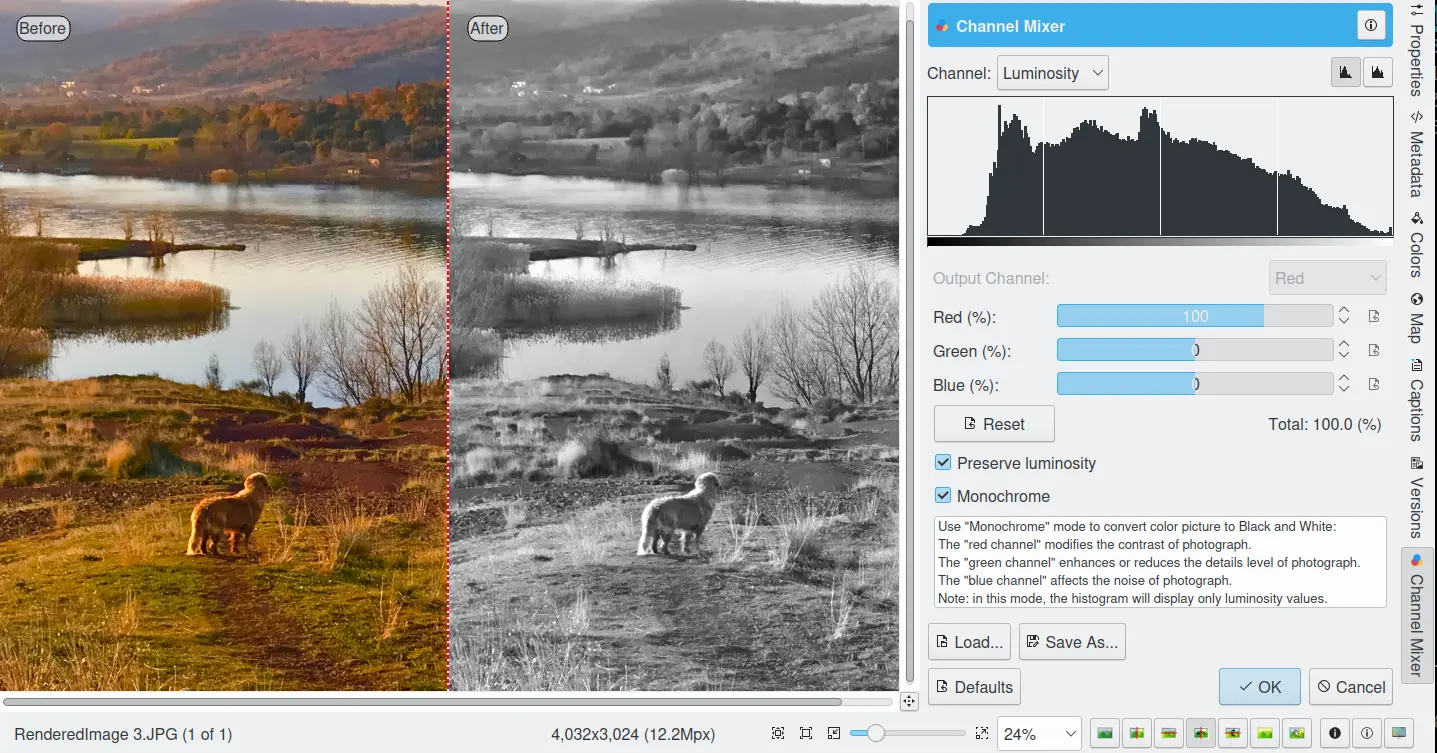
Інструмент мікшування каналів редактора зображень
За допомогою спадного списку Канал можна вибрати канал або канали для показу на гістограмі. Гістограма дає першу підказку про те, як виправити канали на основі їхнього відносного розподілу та амплітуди.
За допомогою спадного списку Канал виводу можна вибрати канал основного кольору, який буде змінено інструментом. Ви можете змінити більше одного каналу, вибравши та змінивши по черзі кожен вихідний канал.
Повзунки Червоний, Зелений і Синій надають змогу мікшувати канали. Якщо ви позначите Зберігати яскравість, зображення збереже свою загальну яскравість, незважаючи на будь-які зміни, які ви внесете в його колірні компоненти.
Позначення пункту Чорно-біле перетворює результат на чорно-біле зображення. Це чудовий інструмент для перетворення ваших фотографій на чорно-білі. Параметр «Зберегти яскравість» особливо корисний при використанні з пунктом Чорно-біле. Спробуйте зменшити зелений канал для чорно-білих портретів.
Результати застосування ефектів змішування кольорів буде негайно показано в області попереднього перегляду зображення ліворуч і на гістограмі, показаній на панелі інструмента. Як і для всіх інших інструментів, область попереднього перегляду можна налаштувати натисканням піктограм стилю порівняння попереднього перегляду на смужці стану.
На панелі перегляду зображення результату ви побачите червону позначку. На гістограмі вертикальною лінією буде показано значення рівня кольору на поточному вибраному каналі у пікселі під позначкою.
Примітка
Іноді, особливо під час виконання монохроматичного (чорно-білого) змішування, зменшення частки одного з каналів кольорів може збільшити рівень видимого шуму, пов’язаного з хроматичним шумом. Хроматичний шум — це невеличкі шумові елементи, які мають різне розташування для окремих каналів кольору так, що шумові візерунки є різними на кожному з каналів кольору. Якщо на зображенні виникає подібний шум, ви можете покращити якість перетворення зображення на чорно-біле: достатньо спочатку усунути хроматичний шум.
Кнопки Зберегти як… і Завантажити… використовуються для виконання відповідних їх назвам дій. Будь-які встановлені вами параметри змішувача може бути збережено до файла і пізніше завантажено. Параметри змішування буде збережено у форматі файла змішувача каналів програми Gimp.
За допомогою пункту Індикатор надмірної експозиції можна додати на зображення кольори, якщо один з каналів пікселя має надмірну експозицію, після чого ви побачите комбінований колір, який є результатом застосування параметрів підсилення каналів. Індикатор надмірної експозиції буде лише показано в області попереднього перегляду, його не буде на остаточному зображенні.
Натискання кнопки Скинути усі відновлює всі типові параметри змішувача каналів.
Баланс білого
У digiKam Баланс білого є напівавтоматичним інструментом для коригування балансу білого на фотографії.
Баланс білого є типовою проблемою для цифрових фотоапаратів. У «старі добрі часи» касет з плівкою балансом білого переймалися працівники фотолабораторій. Сьогодні ж, цифровий фотоапарат має вгадати, що на знімку є білим, а що чорним. Здебільшого точка, яку фотоапарат вважає білою, не є такою за тоном або відтінком. За допомогою інструменту виправлення балансу білого ви можете усунути цю проблему. У інструменті передбачено багато параметрів, які ви можете змінити, щоб отримати точніші кольори на вашій фотографії.
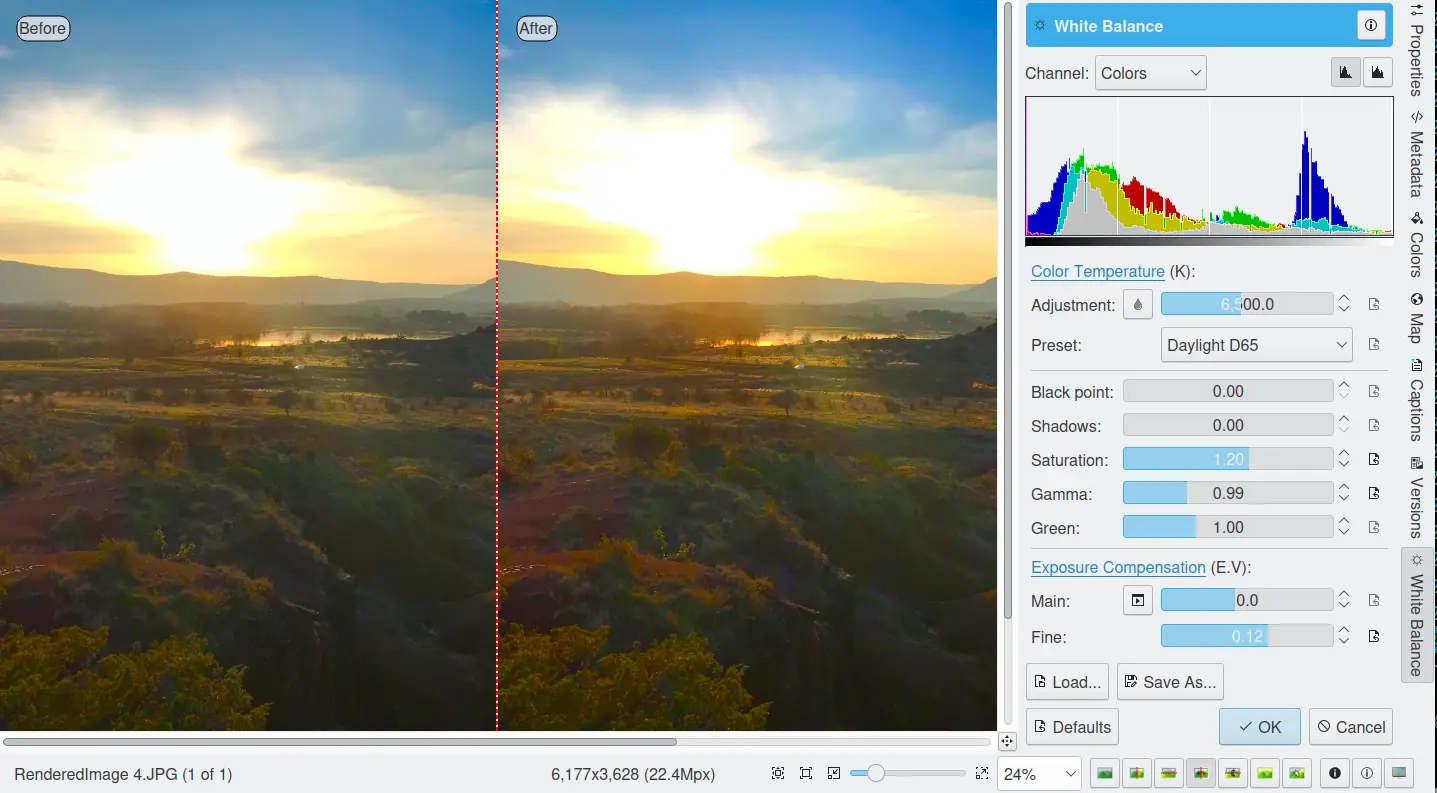
Інструмент балансу білого кольору редактора зображень
Примітка
Виправлення балансу білого, застосоване до 8-бітних зображень, часто може призвести до переекспонованих ділянок. Це трапляється, якщо виправлення надто сильно відрізняються від початкового 16-бітового зображення. Тому виправлення балансу білого найкраще застосовувати під час перетворення даних цифрового негатива, коли запас для виправлення буде більшим.
Результати застосування ефектів виправлення балансу білого буде негайно показано в області попереднього перегляду зображення ліворуч. Як і для всіх інших інструментів, область попереднього перегляду можна налаштувати натисканням піктограм стилю порівняння попереднього перегляду на смужці стану.
У верхньому правому куті розташовано віджет гістограми, вміст якого динамічно оновлюватиметься зі зміною параметрів. Ця гістограма є дуже корисною, оскільки за її допомогою можна переконатися, що навіть на фотографіях з належною експозицією більшість пікселів мають дуже малий рівень світності. За допомогою кнопки ви можете вибрати показ одного з 3 кольорів (або їх суми, яка і називається світністю (яскравістю світла)).
Опишемо решту засобів керування, знизу вгору.
За допомогою пункту Компенсація експозиції ви можете виконати цифрове виправлення експозиції початкової фотографії. У разі збільшення експозиції збільшується ризик появи видимого піксельного шуму та пересвічування світлих ділянок. Позначте пункт Індикатор надмірної експозиції, розташований у нижній правій частині смужки стану, щоб програма перевірити насиченість. Пунктом Точка чорного можна скористатися для коригування лівої частини гістограми. Подібне виправлення знадобиться вам, якщо ваша фотографія виглядає затуманеною (на гістограмі порожнє місце з лівого краю). Програма може автоматично обчислити значення параметрів Експозиція і Точка чорного: для цього натисніть кнопку Автоматичне коригування експозиції. Таким чином можна досить точно встановити точку чорного.
Контрастність отриманого в результаті редагування зображення залежить від значень параметрів Тіні, Насиченість і Гама. За допомогою зміни параметра Тіні ви можете збільшити або зменшити деталізацію тіней на вашій фотографії.
Збільшення контрастності вашої фотографії має побічний ефект: зменшення видимої Насиченості. Значення більші за 1 збільшать насиченість фотографії, а значення менші за 1 — зменшать. Значення рівне 0 перетворить вашу фотографію на чорно-білу. Не вагайтеся у невеликому збільшенні насиченості ваших фотографій. Загальне правило полягає у тому, що чим більшою є контрастність (меншою Гама), тим більшою має бути Насиченість.
Наступний набір параметрів є основним набором параметрів балансу білого, за допомогою цього набору можна керувати співвідношенням між трьома каналами кольорів. Тут ви можете встановити Температуру кольору, тобто зробити кольори вашого знімка теплішими (червонішими) або холоднішими (синішими). Вища температура зробить кольори теплішими. Встановлення співвідношення між трьома каналами кольорів вимагає зміни двох параметрів. Оскільки налаштування температури здебільшого стосується співвідношення між червоним і синім каналами, природно, що другим параметром є параметр, який керує інтенсивністю каналу Зеленого кольору.
Окрім зміни наведених вище параметрів, ви можете просто скористатися натисканням кнопки Піпетка кольору тону температури. Після натискання цієї кнопки наведіть вказівник миші на якусь з точок білого або сірого кольору панелі перегляду початкового зображення і клацніть лівою кнопкою миші, щоб програма автоматично встановила значення полів Температура і Зелений.
Крім того, ви можете встановити баланс білого за допомогою списку шаблонів. Ви можете скористатися такими температурними шаблонами балансу білого:
Температура кольорів |
Опис |
за Кельвіном |
|---|---|---|
40 Вт |
40-ватна лампа розжарювання. |
2680 |
200 Вт |
200-ватна лампа розжарювання, студійне світло. |
3000 |
Схід |
Світло сонця на світанку у сутінках. |
3200 |
Лампа розжарювання |
Лампа розжарювання або світло за 1 годину після світанку або до сутінок. |
3400 |
Нейтральний |
Нейтральна кольорова температура. |
4750 |
Ксенон |
Ксенонова лампа або електрична дуга.. |
5000 |
Сонце |
Сонячне світло близько опівдня. |
5500 |
Спалах |
Електронний фотоспалах. |
5600 |
Небо |
Світло під час хмарного дня. |
6500 |
Використання параметра Температура кольорів є спрощеним способом характеризації спектральних властивостей джерела світла. У реальних умовах колір світла визначається внеском кожної з точок спектральної кривої у загальну потужність світлового потоку. Результат можна обчислити у лінійному масштабі. Це значення може бути корисним, наприклад, для визначення правильного балансу білого у цифровій фотографії, а також для визначення правильного джерела світла під час розробки світлової архітектури. Але слід мати на увазі, що джерела світла однакового кольору (метамери) можуть значно відрізнятися за якістю світла, яке ними випромінюється.
За низької «Температури кольорів» у світлі переважають жовто-червоні відтінки, а за високої — сині. На світанку денне світло має досить низьку температуру, яка підвищується у розпалі дня. Тому іноді буває варто встановити систему електричного підсвічування, яка за потреби доповнюватиме денне світло холодними кольорами і робитиме світло теплішим вночі. З цим ефектом пов’язано те, що вночі ми надаємо перевагу теплішим кольорам світла від свічок та вогнища. Стандартною одиницею виміру температури кольорів є градус Кельвіна (K).
Примітка
Технічно концепція температури кольору походить від спектру чорного тіла, який є спектром світла, випромінюваного ідеальним тепловим випромінювачем. Спектр абсолютно чорного тіла є доброю моделлю для прямого сонячного або місячного світла, коли ці небесні тіла знаходяться високо в небі. Це також добра модель для більшості ламп розжарювання, але погана модель для більшості інших форм штучного освітлення.
За допомогою пункту Індикатор надмірної експозиції можна додати на зображення кольори, якщо один з каналів пікселя має надмірну експозицію, після чого ви побачите комбінований колір, який є результатом застосування параметрів балансу білого. Індикатор надмірного експонування буде лише показано у області попереднього перегляду, він не впливає на вигляд остаточного зображення.
Кнопки Зберегти як… і Завантажити… використовуються для виконання відповідних дій. Будь-які параметри балансу білого кольору, які ви встановили, може бути збережено у текстовому файлі, а потім знову завантажено.
За допомогою натискання кнопки Скинути всі ви можете відновити початкові значення параметрів, які відповідають нейтральному балансу білого кольору. Зауважте, що навіть нейтральні параметри можуть змінити вашу початкову фотографію. Отже, якщо ви збережете зображення після відновлення усіх параметрів, баланс білого, ймовірно, буде змінено.