Toolbars Settings
Editor das Barras de Ferramentas
The digiKam interface can be customized by selection which tools are displayed in the toolbar located below the main menu. The toolbar editor is available from the menu item or from the toolbar context menu (right-click on any tool in the toolbar and select Configure Toolbars…).
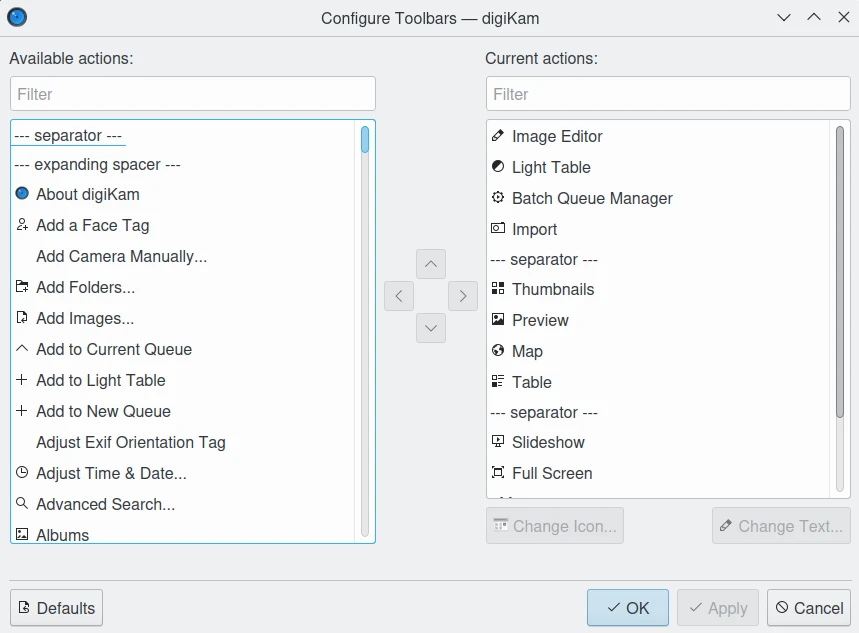
A Janela de Configuração das Barras de Ferramentas do digiKam
The available items that you can display in the toolbar are listed on the left side of the toolbar configuration dialog. The actions that already appear in the toolbar are listed on the right. There is a Filter text box above each list you can use to easily find items in the list.
You can add an item to your toolbar by selecting it from the left side and clicking on the right arrow button. You can remove an item, by selecting it from the right side and clicking the left arrow button.
You can change the position of the items by moving them lower or higher in the list. To move a selected item lower, press the down arrow button. The up arrow button will move selected items higher in the list. You can also change an items” position by dragging and dropping.
Nas barras de ferramentas horizontais, o item que estiver no topo será o que aparece à esquerda. Nas barras verticais, os itens são organizados da mesma forma que aparecem na janela.
Poderá adicionar separadores entre os itens, adicionando um item — separador — na barra de ferramentas.
Poderá repor a sua barra de ferramentas como estava aquando da instalação da aplicação, carregando no botão Predefinições no fundo da janela, confirmando depois a sua decisão.
Poderá alterar o ícone e o texto de cada item individual da barra de ferramentas, seleccionando um item e carregando no botão para Modificar o Ícone… ou Modificar o Texto….
Personalizar a Aparência das Barras de Ferramentas
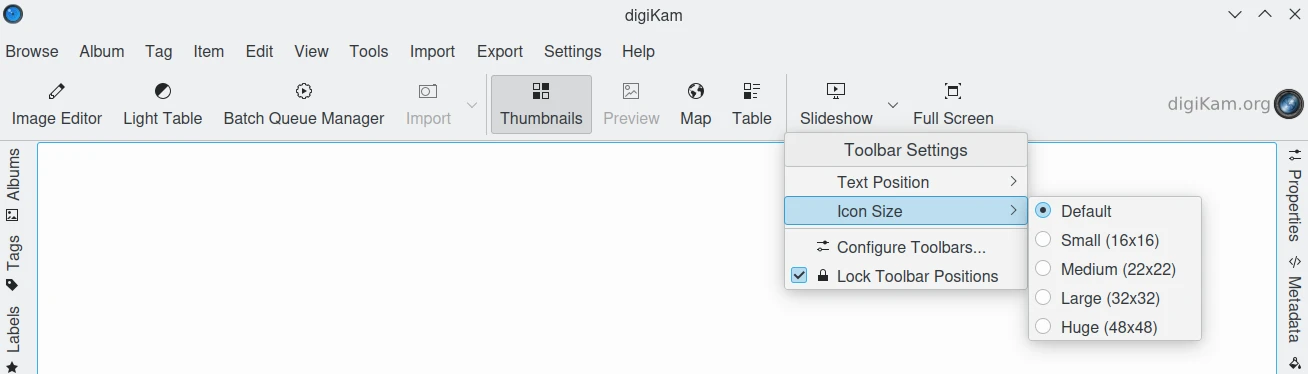
You can change the appearance of toolbars by right-clicking on a toolbar to access it’s context menu. The Text Position sub-menu allows you to customize the button icon and title on the toolbar.
O Menu de Contexto das Barras de Ferramentas do digiKam
Poderá escolher entre:
Ícones: só aparecerá o ícone de cada item da barra de ferramentas.
Texto: só aparecerá a legenda de texto para cada item da barra de ferramentas.
Texto ao Lado dos Ícones: a legenda de texto irá aparecer à direita do ícone de cada item da barra de ferramentas.
Texto sob os Ícones: a legenda de texto irá aparecer debaixo do ícone de cada item da barra de ferramentas.
Também poderá mostrar ou esconder o texto dos itens individuais da barra de ferramentas, carregando com o botão direito sobre um item e marcando ou desmarcando o item debaixo de “Mostrar o Texto”.
Poderá modificar o tamanho dos ícones dos itens da barra de ferramentas, seleccionando o Tamanho dos Ícones no menu de contexto da barra de ferramentas. Poderá escolher entre os seguintes tamanhos em pixels:
Pequeno (16x16).
Médio (22x22) [o valor por omissão].
Grande (32x32).
Enorme (48x48).
Personalizar a Posição da Barra de Ferramentas
The toolbar can be moved to another position, but it must be first “unlocked” by unchecking the Lock Toolbar Positions option from the toolbar’s context menu. To restore the lock, simply recheck this menu item.
Poderá mudar a posição da barra de ferramentas no submenu Orientação do seu menu de contexto.
Poderá escolher entre:
Top [the default position]
Left
Right
Bottom
You can also move the toolbar by clicking and holding onto the dotted line at the left of a horizontal toolbar or the top of a vertical toolbar and dragging it to your desired location.
You can hide the toolbar by deselecting Show Toolbar from either the toolbar’s context menu or the Settings menu. To restore the toolbar, select Show Toolbar from the Settings menu. Note that the toolbar must be “unlocked” to hide it from the context menu.