Templates Settings
The Templates options for digiKam are set from .
Introdução
The O Gestor de Modelos de Meta-Dados é usado para criar e gerir modelos de meta-dados, que podem ser usados em:
A página Informações da área de Legendas, na barra lateral direita.
As Operações na Hora (apenas no JPEG) da área de Configuração, na barra lateral direita, na janela .
The goal of templates is to apply multiple pieces of metadata to one or more items at the same time. You can create many different profiles corresponding to different aspects of your workflow. In all cases, the information will be stored in the file as either XMP or IPTC metadata. Remember that XMP is a replacement of IPTC as explained in this section of the manual.
The top portion of the templates view shows a list of the already existing templates. The first column shows the title of the template, and the second column shows the name of the author(s) in the “Author Names” field of that template. To the right you have three editing buttons, below an input field for the template title. To create a new template you type a title in the input field and click the Add button. The new template will appear in the list. To edit an existing template you select it in the list, edit its fields (see next paragraph) and then click the Replace button. You can also type in a new title for the edited template and save the new version with the Add button. To delete a template, very obviously, you select it in the list and click the Remove button.
Aviso
Note that all the changes you make to the templates will only be stored in the template file if you exit the settings dialog with OK button. The Add and Replace buttons only change the template list stored in memory.
Dica
O ficheiro de modelo poderá ser encontrado em ~/.local/share/digikam/, para uma cópia de segurança manual ou para gerir diferentes conjuntos de modelos, através do sistema de ficheiros.
O resto da janela está dividido em quatro páginas, agrupando os campos de meta-dados em Permissões, Localização, Contacto e Assuntos.
Rights Information

A Página de Configurações das Permissões dos Modelos no digiKam
A página Permissões contém os dados da identidade e direitos de cópia predefinidos. Isto é um extracto das especificações de IPTC/XMP para estes campos:
Authors (synonymous to Creator and By-line): This field should contain your name, or the name of the person who created the photograph. If it is not appropriate to add the name of the photographer (for example, if the identity of the photographer needs to be protected) the name of a company or organization can also be used. Once saved, this field should not be changed by anyone. This field does support the use of semi-colons as a separator. With IPTC, this field is limited to 32 characters.
Cargos do Autor (sinónimo ao título de “Por”): Este campo deverá conter o título do cargo do fotógrafo. Os exemplos poderão incluir títulos como: Fotógrafo Profissional, Fotógrafo “Freelancer”, Fotógrafo Comercial Independente. Dado que isto é um título de qualificação do campo Autor, o campo Autor também deverá ser preenchido. Com o IPTC, este campo está limitado a 32 caracteres.
Crédito (sinónimo de Fornecedor): Use o campo de créditos para identificar quem está a fornecer a fotografia. Não tem necessariamente de ser o autor. Se um fotógrafo estiver a trabalhar para uma agência noticiosa, como a Reuters ou a Associated Press, estas organizações poderão estar representadas aqui, dado que são elas a «fornecer» a imagem para ser usada por outros. Se a imagem for de “stock”, então o grupo (agência) envolvido no fornecimento da imagem deverá estar indicado aqui. Com o IPTC, este campo está limitado a 32 caracteres.
Copyright: The Copyright Notice should contain any necessary copyright notice for claiming the intellectual property, and should identify the current owner(s) of the copyright for the photograph. Usually, this would be the photographer, but if the image was done by an employee or as work-for-hire, then the agency or company should be listed. Use the form appropriate to your country. For the United States you would typically follow the form of (c) {date of first publication} name of copyright owner, as in (c) 2005 John Doe. Note, the word copyright or the abbreviation copr may be used in place of the (c) symbol. In some foreign countries only the copyright symbol is recognized and the abbreviation does not work. Furthermore the copyright symbol must be a full circle with a c inside; using something like (c) where the parentheses form a partial circle is not sufficient. For additional protection worldwide, use of the phrase, «all rights reserved» following the notice above is encouraged. In Europe you would use: Copyright {Year} {Copyright owner}, all rights reserved. In Japan, for maximum protection, the following three items should appear in the copyright field of the IPTC Core: (a) the word, Copyright; (b) year of the first publication; and (c) name of the author. You may also wish to include the phrase all rights reserved.
The copyright marking for a Creative Commons Share-alike license might read:
This work copyright {Year} by {Author} is licensed under CC BY-SA 4.0
See https://creativecommons.org/licenses/by-sa/4.0/ for details on what the Share-Alike license means.
With XMP, you can include more than one copyright string using different languages. With IPTC, this field is limited to 128 characters.
Termos de Utilização Correctos: Este campo deverá ser usado para enumerar as instruções de como deverá ser usado um recurso de forma legal. Com o XMP, poderá incluir mais que um texto de termos de utilização, usando diferentes línguas. Este campo não existe no IPTC.
Origem: O campo de Origem deverá ser usado para identificar o dono original ou o detentor dos direitos da fotografia. O valor deste campo não deverá mais ser alterado, após ter sido introduzida esta informação a seguir à criação da imagem. Embora tal não seja forçado pelos painéis personalizados, o utilizador deverá considerar este campo como sendo de «escrita única». A origem pode ser um indivíduo, uma agência ou um membro de uma agência. Para ajudar em pesquisas posteriores, sugere-se que separe todas as barras / com um espaço em branco. Use o formato fotógrafo / agência em vez de fotógrafo/agência. A origem também poderá ser diferente do Criador e dos nomes enumerados no Aviso de Direitos de Cópia. Com o IPTC, este campo está limitado a 32 caracteres.
Instruções: O campo Instruções deverá ser usado para enumerar as instruções editoriais que dizem respeito ao uso da fotografia. Com o IPTC, este campo está limitado a 256 caracteres.
Location Information
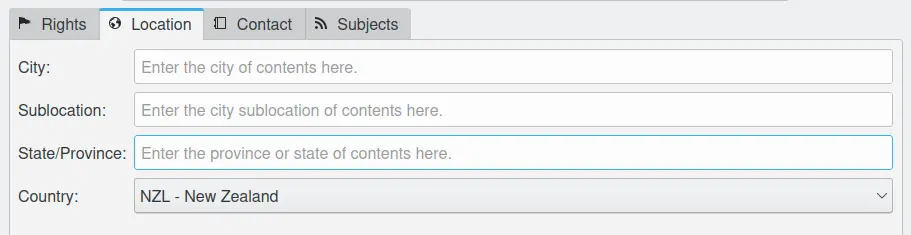
A Página de Configurações da Localização dos Modelos no digiKam
A página de Localização contém os dados predefinidos sobre o local no mundo que descreve o conteúdo. Isto é um extracto das especificações do IPTC/XMP para estes campos:
Cidade: Este campo deverá conter o nome da cidade em que foi tirada a fotografia. Com o IPTC, este campo está limitado a 32 caracteres.
Sub-Localização: Este campo deverá conter o nome da sub-localização cidade em que foi tirada a fotografia. Com o IPTC, este campo está limitado a 32 caracteres.
Distrito/Província: Este campo deverá conter o nome da província ou distrito em que foi tirada a fotografia. Com o IPTC, este campo está limitado a 32 caracteres.
Country: This field should contain the country where the photograph was taken. With IPTC, this field is limited to 64 characters.
Contact Information
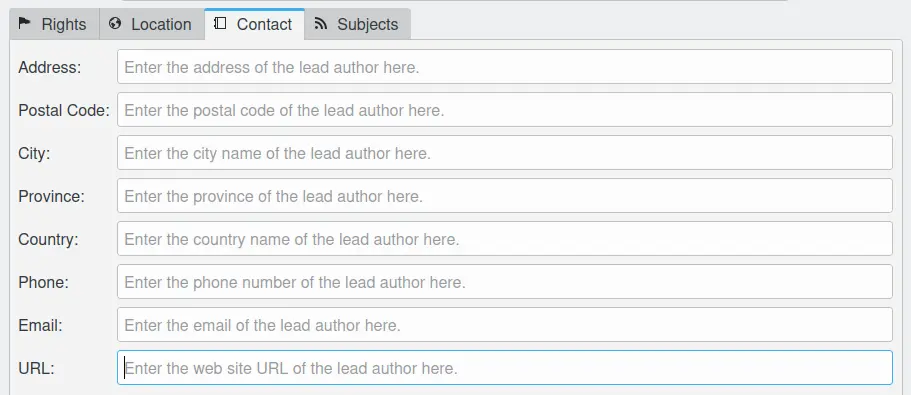
A Página de Configurações dos Contactos dos Modelos no digiKam
The data in the Contact tab refers to the (lead) photographer under Author Names in the Rights tab. Since these fields do not exist in IPTC, an extract of the XMP specifications for these fields is listed below:
Endereço: Este campo deverá conter o endereço onde mora o autor principal.
Código Postal: Este campo deverá conter o código postal onde mora o autor principal.
Cidade: Este campo deverá conter o nome da cidade onde mora o autor principal.
Distrito/Província: Este campo deverá conter o distrito/província onde mora o autor principal.
País: Este campo deverá conter o nome do país onde mora o autor principal.
Telefone: Este campo deverá conter o número de telefone do autor principal.
E-mail: Este campo deverá conter o endereço de e-mail do autor principal.
URL: Este campo deverá conter o URL da página Web do autor principal.
Subjects Information
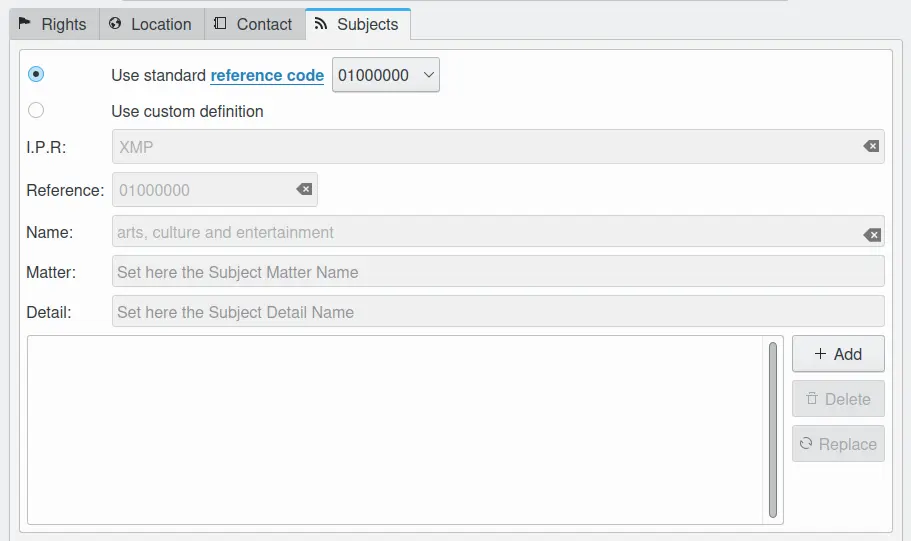
A Página de Configurações dos Assuntos dos Modelos no digiKam
In the Subjects tab you can assign one or more Subject Codes according to the IPTC Photo Metadata Standard to the template. If the first option Use standard reference code is selected you can choose a code from the drop-down field and the meaning of it will then appear in the fields of the Use custom definition section. If you don’t know the code for the subject you want to assign this way is a bit tedious since there are 1400 subjects in the standard. A better way is to look for your subject in this URL. There you select Subject Codes and your language (English recommended) and click Show. You can scroll through the diagram and make additional levels visible by clicking on one of the fields. In the field right of the diagram you can find the code of the selected subject.
In general the IPTC Subject Codes are quite comprehensive but on the other hand a bit incomplete in some fields, e.g. under Lifestyle and Leisure/Games you find just Go, Chess, Bridge and Shogi. So you may want to add your own subjects, even though they always remain private (or company) subjects. A way to do that in digiKam is to first check Use standard reference code and select 10001004 which brings you to Lifestyle and Leisure/Games/shogi - just to continue with our example. Then you check Use custom definition and change the last digit of Reference to 5 and the text in the Detail field to - say domino. You save this custom definition to the template by clicking Add button at the right side of the subjects list. Then you type in a template title (if it’s a new template) and save the template by clicking the Add button at the right side of the templates list. Don’t mix up these two.