Templates Settings
The Templates options for digiKam are set from .
Overview
The Metadata Templates Manager is meant to create and manage metadata templates which can be used in:
The Information tab of the Captions view from the Right Sidebar.
The On the Fly Operations (JPEG only) section of the Settings view from the Right Sidebar in the Window.
The goal of templates is to apply multiple pieces of metadata to one or more items at the same time. You can create many different profiles corresponding to different aspects of your workflow. In all cases, the information will be stored in the file as either XMP or IPTC metadata. Remember that XMP is a replacement of IPTC as explained in this section of the manual.
The top portion of the templates view shows a list of the already existing templates. The first column shows the title of the template, and the second column shows the name of the author(s) in the “Author Names” field of that template. To the right you have three editing buttons, below an input field for the template title. To create a new template you type a title in the input field and click the Add button. The new template will appear in the list. To edit an existing template you select it in the list, edit its fields (see next paragraph) and then click the Replace button. You can also type in a new title for the edited template and save the new version with the Add button. To delete a template, very obviously, you select it in the list and click the Remove button.
Avertissement
Note that all the changes you make to the templates will only be stored in the template file if you exit the settings dialog with OK button. The Add and Replace buttons only change the template list stored in memory.
Astuce
The template file can be found in ~/.local/share/digikam/ for manual backup or for managing different template sets by means of the file system.
The rest of the window is divided into four tabs, grouping the metadata fields into Rights, Location, Contact and Subjects.
Rights Information
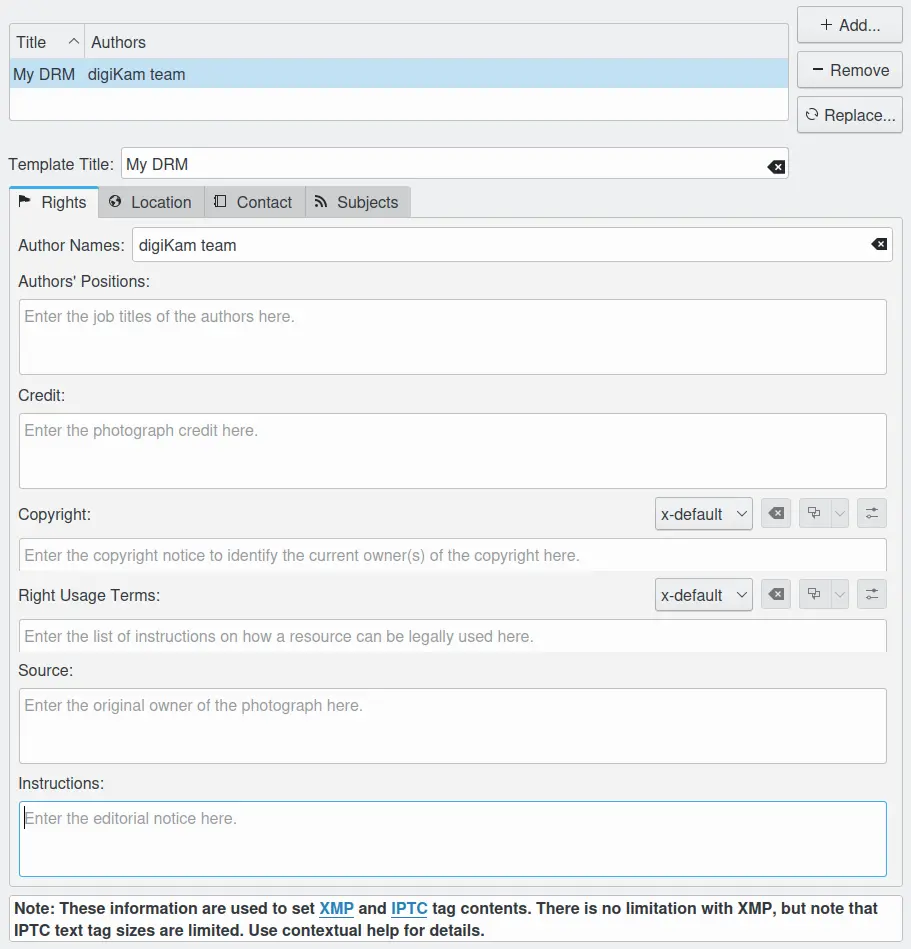
The digiKam Template Rights Configuration Page
The Rights tab contains the default identity and copyright data. This is an extract of the IPTC/XMP specifications for these fields:
Authors (synonymous to Creator and By-line): This field should contain your name, or the name of the person who created the photograph. If it is not appropriate to add the name of the photographer (for example, if the identity of the photographer needs to be protected) the name of a company or organization can also be used. Once saved, this field should not be changed by anyone. This field does support the use of semi-colons as a separator. With IPTC, this field is limited to 32 characters.
Author Positions (synonymous with By-line title): This field should contain the job title of the photographer. Examples might include titles such as: Staff Photographer, Freelance Photographer, or Independent Commercial Photographer. Since this is a qualifier for the Author field, the Author field must also be filled out. With IPTC, this field is limited to 32 characters.
Credit (synonymous with Provider): Use the credit field to identify who is providing the photograph. This does not necessarily have to be the author. If a photographer is working for a news agency such as Reuters or the Associated Press, these organizations could be listed here as they are "providing" the image for use by others. If the image is a stock photograph, then the group (agency) involved in supplying the image should be listed here. With IPTC, this field is limited to 32 characters.
Copyright: The Copyright Notice should contain any necessary copyright notice for claiming the intellectual property, and should identify the current owner(s) of the copyright for the photograph. Usually, this would be the photographer, but if the image was done by an employee or as work-for-hire, then the agency or company should be listed. Use the form appropriate to your country. For the United States you would typically follow the form of (c) {date of first publication} name of copyright owner, as in (c) 2005 John Doe. Note, the word copyright or the abbreviation copr may be used in place of the (c) symbol. In some foreign countries only the copyright symbol is recognized and the abbreviation does not work. Furthermore the copyright symbol must be a full circle with a c inside; using something like (c) where the parentheses form a partial circle is not sufficient. For additional protection worldwide, use of the phrase, "all rights reserved" following the notice above is encouraged. In Europe you would use: Copyright {Year} {Copyright owner}, all rights reserved. In Japan, for maximum protection, the following three items should appear in the copyright field of the IPTC Core: (a) the word, Copyright; (b) year of the first publication; and (c) name of the author. You may also wish to include the phrase all rights reserved.
The copyright marking for a Creative Commons Share-alike license might read:
This work copyright {Year} by {Author} is licensed under CC BY-SA 4.0
See https://creativecommons.org/licenses/by-sa/4.0/ for details on what the Share-Alike license means.
With XMP, you can include more than one copyright string using different languages. With IPTC, this field is limited to 128 characters.
Right Usage Terms: The Right Usage Terms field should be used to list instructions on how a resource can be legally used. With XMP, you can include more than one right usage terms string using different languages. This field does not exist with IPTC.
Source: The Source field should be used to identify the original owner or copyright holder of the photograph. The value of this field should never be changed after the information is entered following the image's creation. While not yet enforced by the custom panels, you should consider this to be a "write-once" field. The source could be an individual, an agency, or a member of an agency. To aid in later searches, it is suggested to separate any slashes / with a blank space. Use the form photographer / agency rather than photographer/agency. Source may also be different from Creator and from the names listed in the Copyright Notice. With IPTC, this field is limited to 32 characters.
Instructions: The Instructions field should be used to list editorial instructions concerning the use of photograph. With IPTC, this field is limited to 256 characters.
Location Information
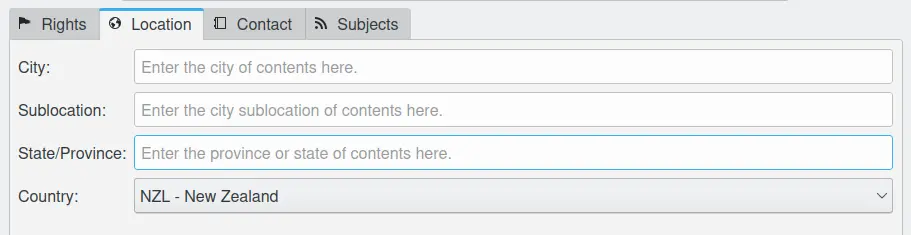
The digiKam Template Location Configuration Page
The Location tab contains the default data about the place in the world describing the contents. This is an extract of the IPTC/XMP specifications for these fields:
City: This field should contain the name of the city where the photograph was taken. With IPTC, this field is limited to 32 characters.
Sublocation: This field should contain the sublocation of the city where the photograph was taken. With IPTC, this field is limited to 32 characters.
State/Province: This field should contain the province or state where the photograph was taken. With IPTC, this field is limited to 32 characters.
Country: This field should contain the country where the photograph was taken. With IPTC, this field is limited to 64 characters.
Contact Information

The digiKam Template Contact Configuration Page
The data in the Contact tab refers to the (lead) photographer under Author Names in the Rights tab. Since these fields do not exist in IPTC, an extract of the XMP specifications for these fields is listed below:
Address: This field should contain the address where the lead author lives.
Postal Code: This field should contain the postal code where the lead author lives.
City: This field should contain the city name where the lead author lives.
Province: This field should contain the province where the lead author lives.
Country: This field should contain the country name where the lead author lives.
Phone: This field should contain the phone number of the lead author.
Email: This field should contain the email of the lead author.
URL: This field should contain the web site URL of the lead author.
Subjects Information
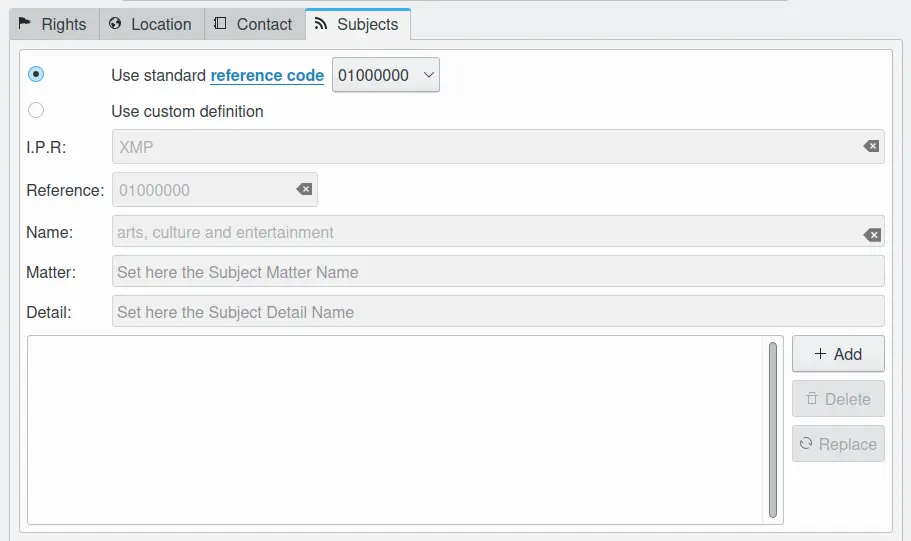
The digiKam Template Subjects Configuration Page
In the Subjects tab you can assign one or more Subject Codes according to the IPTC Photo Metadata Standard to the template. If the first option Use standard reference code is selected you can choose a code from the drop-down field and the meaning of it will then appear in the fields of the Use custom definition section. If you don't know the code for the subject you want to assign this way is a bit tedious since there are 1400 subjects in the standard. A better way is to look for your subject in this URL. There you select Subject Codes and your language (English recommended) and click Show. You can scroll through the diagram and make additional levels visible by clicking on one of the fields. In the field right of the diagram you can find the code of the selected subject.
In general the IPTC Subject Codes are quite comprehensive but on the other hand a bit incomplete in some fields, e.g. under Lifestyle and Leisure/Games you find just Go, Chess, Bridge and Shogi. So you may want to add your own subjects, even though they always remain private (or company) subjects. A way to do that in digiKam is to first check Use standard reference code and select 10001004 which brings you to Lifestyle and Leisure/Games/shogi - just to continue with our example. Then you check Use custom definition and change the last digit of Reference to 5 and the text in the Detail field to - say domino. You save this custom definition to the template by clicking Add button at the right side of the subjects list. Then you type in a template title (if it's a new template) and save the template by clicking the Add button at the right side of the templates list. Don't mix up these two.