Transform Tools
Cropping a Photograph
Crop to Selection
The digiKam Crop to Selection tool is used to crop an image based on a user selection. It is the simplest of the three cropping tools in digiKam.
Cropping a photograph is a common operation, but the value of cropping to improve the composition of an image is often underestimated. The Image Editor makes it very easy. To manually crop a photograph simply drag a rectangle over the image by holding down the left mouse button while moving the mouse. You will see a wire frame rectangle appear as you move the mouse.
A Region from Image Editor Canvas Ready for Manual Crop
When you release the button the area of the photograph that will be removed by a crop operation is greyed out. This allows you to get a good view of how your photograph will look once you have cropped it. You can change the size of the cropped area by dragging the corners of the rectangle, and you can create a new crop area simply by dragging out another rectangle.
Once you are happy with the crop, click on the Image Editor Crop to Selection button on the toolbar and the photograph will be cropped Ctrl+X. Use the or entries in the File menu to save the newly cropped photograph.
Note
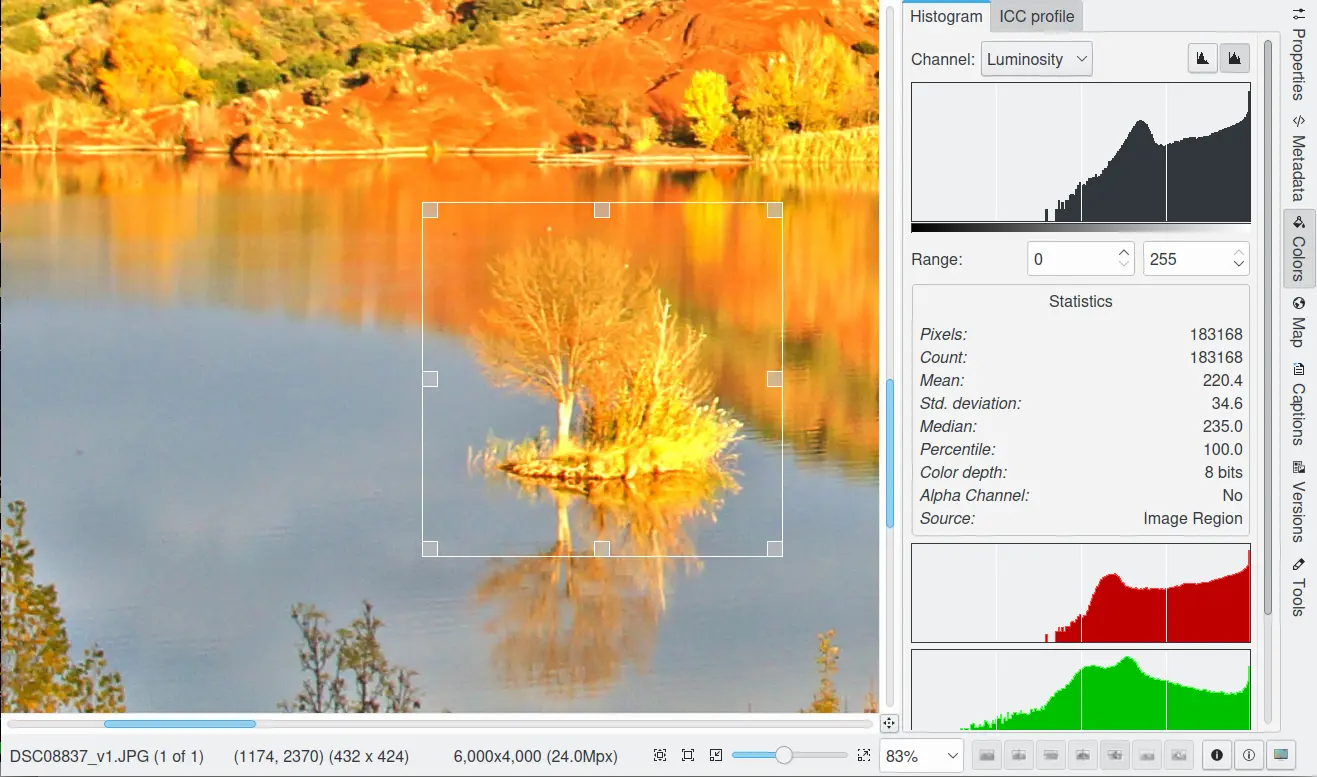
The Histogram tab from the right sidebar will recompute the color statistics based on the current selected portion of the image.
Auto-Crop
The digiKam Auto Crop tool automatically removes the borders from an image. It searches the largest possible border area that is all the same color, and then crops this area from the image.
One use of this tool would be to remove the irregular black border produced when multiple images are stitched together into a panorama.
The figure below illustrates a stitched Panorama processed with the auto crop tool.
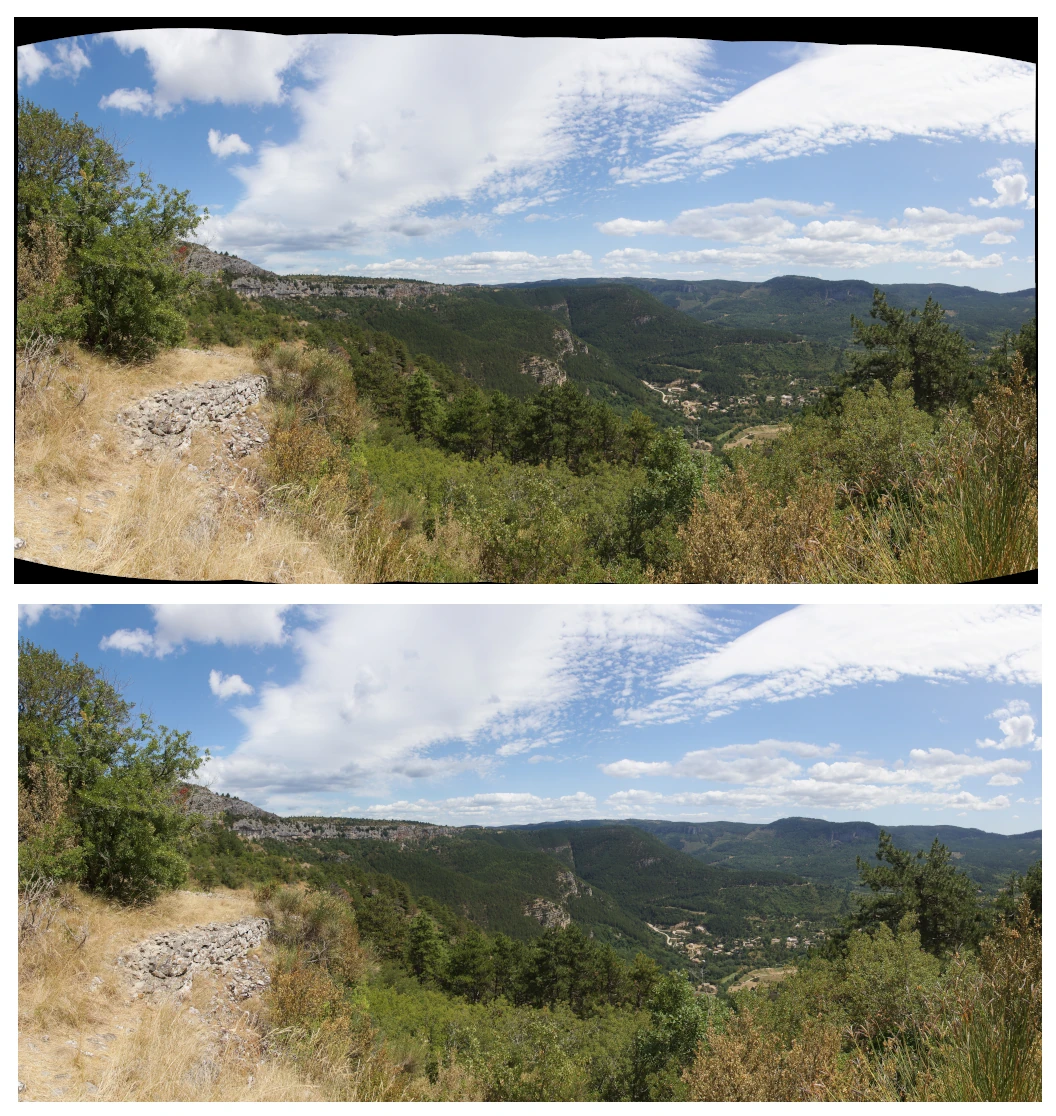
A Panorama Processed on the Bottom by Auto-Crop to Drop the Black Frame Around the Original Image on the Top.
Aspect Ratio Crop
The digiKam Aspect Ratio Crop tool is a more powerful crop tool. While you are editing digital images, it is often necessary to create a compatible format for use in your photo album or a picture frame. If you print an image from your digital camera and then try to put it in your photo album, you may notice that the camera has a different width or height ratio than a normal photographic film format. The Aspect Ratio Crop tool can crop your digital images in a predefined ratio (for example 5:7 or 2:3 which are standard photo ratios).
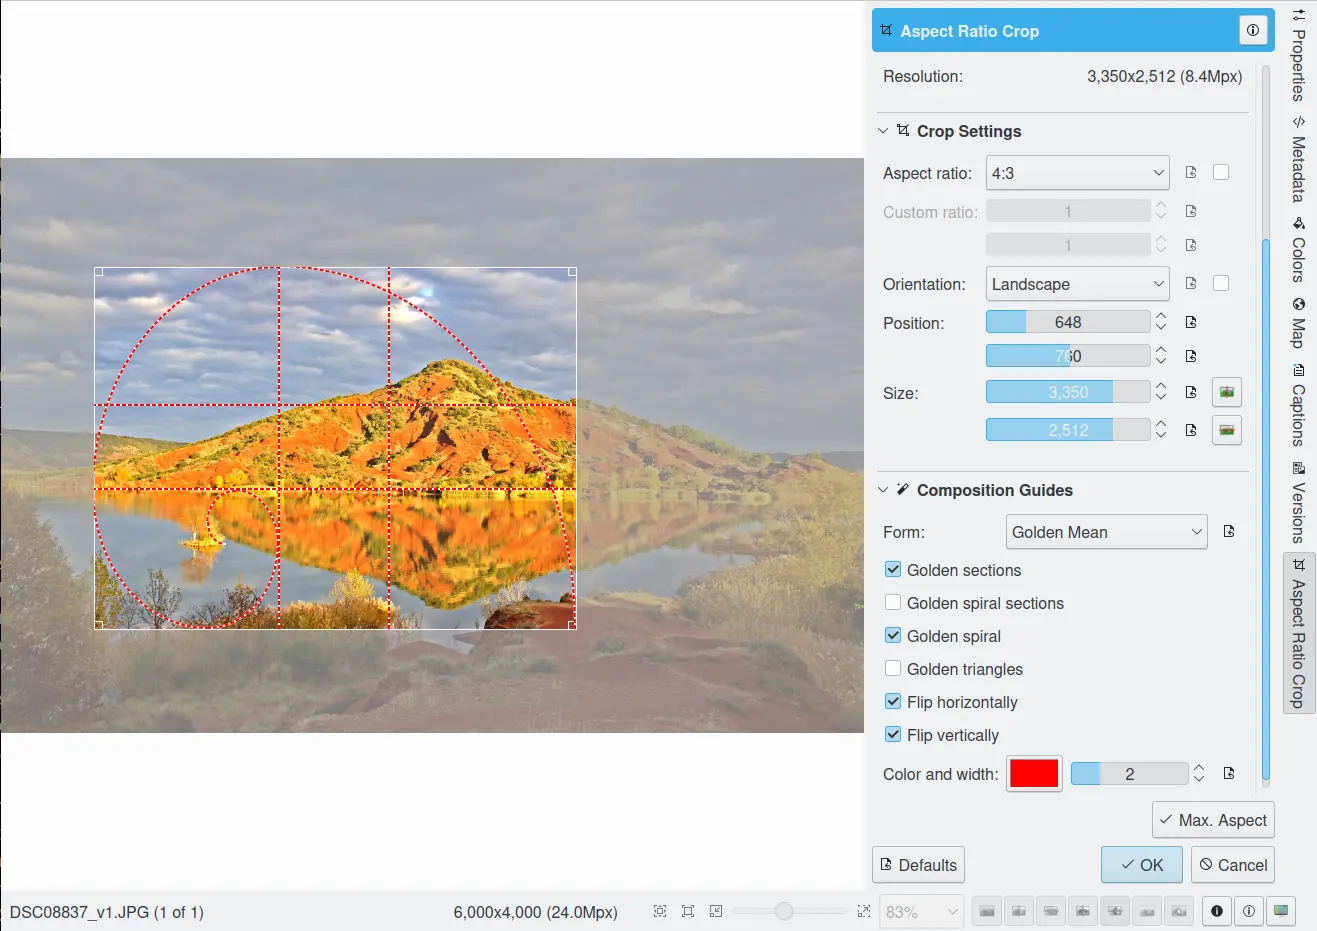
The digiKam Image Editor Ratio Crop Tool
In the preview area you can resize the cropping rectangle by moving the corners with the mouse. It will keep the ratio value set in the bottom of dialog.
In the Aspect Ratio Crop tool settings, you specify the Orientation as Portrait or Landscape. Portrait will always have the larger size assigned to the Height and Landscape to the Width.
The Aspect Ratio Crop tool uses a relative ratio. This means it is the same if you use centimeters or inches and it doesn’t specify the physical size. For example, you can see below a correspondence list of traditional photographic paper sizes and the crop aspect ratio.
Standard Photograph Paper Size |
Crop Aspect Ratio |
|---|---|
10x15cm 20x30cm 30x45cm 3.5x5” 4x6” 8x12” 12x18” 16x24” 20x30” |
2:3 |
6x8cm 15x20cm 18x24cm 30x40cm 3.75x5” 4.5x6” 6x8” 7.5x10” 9x12” |
3:4 |
20x25cm 40x50cm 8x10” 16x20” |
4:5 |
15x21cm 30x42cm 5x7” |
5:7 |
21x30cm 42x60cm |
7:10 |
Two buttons are available at the far right of the dialog to move the crop selection automatically to the horizontal or vertical center of the image.
At the very bottom line of the dialog, the Max. Ratio button lets you set the crop area size to the maximum size according to the current aspect ratio settings and orientation.
Note
The Aspect Ratio Crop tool remembers your settings depending on image orientation (horizontal or vertical). When you use the crop tool next time, these settings will be used as default values depending on the image orientation. The changed image dimensions are stored into the Exif tables so that the Exif data reflects the cropped image and not the original one.
Composition Guide
When first looking at an image, the eye of the viewer rarely settles at the center of the image, but moves instead from the top left to the right, and then from the lower left to the right again. This pattern is unconscious but has been well documented. It is probably associated with the western reading pattern. From the photographer’s point of view, the goal then becomes to guide the gaze of the viewer to the subject, being aware of the way many people perceive an image.
The Composition Guide settings provide guiding elements to better compose your images. These guides are:
Rule of Thirds: a grid that divides the image into thirds in every direction (that makes for 9 parts). These proportions are close to the golden rule and are derived from the field of view of the human eye. When an image is divided vertically and horizontally into three sections, the points of intersection represent places to position important visual elements. Moving a horizon in a landscape to the position of one third is often more effective than placing it in the middle. While many photographers and artists are aware of the Rule of Thirds, there is nothing obligatory about applying the Rule of Thirds. A landscape horizon could also be placed near the bottom one quarter or sixth and still produce a good photograph. In placing visual elements for effective composition, one must assess many factors including color, dominance, size and balance together with proportion. Often a certain amount of image balance or tension can make a composition more effective.
Harmonious Triangles: harmonious divisions rely on the principle of similarity. Like the Rule of Thirds guide, Harmonious Triangles are another division of the image dividing the rectangle into equiangular harmonious triangles aligned with the diagonal.
Golden Mean: the Golden Mean is a ratio underlying numerous growth patterns throughout nature (from the spiral of a Nautilus shell to the petals of a sunflower), it has an uncanny way of showing up in all kinds of things we deem beautiful. The Golden Ratio is the irrational number 1.618033988…, and its usage dates back to the ancient Egyptians and Greeks who used it in the construction of their temples and pyramids. Artists and architects throughout time have used the Golden Ratio when composing their paintings, buildings, and even photographs, in order to give their creations a sense of natural order and beauty. The ratio is inherent in the Fibonacci series: 1, 1, 2, 3, 5, 8, 13, 21, 34 etc.., where each succeeding number after 1 is equal to the sum of the two preceding numbers. The ratio formed 1:1.618 is the Golden Mean. A composition following this rule is considered visually harmonious. The Golden Mean provides more fluid guidelines when used to compose an image. These guides are listed below:
The Golden Spiral guide will increase your odds of getting captivating results in your photographs. As opposed to Rule of Thirds, the Golden Spiral forms a fluid line for the eye to trace through the image. This style of composition will invite the viewer’s gaze into the image along the line of the spiral, creating a more symmetrical visual flow, and an overall compelling viewing experience. See below an image composition example using golden spiral.
One more rule is a Golden Spiral Sections (or Golden Rectangles). These rectangles are used to build the Golden Spiral. There should be something leading the eye to the center of the composition. It could be a line or several subjects. This “something” could just be there without leading the eyes, but it would make its job.
The Golden Triangles is a derivative of the Golden Spiral discussed above. Its vertices are the midpoints of the sides of the Golden Rectangle. Note that unlike Harmonious Triangles, Golden Triangles aren’t equiangular triangles. Placing diagonals along these lines can make an otherwise static subject appear more dynamic. When you use Golden Triangles to break up your frame, you’re creating an effect professional photographic experts call Dynamic Symmetry. Try to keep your focal subject on one of the intersecting points, and place other visual information into the triangles you’ve already divided out. The result will be a very attractive composition you may not have otherwise attained.
Like the Rule of Thirds the Golden Sections affects the ratio of an image size as well as the placement of the main subjects on the photo. This ratio is close to the 35mm ratio, so you don’t need to change the size of the photo in most cases. But you need to consider the composition: the main subject should lie on one of the four lines or four intersections (subject’s eye for example). Truthfully speaking, these rules are not the same. Rule of Thirds is a simplified version of the Golden Mean.
The Flip Horizontal and Flip Vertical options can be used to apply flip transformation to the harmonious divisions.
The Color button lets you set the guidelines color. If you have an high color contrast image, the guidelines may become invisible. By the way, you can adapt the color guide to the current image.
Rotating or Flipping
If the photograph shows a wrong orientation you can Flip or Rotate it to the orientation you would like by using Transform Flip/Rotate tools available in menus.
With flipping options, you can flip or turn over the image horizontally or vertically like a card deck. With the rotating options, you can rotate the image in 90 degrees steps clockwise. It can be used to change the display mode to Portrait or Landscape. Be aware that this rotation is not lossless when using JPEG format. You also can rotate more accurately to a finer degree by using the Free Rotation tool. You can access it from the menu entry. See the dedicated Free Rotation section below for more information.
Free Rotation
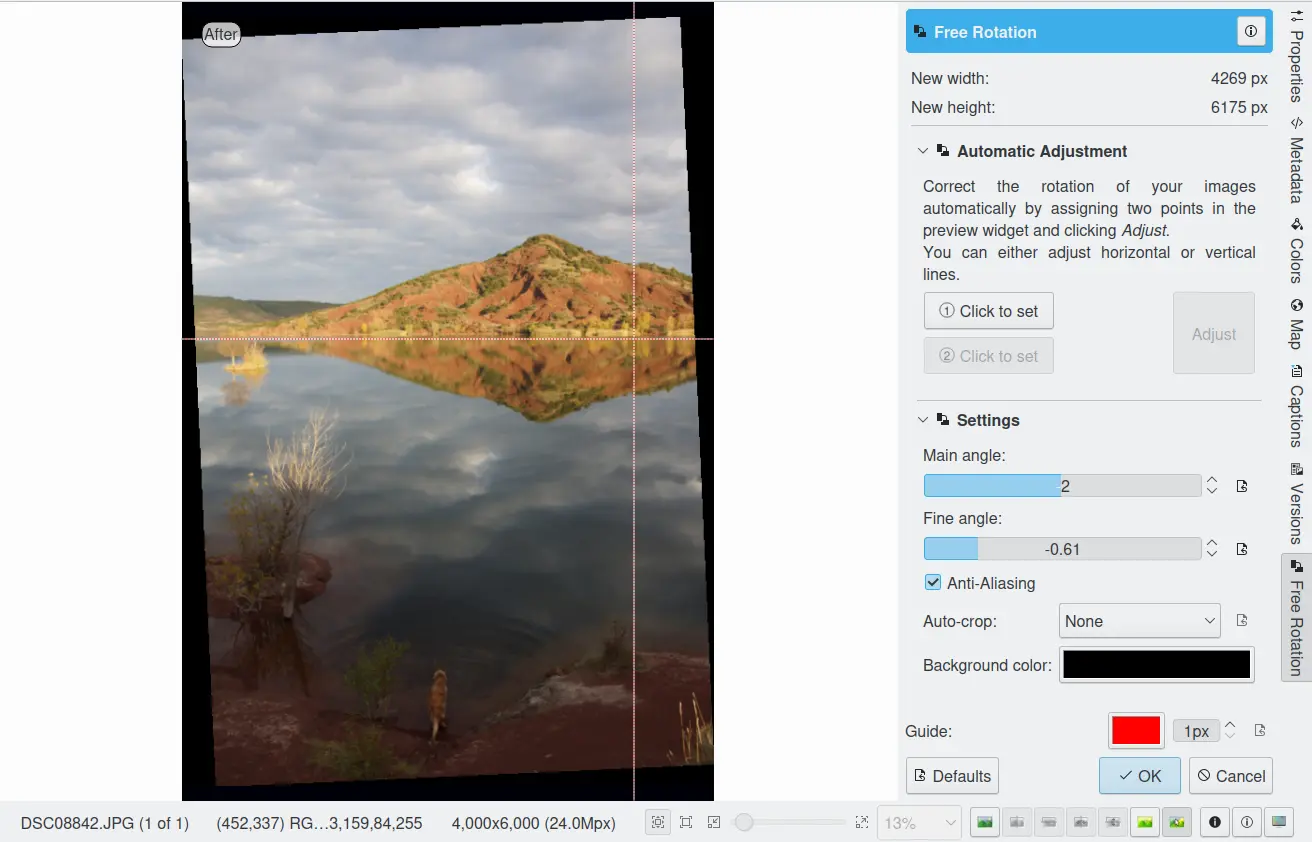
The digiKam Free Rotation tool can rotate an image by any arbitrary angle.
It is all too easy to hold the camera a little rotated from the horizontal when taking an image. This produces an image where everything is tilted at an angle. The Free Rotation tool can fix this. From within the digiKam Image Editor, select .
Rotate your image by using the Angle slider (value in degrees). Press Reset Values to reset the slider to zero. The preview area shows the effect of the rotation. The new target image dimensions in pixels are shown.
For better orientation, the Free Rotation tool provides a vertical and horizontal guide. Move the mouse cursor over the image preview to display the dashed line guide. Move the cursor to any vertical or horizontal feature in the image like the sea or a building edge and press the left mouse button to freeze the position of the dashed lines. Now, adjust the angle to match the guide.
Warning
After rotating the image, you often find that things are better but not quite perfect. One solution is to rotate a bit more, but there is a disadvantage to that approach. Each time you rotate an image, because the rotated pixels don’t line up precisely with the original pixels, the image inevitably gets blurred a little bit. For a single rotation, the amount of blurring is quite small, but two rotations cause twice as much blurring as one, and there is no reason to blur things more than you have to. So use the guide tool available in the Free Rotation preview to help you to get the correct rotation angle before applying the rotation.
The digiKam Image Editor Free Rotation Tool
After you have rotated an image, there will be unpleasant triangular holes at the corners. One way to fix them is to crop the image with Image Editor menu.
A more elegant way to crop the rotated image is to use the Auto-Crop function. Choose any one of the following options from the combo-box based on your preference:
Widest area: This option crops the rotated image to the widest possible (width) rectangular section.
Largest area: This option crops the rotated image to the biggest surface.
Hold the mouse over the combo-box and scroll with the wheel between the two possibilities.
The Anti-aliasing checkbox will smooth the image a bit after rotation. Please read the warning above.
Perspective Adjustment
The digiKam Perspective Adjustment tool geometrically remaps an image to adjust the image’s perspective.
With this tool you can work on the perspective in a photograph. This is very useful when working with photographs that contain keystone distortion. Keystone distortion occurs when an object is photographed from an angle rather than from a straight-on view. For example, if you take an image of a tall building from ground level, the edges of the building appear to meet each other at the far end. On the other hand, you can use this tool to introduce a new perspective that is not a face-on view but gives the image a creative spin.
All perspective transformations are performed around a fixed point called the reference point. This point is at the center of the item you are transforming and is displayed by a red circle.
To change the perspective, drag the square areas in the corners of the image. The perspective preview is rendered automatically. On the right of the dialog you’ll find a set of information which should help you control the perspective change:
New Width: is the new image width in pixels including the empty area around the image resulting from the geometrical transformation.
New Height: is the new image height in pixels including the empty area around the image resulting from the geometrical transformation.
Top Left Angle: is the current angle in degrees at the top left corner of the perspective area.
Top Right Angle: is the current angle in degrees at the top right corner of the perspective area.
Bottom Left Angle: is the current angle in degrees at the bottom left corner of the perspective area.
Bottom Right Angle: is the current angle in degrees at the bottom right corner of the perspective area.
Warning
After applying the perspective adjustment, the image inevitably gets blurred a little bit. For a single adjustment, the amount of blurring is quite small, but two adjustments cause twice as much blurring as one, and there is no reason to blur things more than you have to.
After you have adjusted the perspective of an image there will be unpleasant triangular holes at the corners. One way to fix them is to crop the image with Image Editor menu.
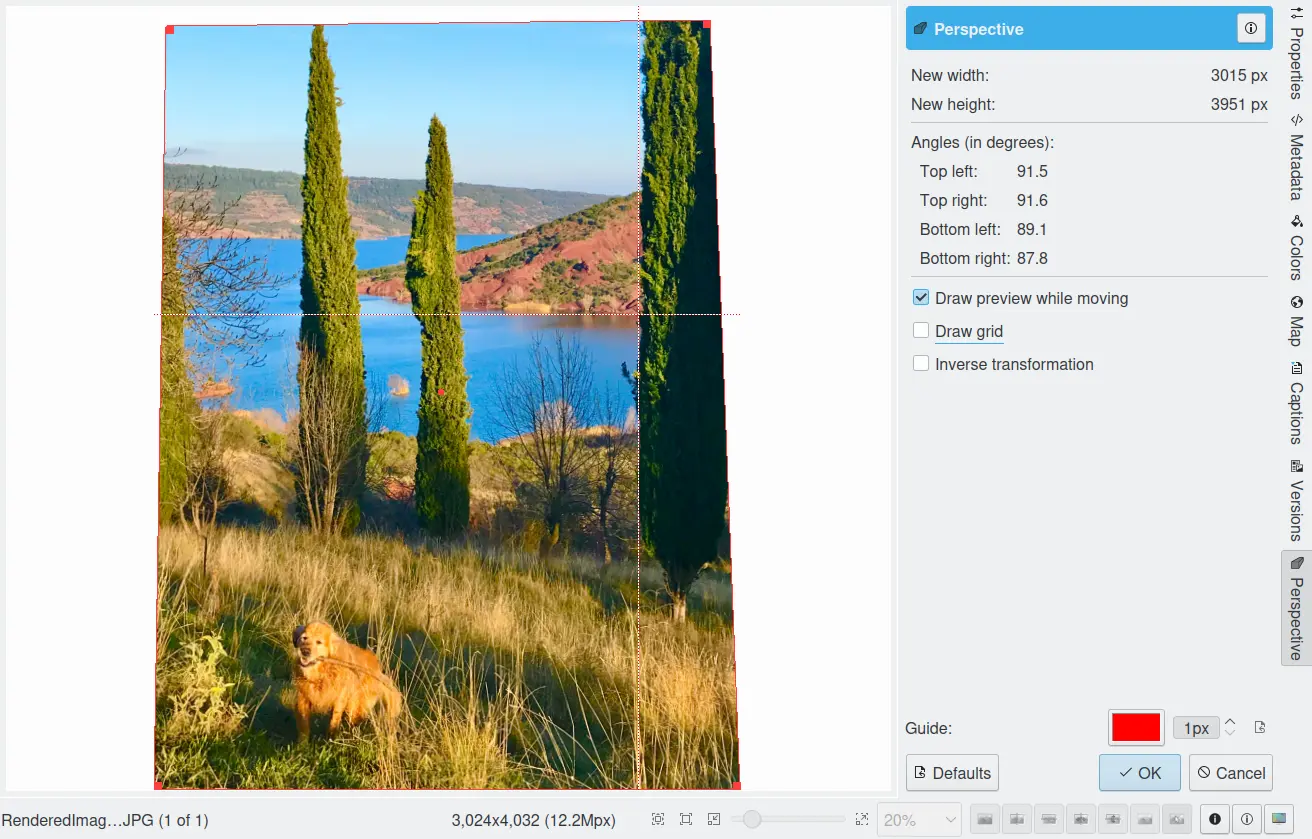
The digiKam Image Editor Perspective Tool
Shear
The digiKam Shear tool is used to shear an image horizontally or vertically.
The Shear tool is used to shift one side of an image in one direction and the opposite side in the opposite direction. For instance, a horizontal shearing will shift the upper part to the right and the lower part to the left. This is not a rotation: the image is distorted. In other words, it will turn a rectangle into a parallelogram. This tool is available from or the Image Editor right sidebar tool view.
Shear your image by using the Horizontal Angle and Vertical Angle sliders (values in degrees). You can shear horizontally, or vertically, or both at the same time. Click on the Reset Values to reset. A shearing effect preview is shown on the center of dialog window. The new target image dimensions in pixels are displayed at the right side of dialog.
To assist you in alignment, the tool provides a vertical and horizontal guide. Move the mouse cursor over the image preview to display the dashed lines guide. Move the cursor to an important place in the image like the sea or a building edge and press the left mouse button to freeze the position of the dashed lines. Now, adjust the shear angles according to the guide.
Warning
After applying a shearing adjustment, the image inevitably gets blurred a little bit. For a single shearing, the amount of blurring is quite small, but two shears cause twice as much blurring as one, and there is no reason to blur things more than you have to.
After you have sheared an image, there will be unpleasant triangular “holes” at the corners. One way to fix them is to crop the image with Image Editor menu.
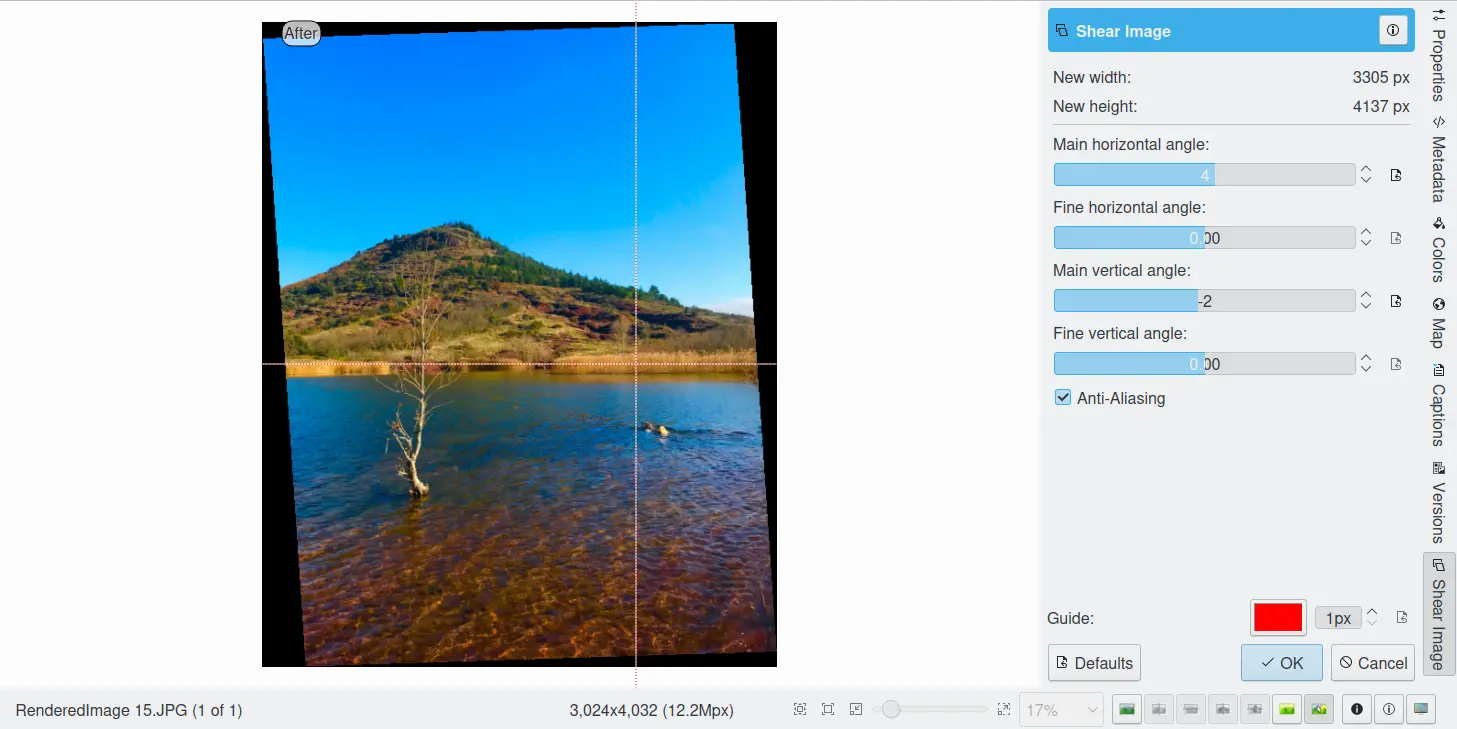
The digiKam Image Editor Shear Tool
Resize
The Resize tool is definitely one of the most advanced tools to increase a photograph’s size with minimal loss in image quality.
Rescaling an image to make it smaller is easy. The big question is: how can you blow up an image and keep the details sharp? How can one zoom in when the resolution boundary has been reached? How can one reinvent or guess the missing information to fill in the necessarily coarse image after upsizing? Well, the algorithm we use here does an excellent job. Try it out and see for yourself.
Resizing a Photograph
If the photograph has the wrong size, you can scale it to the size you would like by using the Resize tool. Select and adjust the target values. The Resize tool dialog is shown below.

The digiKam Image Editor Resize Tool
This image resizing tool uses a standard linear interpolation method to approximate pixels.
Increasing Image Size
Many image editing programs use some kind of interpolation e.g. spline interpolation to scale-up an image. digiKam uses a more sophisticated approach.
You have to tell the tool about the resizing you want to do. These settings are available in New Size tab and are listed below:
Maintain Aspect Ratio: if this option is enabled, setting the new image size will preserve the aspect ratio of the original image.
Width: the new image width to use for blowing up.
Height: the new image height to use for blowing up.
If you want to set filter parameters for finer adjustments, use Smoothing Settings and Advanced Settings tabs:
Photograph Resize Smoothing Settings:
Detail Preservation [0, 1]: this controls the preservation of features in the image. A low value forces an equal smoothing across the image, whereas bigger values preferably smooth the homogeneous regions, leaving sharper details. A value of 0.9 does a good job of preserving details so that no sharpening is required afterwards. Note that Detail Preservation must be always inferior to Anisotropy.
Anisotropy alpha [0, 1]: a low value smooths equally in all directions, whereas a value close to 1 smooths in one direction only. If you have film grain or CCD kind of noise a high value will result in wave-like pattern, whereas JPEG artifacts are suited for values close to 1.
Smoothing [0, 500]: this sets the maximum overall smoothing factor, while Detail Preservation defines the relative smoothing. Set this value based on the noise levels in the image.
Regularity [0, 100]: this parameter is concerned with the uniformity of the smoothing. Imagine the smoothing process as a combing of the image. Then the Regularity would correspond to the size of the comb. The bigger this value, the more even the overall smoothing will be. This term is required when there is a lot of noise in the image, making it difficult to estimate the local features in the scene.
Filter Iterations: number of times the blurring algorithm is applied. Usually 1 or 2 is sufficient.
Photograph Resize Advanced Settings:
Angular Step [5, 90]: angular integration of the anisotropy alpha. If alpha is chosen small, the Angular Step should also be chosen small. But beware that small angles result in long runs! So choose a value as large as you can accept.
Integral Step [0.1, 10]: spatial integration step width in terms of pixels. Should remain less than 1 (sub-pixel smoothing) and never be higher than 2.
Use Linear Interpolation: The gain in quality if you select this option is only marginal and you lose a factor of 2 in speed. Our recommendation is to leave it off.
Save As and Load buttons are used to do just that. Any Resize settings that you have set can be saved to a text file and reloaded later.
Warning
Resize Photograph is very fast given what it is doing, but it can take a long time to run and cause high CPU load. You may always abort computation by pressing Cancel button during rendering.
Liquid Rescale
The digiKam Liquid Rescale tool uses the Seam Carving method to non-uniformly resize pictures while preserving their important features. The tool can intelligently decrease the width (or height) of an image by deleting vertically or horizontally oriented seams of pixels that do not contain important features. Think of the seams as wiggly columns or rows that snake through the image avoiding important features. The tool can also use the same approach to increase the size of an image by inserting seams. The tool supports manual selection of masks to identify features to be deleted or retained, to supplement its automatic seam evaluation capability.
The best way to understand how this tool is used is to follow along as the tool as applied to the sample image in the figure below.
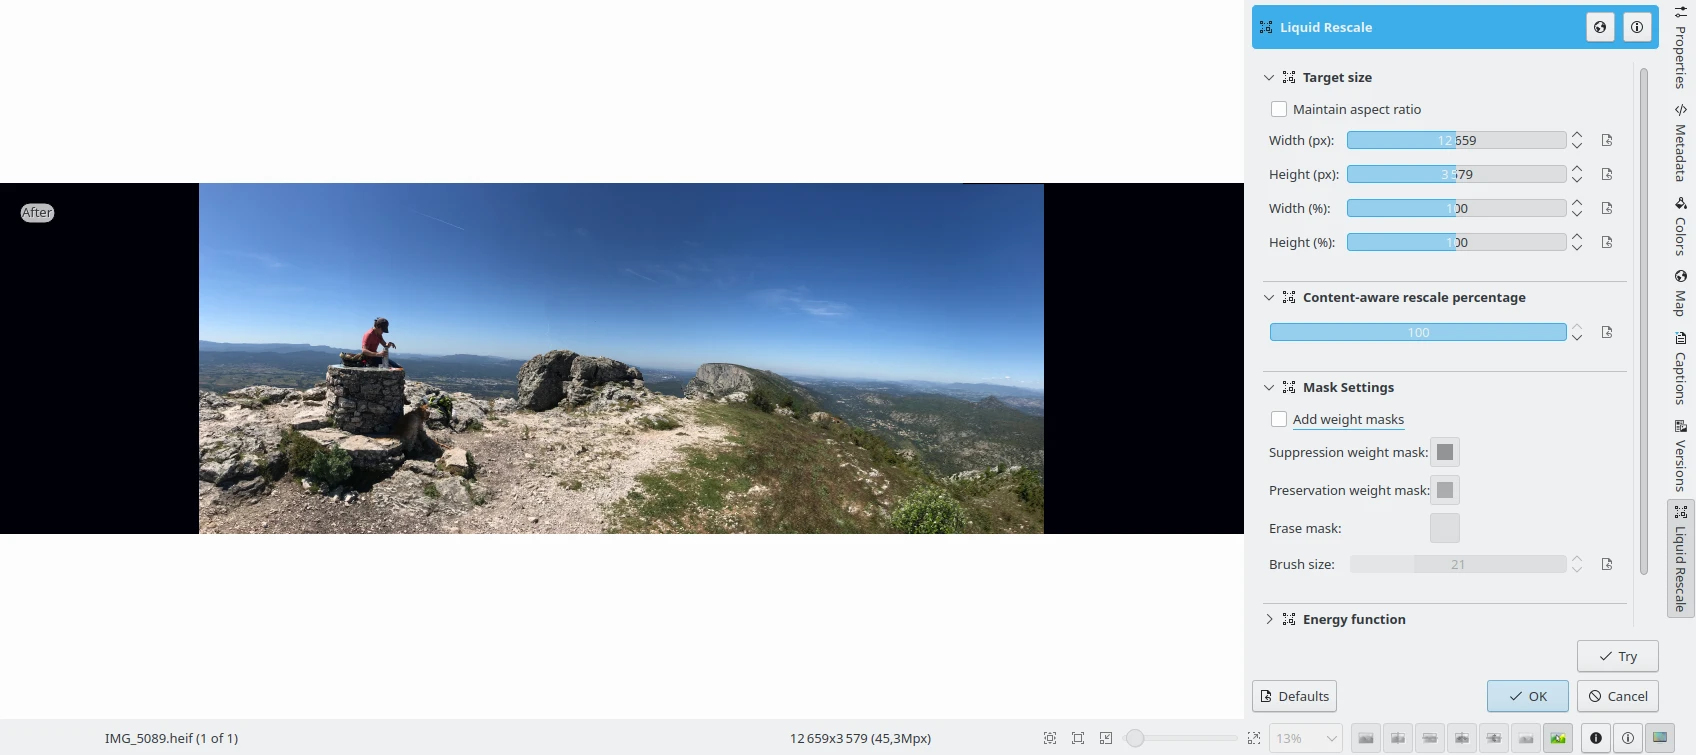
Step 1: A Sample Image Before Resizing Using Liquid Rescale Tool
Target Size
After starting the Liquid Rescale tool, a series of parameters have to be set. The first set of parameters specifies the desired size of the final image.
The digiKam Liquid Rescale Tool Size Settings
It is advisable to always rescale in one direction at a time. If both the width and the height are changed, rescaling is performed by default on the width first, then on the height. You can also Preserve aspect ratio from the original image. Dimensions can be set in pixels (px) or in percents.
Rescale Percentage
The next set of parameters sets the desired content-aware rescaling percentage.

The digiKam Liquid Rescale Tool Percentage Settings
This option sets the maximum enlargement which will be performed in a single rescale step. When the final size is greater than this, the tool will automatically stop and restart the rescaling as many times as needed. You might need to reduce this value if you have large preservation masks. Note that in this case, the same areas will be affected over and over by the rescaling.
The Feature Masks
The digiKam Liquid Rescale Tool Mask Settings
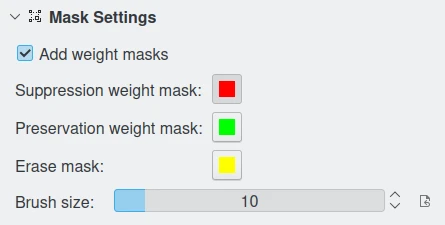
Feature masks are the easiest way to manually select the features of the image that you want to protect or discard. Turn on the Add weight masks option to switch into mask edit mode.
To discard a portion of the image, press the Suppression weight mask button and paint the red mask over the canvas. The mask is a virtual transparent layer using Red color, with 50% opacity to indicate the area to discard.
To protect a portion of the image, press the Preservation weight mask button and paint the green mask over the canvas. The mask is a virtual transparent layer using Green color, with 50% opacity to indicate the area to protect.
You can change the Brush size to paint masks on the canvas. To change mask regions, use the Erase mask button to erase desired portions of masks from the canvas.
Note
Object removal is only possible when shrinking an image. By default, feature discard masks are ignored when enlarging, because in that case the masked areas would be inflated rather then removed. If you actually want to get this effect, you need to unset the corresponding option in the Advanced Settings tab.
Preservation of features is not possible if enlarging too much. The inflation process is the exact reverse of the shrinking process, so the maximum amount of pixels you can add to a layer corresponds to the amount of pixels that are not protected. For example, if you have a 1000 pixel wide image and you have marked a 800 pixel wide area for protection, the final width should be less than 1200.
The sample image below illustrates where masks have been applied to preserve important areas in green and remove unwanted areas in red. The image width will be reduced by 40% and the height will be unchanged.
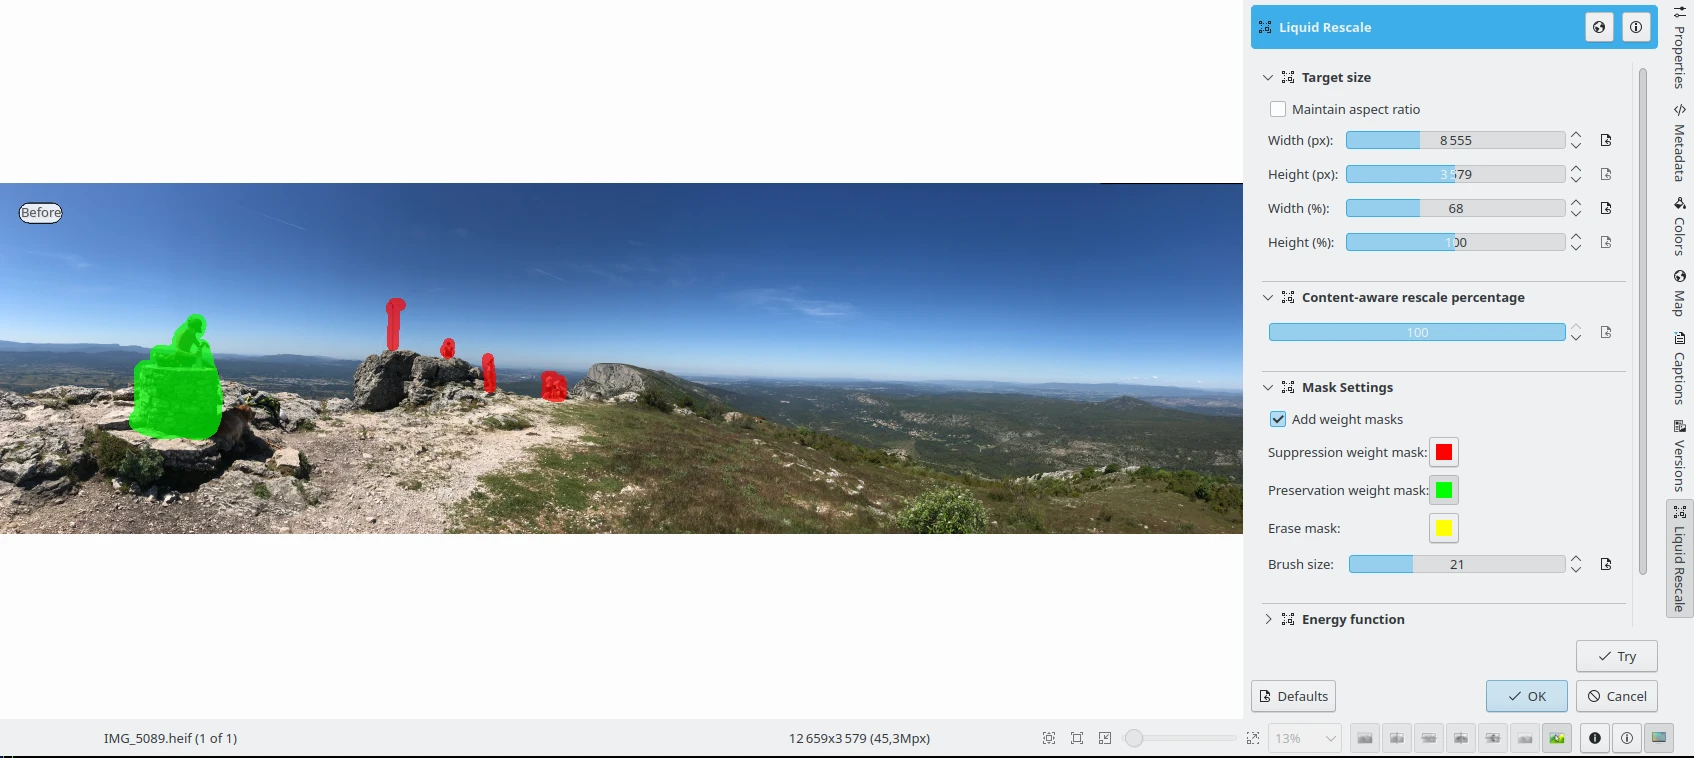
Step 2: Liquid Rescale Preservation and Suppression Masks Applied Over the Sample Image Before Width Resizing Down
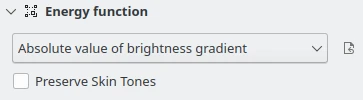
Energy Function
These options are used to the gradient function applied while rescaling. The gradient function is used to determine which pixels should be removed or kept.
The digiKam Liquid Rescale Energy Function Settings
Possible values are listed below:
Norm of brightness gradient: norm of the brightness gradient.
Sum of absolute values of brightness gradients: sum of absolute values of the brightness gradients in both directions.
Absolute value of brightness gradient: absolute value of the brightness gradient in the direction of the rescaling (this is the default).
Norm of luma gradient: norm of the luma gradient.
Sum of absolute values of luma gradients: sum of absolute values of the luma gradients in both directions.
Absolute value of luma gradient: absolute value of the luma gradient in the direction of the rescaling.
The Preserve Skin Tones option allows you to preserve pixels whose color is close to a skin tone.
Advanced Settings
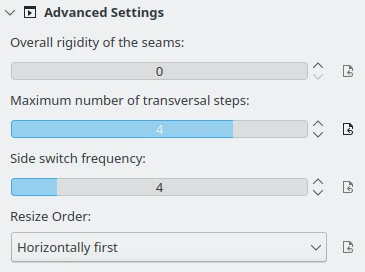
The digiKam Liquid Rescale Advanced Settings
In this section, you can tune some advanced values to tweak the tool.
Overall rigidity of the seams: Use this value to give a negative bias to the seams that are not straight. May be useful to prevent distortions in some situations, or to avoid artifacts from pixel skipping (it is better to use low values in such case). This setting applies to the whole selected layer if no rigidity mask is used.
Note
The bias is proportional to the difference in the transversal coordinate between each two successive points, elevated to the power of 1.5, and summed up for the whole seam.
Maximum number of transversal steps: This option lets you choose the maximum transversal step that the pixels in the seams can take. In the standard algorithm, corresponding to the default value of step = 1, each pixel in a seam can be shifted by at most one pixel with respect to its neighbors. This implies that the seams can form an angle of at most 45 degrees with respect to their base line. Increasing the step value lets you overcome this limit, but may lead to the introduction of artifacts. In order to balance the situation, you can use the rigidity setting.
Side switch frequency: During the carving process, at each step the optimal seam to be carved is chosen based on the relevance value for each pixel. However, in the case where two seams are equivalent (which may happen, for instance, when large portions of the image have the same color), the algorithm always chooses the seams from one side. In some cases, this can pose problems, e.g. an object centered in the original image might not be centered in the resulting image. In order to overcome this effect, this setting allows the favored side to be switched automatically during rescaling, at the cost of slightly worse performance.
Resize Order: Here you can set whether to resize horizontally first or vertically first.
More Details About the Seam Carving Technique
The tool works by finding so-called seams over an image, i.e. continuous, zig-zagged lines transversing the image from top to bottom (vertical seams), or from left to right (horizontal seams). When one such seam, say a vertical one, is removed from an image (the carving operation), the width of the image is reduced by one pixel. Removing horizontal seams reduces the height. Iterating such operations (find a seam and remove it), one can reduce the image size at will. Collecting together all the seams which were carved from an image, in their respective order, constitutes what is called a seams map.
Mirroring the carving process, by inserting additional seams besides the ones which are found by the algorithm, instead of removing them, image enlargement can be obtained, too. The meaning of the seam map is reversed in this case.
In order to get good results from this technique, the main issue is finding which are the most suitable seams to carve or to insert. If the aim is simply to change the proportions of the image without too much effect on the content, good seams will be those that don’t cross important features of the image, and instead pass through a background landscape.
By default, the tool tries to find the seams which cross the lowest-contrast areas (how this happens exactly is specified by the energy function settings). Therefore, each pixel in the image is assigned a so-called energy value. Higher contrast means higher energy, and seams are less likely to cross high-energy areas.
Since in many cases this simple contrast-based method is not optimal, the energy function can be biased by the user, who can decide that some areas should have a higher energy (using a preservation masks) or, on the contrary, that they should have a lower energy (using a suppression mask), and therefore effectively drive the seams and the whole process.
See the sample image below after it has been resized, reducing its width by 40%. The image height is still the same. Notice the preserved areas were not deformed by the operation, but the unwanted areas have magically disappeared.

Step 3: The Sample Image Width Finally Reduced With Liquid Rescale Masks Applied