Tags View
Tags, also known as keywords in some applications, are an essential feature in digiKam. They are used to organize, categorize, and facilitate the retrieval of digital assets. Here are some key uses of tags:
Organization: Tags help in structuring and organizing large collections of digital assets by assigning labels to each asset. This enables users to group related assets together and maintain a logical arrangement.
Searchability: By tagging assets with relevant keywords, users can easily search and find specific assets. Tags enhance the search functionality, making it quicker and more efficient to locate files based on their content, theme, or other attributes.
Categorization: Tags allow users to categorize assets into different groups or categories based on specific criteria. This is particularly useful for managing diverse collections of assets, such as images, videos, documents, and more.
Metadata Enhancement: Tags contribute to enriching the metadata associated with each asset. This additional information can include descriptions, keywords, and other relevant details, providing more context and making the assets more informative.
Workflow Automation: Tags can be used to automate workflows within digiKam. For example, assets tagged with a certain label can be used in various tools like facial recognition and image quality scanning.
Collaboration: Tags facilitate collaboration by allowing team members to easily share and access tagged assets. This ensures that everyone involved in a project can quickly find the necessary resources.
Version Control: Tags can help in managing different versions of an asset by labeling them with version numbers or other identifying information. This makes it easier to track changes and maintain the integrity of the asset.
Overall, tags are a powerful tool in digiKam that enhance organization, improve searchability, and streamline workflows, making it easier to manage and access digital assets efficiently.
By arranging tags in a hierarchical tree, you can maintain a logical and systematic structure. The ability to collapse sections of the tree in the Tags list further enhances navigation, making it easier to locate the desired tags.
Utilizing the power of hierarchical tagging can greatly improve the organization and accessibility of your photo collection, ensuring you can quickly and easily find the images you need.
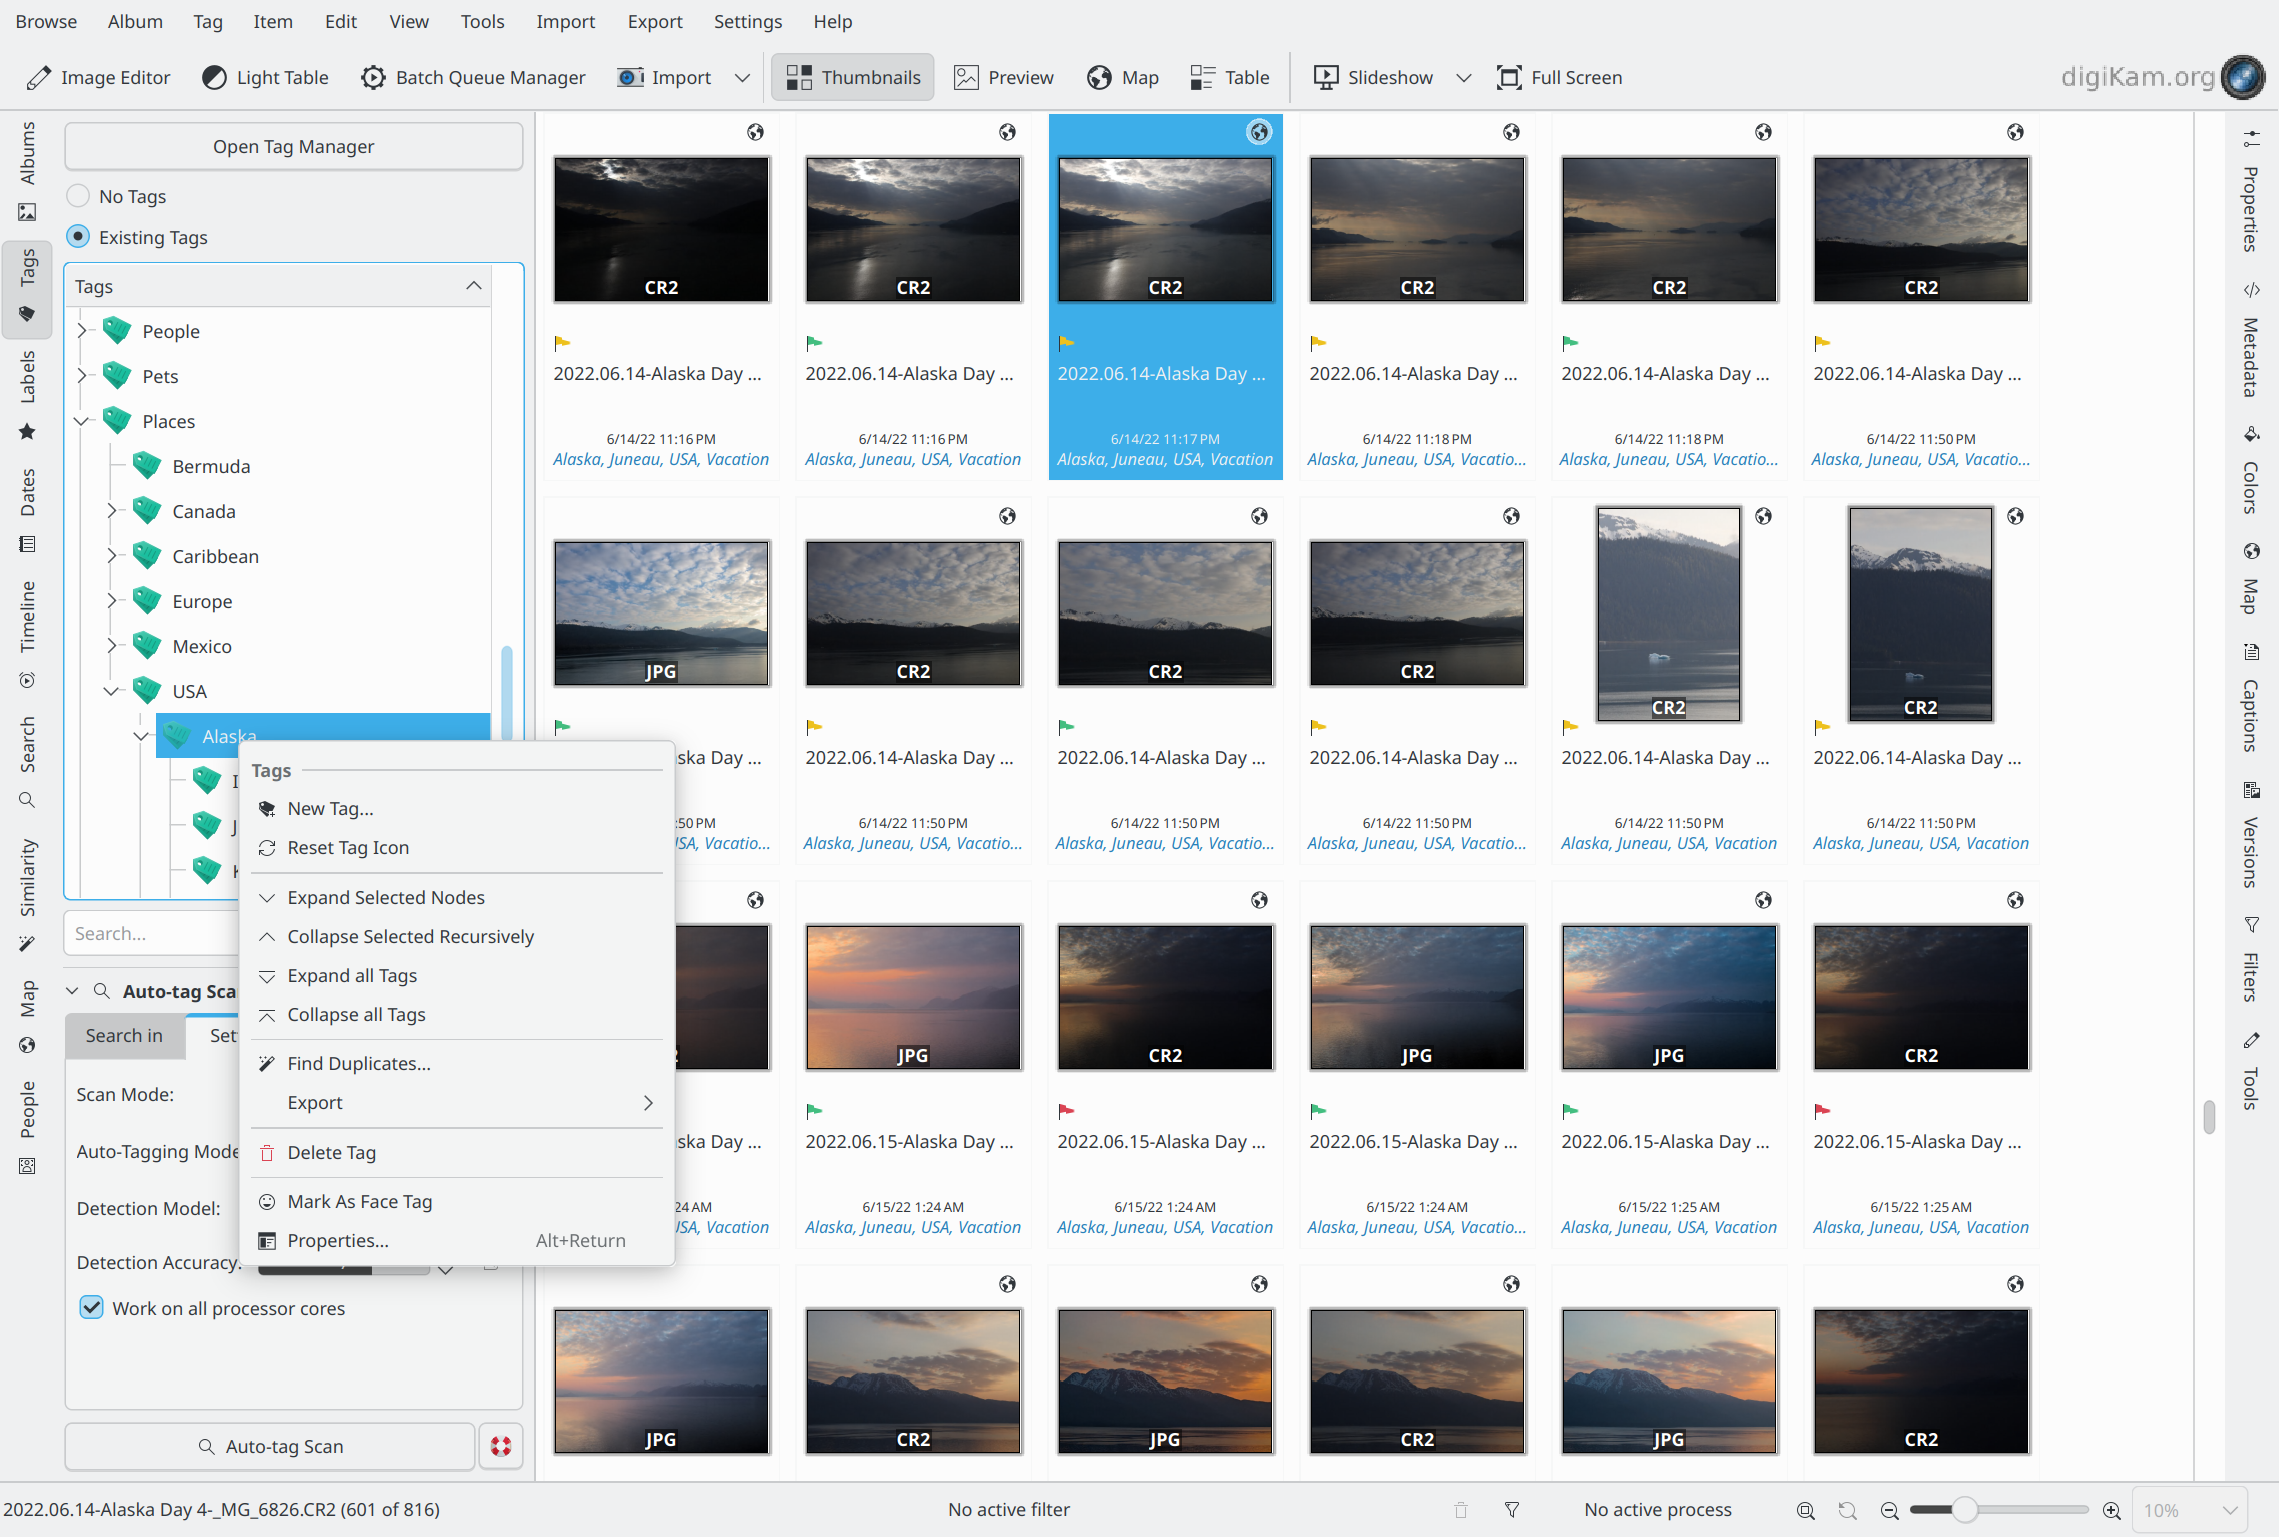
The digiKam Nested Tag Tree-View
When a tag is selected in the Left Sidebar, all of the images that are marked with that tag are displayed in the View Area.
But before assigning and using tags, you first have to define them. If you import photographs that already have assigned tags, digiKam will build an appropriate tag tree during import. Alternatively, you can use digiKam’s auto-tags feature to find objects in your images and create tags. The context menu shown in the screenshot above provides an easy approach to managing tags.
Managing Tags
You can add new tags by clicking with the right mouse button on either the Tags label or an existing tag and selecting New Tag…. A dialog will open where you can type in the tag name (or even a whole hierarchy branch), and assign an icon and/or a shortcut to the tag. If you add a new tag by clicking with the right mouse button on an existing tag, your new tag will be created as a sub-tag.
You can delete a tag by clicking with the right mouse button on the tag you want to delete and selecting Delete Tag. When you delete a tag, the photographs themselves are not deleted. The tag is simply removed from those photographs.
You can move the position of a tag within the tree by dragging and dropping it into the desired position. A menu will appear giving you the option to Move the tag. This works in both the left and right sidebars. A tag can only be in one place in the tree at a time.
You can set the Tag Properties by clicking with the right mouse button on a tag and selecting Properties…. The Tag Properties allow you to change the name of the tag, the icon used in the Tag tree and the shortcut.
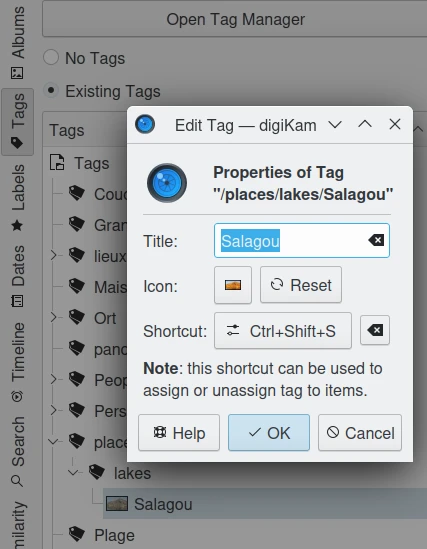
The digiKam Tags Properties Dialog
To select a photograph as the tag icon, click with the right mouse button on the photograph that you want to use as the tag icon and select Set as Tag Thumbnail from the context menu. You can also use drag and drop to set the tag icon. Drag the image icon and drop it onto the currently selected tag in the tag list.
A tool for more elaborate work on a big tag tree is the Tag Manager which you can access by clicking the Open Tag Manager button at the top of the Tag tree.
The Digital Asset Management (DAM) chapter of this manual provides some useful information about how to build your Tag tree.
It is not always easy to build a logical hierarchy from general and generic categories. You might run into a problem like this:
Animal
Domestic Animal
Cat
Cattle
Dog
Wild Animal
Bird
Cat
Cheetah
Lion
Tiger
Zoo Animal
Bird
Cat
Cheetah
Leopard
In this tag tree the keyword Cat appears three times. This will not cause a problem within digiKam, but there are quite a few views where the user cannot know which of the three is applied to an image because they might not be able to see the whole tag hierarchy. In a case like this, also tagging the image with the parent tag or even the whole hierarchy often becomes quite unwieldy, particularly in the display of image tags within the image icon. The second Cat could be avoided by calling it Wild Cat, but calling the third one Zoo Cat seems a bit excessive, I think. And there would still be two Cheetah!
A more viable solution would be to replace the Zoo Animal branch by a single tag Zoo which you use in addition to the tag(s) you choose from the two remaining branches. You could even put it on the top level of your hierarchy, if you have photographs taken in a zoo but not showing animals. So a better tag tree could be:
Animal
Bird
Cat
Cheetah
Leopard
Lion
Tiger
Cattle
Dog
Domestic
Wild
Zoo
Tag Manager
While digiKam allows you to manage tags from the context menu accessible from the tags views in the digiKam sidebars, the Tag Manager offers an easier and more comprehensive way to organize your tags. For general information about tags, including why and how to use them, see the beginning pages of this section.
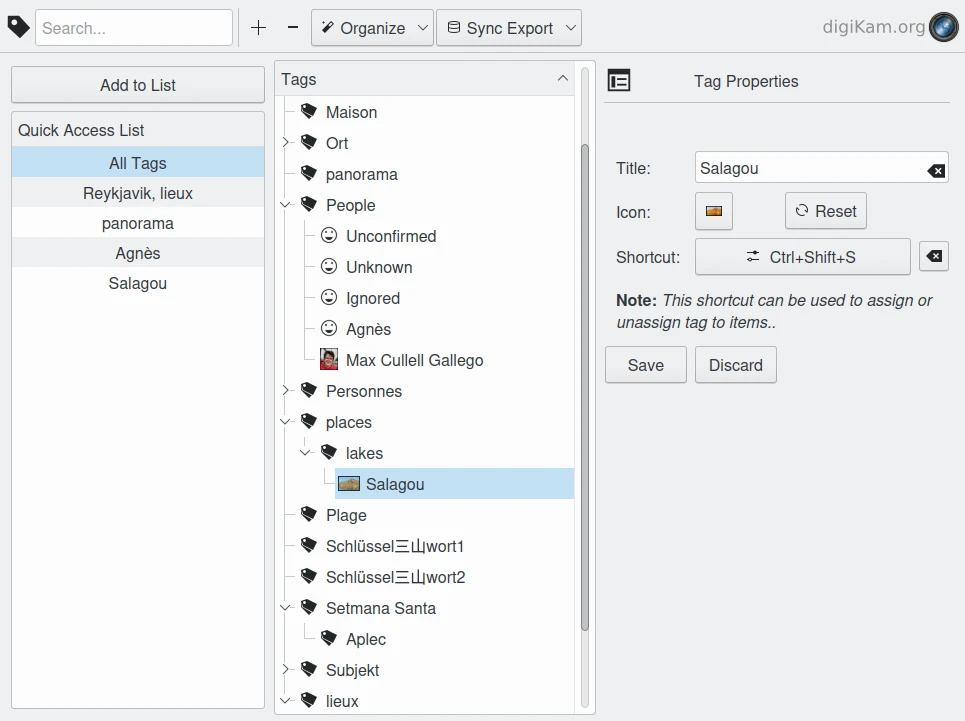
The digiKam Tag Manager Window
The toolbar at the top of the Tag Manager offers:
An adaptive search field to find selected tags in a big tree.
A button to add a tag as a sub-tag to the current (last clicked) tag.
A button to delete a tag or a selection of tags.
The drop down menu Organize which contains:
Edit Tag Title F2 to modify a tag name.
Reset Tag Icon to reset the standard tag icon.
Create Tag from Address Book to import address book items as new tags.
Mark Unassigned Tags to mark all tags that are unassigned.
Invert Selection, which is useful if you want to select most but not all of your tags.
Expand Selected Nodes to expand only the selected nodes from the tag tree.
Expand Tag Tree to expand all of the nodes of the tag tree.
Collapse Tag Tree to collapse all of the nodes of the tag tree.
Remove Tag from Images to remove selected tag(s) from all images.
And the drop down menu Sync Export which contains:
Write Tags from Database to Image to set image metadata with tags from the database.
Read Tags from Image to set tags in the database from the image metadata.
Wipe all Tags from Database only.
Export tags to a file from selected tag and Import tags from a file to selected tag allows to import or export tag hierarchies to and from text files, supporting the Controlled Vocabulary Keyword Catalogue format. This functionality simplifies the management and sharing of complex tag structures across different platforms, programs, and workflows.
The Tag Manager window consists of three parts, the Quick Access List to the left, the Tags tree (or parts of it) in the middle and the Tag Properties to the right that shows the properties for the selected tag.
The Quick Access List allows you to display only a certain node (and its sub-nodes) in the tag tree window. Select a tag in the tag tree and click on Add to List button. The tag will appear in the Quick Access List. If you select the tag there, the tag tree will show only the selected node which can still be expanded to see the sub-nodes. Note that the entering text into the search field will also limit the tag tree to only display those tags that contain the string in the search field.
The Tag Properties dialog allows you to change the name of the tag, the icon used in the Tag tree and the shortcut.
Tagging Photographs
Before you can get the most out of digiKam’s tagging capabilities, you must first tag your photographs. There are a few methods for that task. Once you have identified the photographs that you want to tag you can either drag and drop them onto the tag in the Tag tree or, by clicking with the right mouse button on the selected photographs in the Image Window, you can use the Assign Tag menu to select the tags you wish to set.
Drag and Drop works with any visible tags and photographs in both sidebars. With the Right Sidebar it works the obvious way: you drag the tag and drop it onto the photograph or selection of photographs you want to tag. With the Left Sidebar you have to drag the photographs to the tags. You want to know why? Just try it the other way and you will see.
小技巧
You can also use drag and drop between tabs from same sidebar, for example dragging a icon-view item from Albums to the Tags view. To switch from one tab to another one, just move the mouse over the tab title for a few seconds while dragging, the new view will be enabled and the dragging operation can continue.
Shortcuts: as mentioned earlier in this chapter you can assign keyboard shortcuts to the Tag Properties. Such shortcuts could then be used to assign or un-assign a tag to the selected photograph(s).
Context menu: by clicking with the right mouse button on the selected photographs and choosing Assign Tag you will see a list of the ten most recently used tags, Add New Tag…, described at the beginning of the previous section, and More Tags… which displays the Tags tab of the Captions view in the Right Sidebar. This is described in more detail in the paragraphs below and in this section of the manual. This context menu may be the easiest method to add a limited number of tags to one or more images.
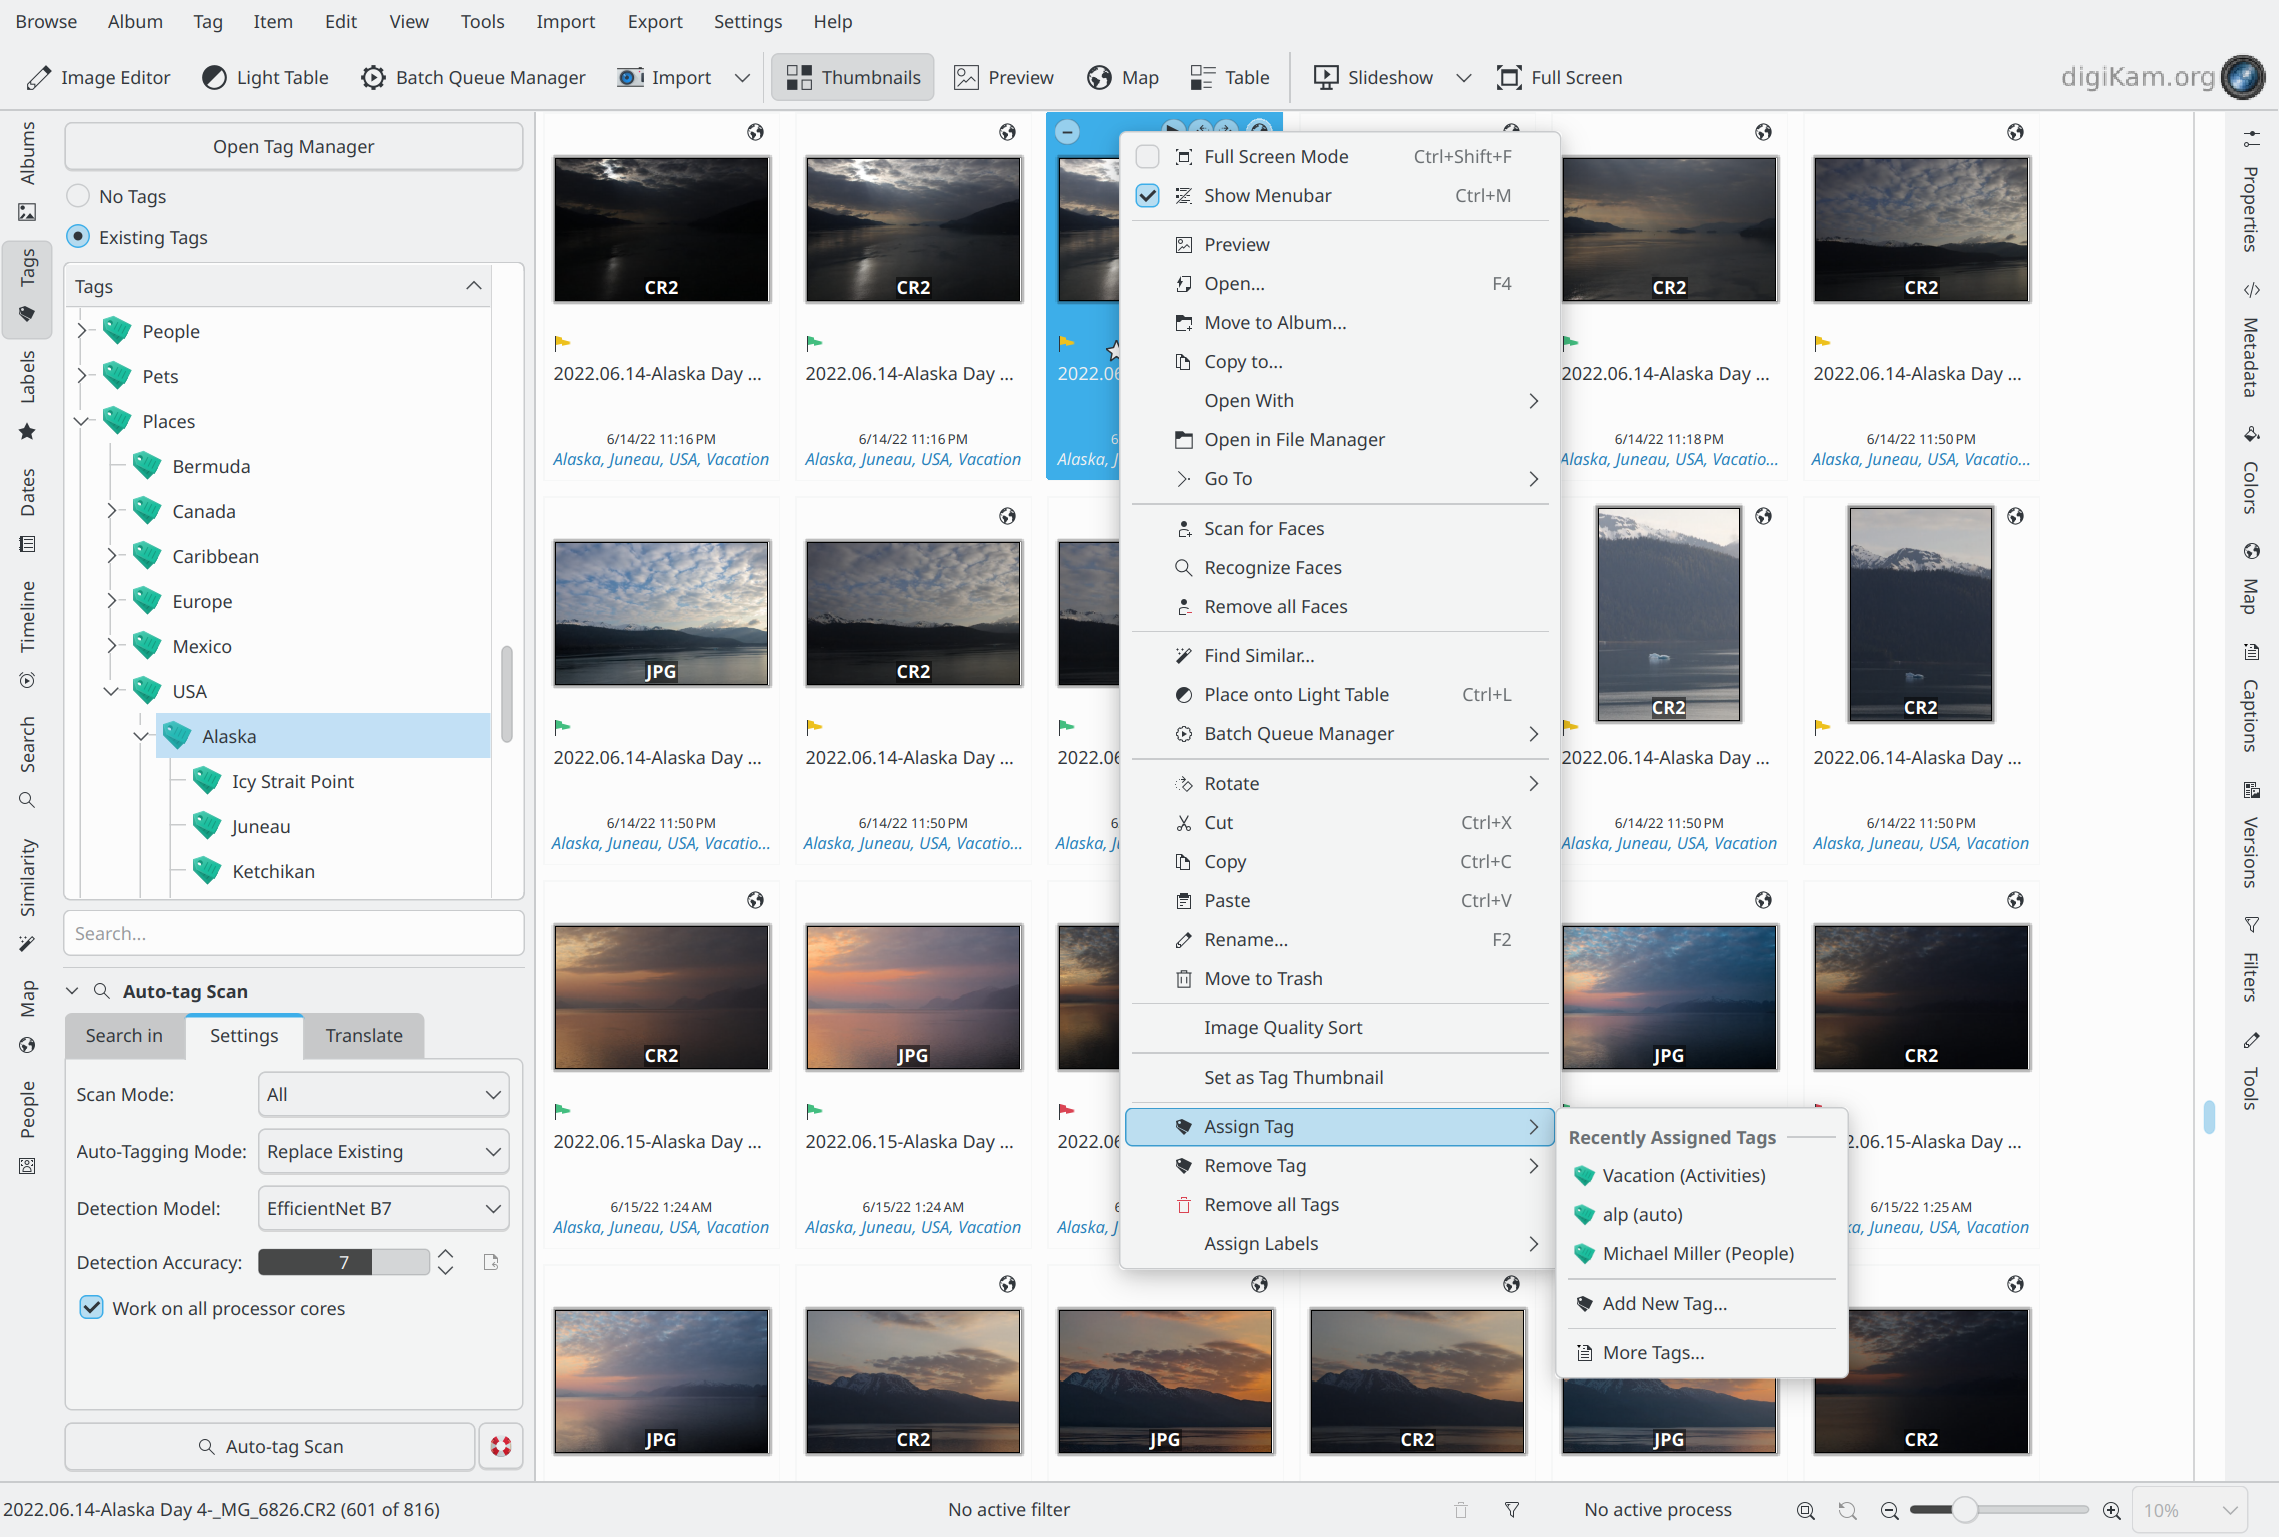
Tagging Image With Context Menu From Icon-View
You can remove a tag from a photograph by clicking with the right mouse button on the photograph and select Remove Tag submenu from the context menu. This submenu will only show those tags that have been set on this photograph.
Many people use the Tags tab of the Captions view in the Right Sidebar as their standard method for assigning tags. Click Captions tab from the Right Sidebar and then the Tags tab from the top of the sidebar to display the whole tag tree. Simply check/un-check the boxes of the tags you want to assign/un-assign and then click Apply. If you change focus without clicking Apply, you will be asked whether you want to apply the changes. This request for confirmation can be disabled either by checking Always apply changes without confirmation or by checking Do not confirm when applying changes in the right sidebar in the Miscellaneous section of . More details about the other buttons and fields in the Tags tab are provided in digiKam sidebar.
You can label a photograph with as many tags as you like. The photograph will appear when you select any of the tags that are applied to it. This way you can set a tag for each person in a photograph, as well as the place the photograph was taken, the event it was taken at, etc.
Once you have tagged a photograph, the tag name will appear under the thumbnail in the Image Area.
小技巧
Tags are stored in a database for fast access, and the applied tags are written into IPTC data fields of the image (at least for JPEG). So you can use your tags with other programs or, in case of loss of that data in the database, the tags will be restored when the image is re-imported into digiKam.
Auto-tagging Images
Auto-tagging in a digiKam is the process of automatically assigning tags to digital assets like photos and videos. Instead of manually tagging each asset with terms and phrases, auto-tagging uses deep-learning neural networks to analyze the content and generate relevant tags, keywords, and descriptions.
This process enriches your digital assets with valuable information, making them easier to organize, search, and manage. It also saves time and resources by automating repetitive metadata creation, reducing human errors, and ensuring consistent metadata across assets.
Auto-tagging can identify objects like dogs, cars, and people (not faces) within digital assets, and it can even recognize and tag content in multiple languages. This enhances the discoverability and usability of your digital assets, allowing you to focus on more strategic tasks.
重要
For auto-tagging to work correctly, digiKam needs to download the deep-learning models from the web. These files can either be downloaded when digiKam is first run (see the Quick Start section for details), or the files can be downloaded by clicking on the Download required binary data button on the page.
The settings view is divided into three tabs: Search-in, Settings, and Translate.
Search-in Tab
The Search-in tab lets you choose which albums and image tags to include in a scan. You can select specific albums or tags for auto-tagging.
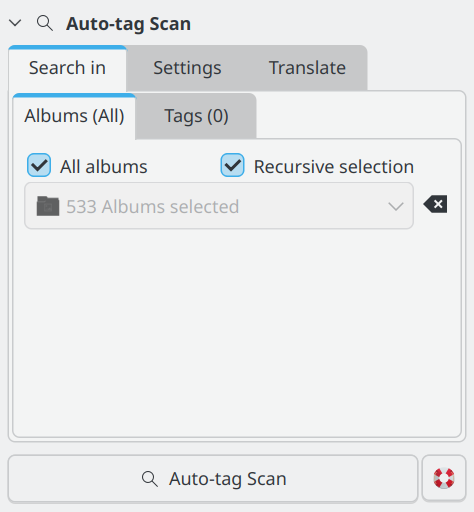
The digiKam Auto-tags Search-in view
Settings Tab
The Settings tab lets you fine-tune the results from scans. Here, you can select the auto-tagging model, adjust tagging behavior, and set the accuracy level. Additionally, you can control the processor load used for auto-tagging detection. The default values have been carefully chosen for normal use after exhaustive testing on multiple datasets.
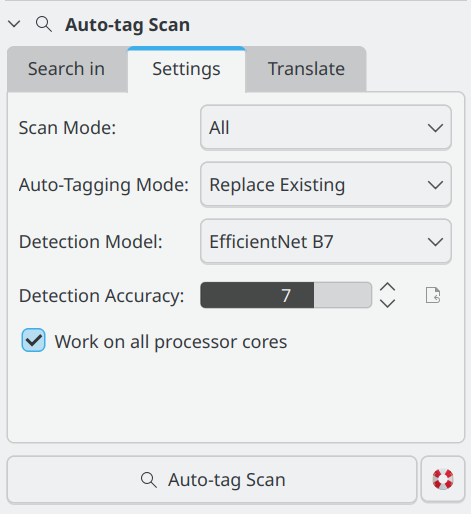
The digiKam Auto-tags Settings view
Auto-tag Settings
For Auto-tagging, there are 4 settings the user can adjust to control how digiKam detects and tags objects in an image.
Scan mode: The scan mode determines if digiKam will scan all images, or only images that don’t have an auto tag already assigned. The auto tag is assigned to images that have been auto-tagged. The auto tag is not assigned to images that have been manually tagged.
Auto-tagging Mode: When applying auto-tags, you can choose between Update and Replace Existing. Selecting Update will add any new auto-tags to the existing tags on the image. Replace Existing will remove all existing auto-tags and replace them with the tags detected by the current scan. Any tags not under the auto tag will not be affected. This setting is useful if you want to run multiple scans with different settings and combine the results.
Detection Model: The detection model is the neural network used to detect objects in the image. The default model is EfficientNet B7. The EfficientNet B7 model is a general-purpose model that can detect 1,000 different objects and scenes. The YOLOv11-Nano model is faster and uses less memory than the EfficientNet B7 model. The YOLOv11-Nano model is recommended for users with limited memory or slower processors, and YOLOv11-XLarge is recommended for users with more memory and faster processors. Both YOLOv11 models are trained to detect 80 different objects based on the COCO dataset.
Accuracy: Lower accuracy settings may detect more objects in an image, but it will also increase the number of incorrectly identified objects (false positives). The default setting of 7 is recommended for normal use.
Work on all processor cores
Auto-tagging can be a time-consuming task depending on the size of your library and filtering selected in Search-in. It is recommended to use all processor cores. This will make the process run faster, but it can potentially make other processes run slower and make your computer feel unresponsive while auto-tagging is running. You can uncheck Work on all processor cores if your machine is slow and you want to perform other tasks while the auto-tag scan is running.
Translate Tab
The Translate tab lets you choose additional languages for auto-tagging. This feature will use an online translation service to translate the auto-tag into one of the supported languages.
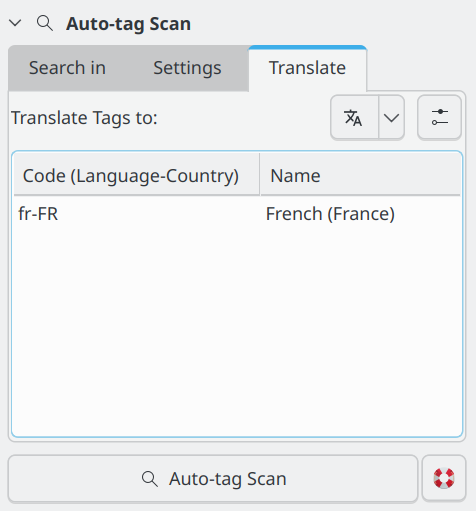
The digiKam Auto-tags Translate view