Transform Tools
Recortar uma Fotografia
Crop to Selection
The digiKam Crop to Selection tool is used to crop an image based on a user selection. It is the simplest of the three cropping tools in digiKam.
Cropping a photograph is a common operation, but the value of cropping to improve the composition of an image is often underestimated. The Image Editor makes it very easy. To manually crop a photograph simply drag a rectangle over the image by holding down the left mouse button while moving the mouse. You will see a wire frame rectangle appear as you move the mouse.

Uma Região do Editor de Imagens Pronta para um Recorte Manual
Quando largar o botão, a área da fotografia que será removida por uma operação de recorte fica acinzentada. Isto permite-lhe obter uma boa visão sobre como ficará a sua fotografia após o recorte. Poderá mudar o tamanho da área recortada, arrastando os cantos do rectângulo, podendo criar uma nova área de recorte, bastando para tal arrastar outro rectângulo.
Once you are happy with the crop, click on the Image Editor Crop to Selection button on the toolbar and the photograph will be cropped Ctrl+X. Use the or entries in the File menu to save the newly cropped photograph.
Nota
The Histogram tab from the right sidebar will recompute the color statistics based on the current selected portion of the image.
Auto-Crop
The digiKam Auto Crop tool automatically removes the borders from an image. It searches the largest possible border area that is all the same color, and then crops this area from the image.
One use of this tool would be to remove the irregular black border produced when multiple images are stitched together into a panorama.
The figure below illustrates a stitched Panorama processed with the auto crop tool.
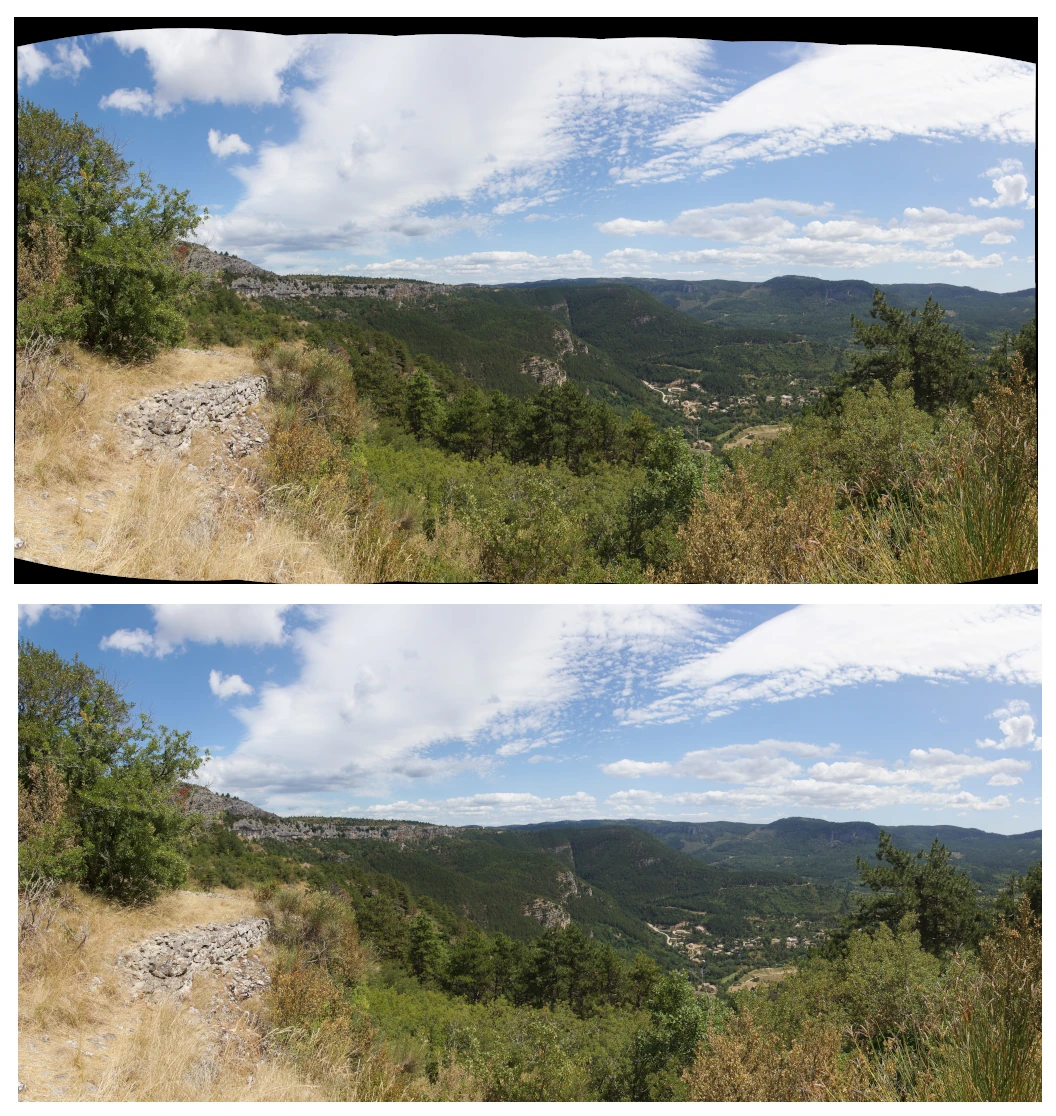
Um Panorama Processado no Fundo pelo Recorte Automático para Deixar a Imagem Preta em Torno da imagem Original no Topo.
Corte em Rácio de Aspecto
The digiKam Aspect Ratio Crop tool is a more powerful crop tool. While you are editing digital images, it is often necessary to create a compatible format for use in your photo album or a picture frame. If you print an image from your digital camera and then try to put it in your photo album, you may notice that the camera has a different width or height ratio than a normal photographic film format. The Aspect Ratio Crop tool can crop your digital images in a predefined ratio (for example 5:7 or 2:3 which are standard photo ratios).
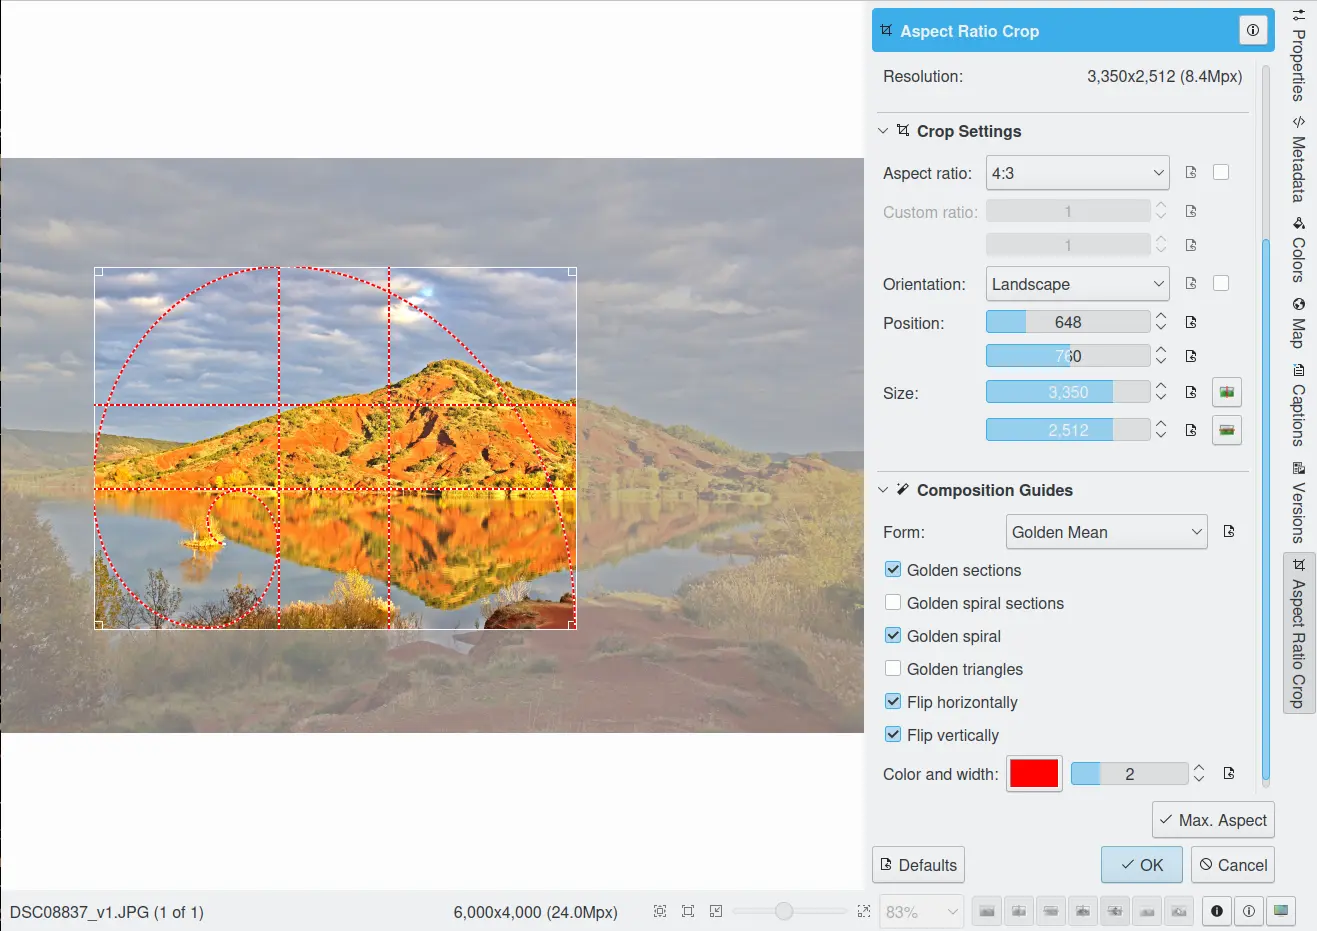
A Ferramenta de Recorte Proporcional do Editor de Imagens do digiKam
Na área de antevisão, poderá dimensionar o rectângulo de recorte se mover os cantos com o rato. A opção irá manter as proporções definidas no fundo da janela.
Na configuração da ferramenta de Recorte Proporcional, irá indicar a Orientação como Retrato ou Paisagem. O Retrato irá ter sempre o tamanho maior atribuído à Altura e a Paisagem à Largura.
The Aspect Ratio Crop tool uses a relative ratio. This means it is the same if you use centimeters or inches and it doesn’t specify the physical size. For example, you can see below a correspondence list of traditional photographic paper sizes and the crop aspect ratio.
Tamanho-Padrão do Papel Fotográfico |
Crop Aspect Ratio |
|---|---|
10x15cm 20x30cm 30x45cm 3.5x5» 4x6» 8x12» 12x18» 16x24» 20x30» |
2:3 |
6x8cm 15x20cm 18x24cm 30x40cm 3.75x5» 4.5x6» 6x8» 7.5x10» 9x12» |
3:4 |
20x25cm 40x50cm 8x10» 16x20» |
4:5 |
15x21cm 30x42cm 5x7» |
5:7 |
21x30cm 42x60cm |
7:10 |
Two buttons are available at the far right of the dialog to move the crop selection automatically to the horizontal or vertical center of the image.
Mesmo na última fila de baixo da janela, o botão Proporção Máx. permite-lhe definir o tamanho da área de recorte ao tamanho máximo de acordo com a configuração actual da proporção e da orientação.
Nota
The Aspect Ratio Crop tool remembers your settings depending on image orientation (horizontal or vertical). When you use the crop tool next time, these settings will be used as default values depending on the image orientation. The changed image dimensions are stored into the Exif tables so that the Exif data reflects the cropped image and not the original one.
Guia de Composição
Ao olhar pela primeira vez para uma imagem, o olho do observador raramente fica no centro da imagem, mas sim no topo, da esquerda para a direita e depois da parte inferior esquerda para a direita. Este padrão é maioritariamente inconsciente mas foi bem documentado. Está provavelmente associado com o padrão de leitura ocidental. Do ponto de vista do fotógrafo, o objectivo passa então a guiar a vista do observador para o assunto, tendo em atenção a forma como a maioria das pessoas deverão ficar na imagem.
The Composition Guide settings provide guiding elements to better compose your images. These guides are:
Rule of Thirds: a grid that divides the image into thirds in every direction (that makes for 9 parts). These proportions are close to the golden rule and are derived from the field of view of the human eye. When an image is divided vertically and horizontally into three sections, the points of intersection represent places to position important visual elements. Moving a horizon in a landscape to the position of one third is often more effective than placing it in the middle. While many photographers and artists are aware of the Rule of Thirds, there is nothing obligatory about applying the Rule of Thirds. A landscape horizon could also be placed near the bottom one quarter or sixth and still produce a good photograph. In placing visual elements for effective composition, one must assess many factors including color, dominance, size and balance together with proportion. Often a certain amount of image balance or tension can make a composition more effective.
Harmonious Triangles: harmonious divisions rely on the principle of similarity. Like the Rule of Thirds guide, Harmonious Triangles are another division of the image dividing the rectangle into equiangular harmonious triangles aligned with the diagonal.
Golden Mean: the Golden Mean is a ratio underlying numerous growth patterns throughout nature (from the spiral of a Nautilus shell to the petals of a sunflower), it has an uncanny way of showing up in all kinds of things we deem beautiful. The Golden Ratio is the irrational number 1.618033988…, and its usage dates back to the ancient Egyptians and Greeks who used it in the construction of their temples and pyramids. Artists and architects throughout time have used the Golden Ratio when composing their paintings, buildings, and even photographs, in order to give their creations a sense of natural order and beauty. The ratio is inherent in the Fibonacci series: 1, 1, 2, 3, 5, 8, 13, 21, 34 etc.., where each succeeding number after 1 is equal to the sum of the two preceding numbers. The ratio formed 1:1.618 is the Golden Mean. A composition following this rule is considered visually harmonious. The Golden Mean provides more fluid guidelines when used to compose an image. These guides are listed below:
A Espiral Dourada irá aumentar as suas hipóteses de obter resultados cativantes nas suas fotografias. Em oposição à Regra dos Terços, a Espiral Dourada forma uma linha fluída para o olho percorrer ao longo da imagem. Este estilo de composição irá convidar a curiosidade do observador para a imagem ao longo da linha da espiral, criando um fluxo visual mais simétrico e para uma experiência de visualização mais emocionante a nível global. Veja em baixo um exemplo de composição da imagem com a espiral dourada.
Outra regra mais são as Secções da Espiral Dourada (ou Triângulos Dourados). Estes rectângulos são usados para compor a Espiral Dourada. Deverá existir algo que conduz o olho para o centro da composição. Poderá ser uma linha ou diversos assuntos. Este «algo» poderia aí estar sem conduzir os olhos, mas iria fazer a sua tarefa.
Os Triângulos Dourados são uma derivação da Espiral Dourada descrita acima. Os seus vértices são os pontos médios dos lados do Rectângulo Dourado. Lembre-se que, ao contrário dos Triângulos Harmoniosos, os Triângulos Dourados não são triângulos regulares. A colocação das diagonais ao longo destas linhas poderão fazer com que um assunto estático pareça mais dinâmico. Quando usar os Triângulos Dourados para quebrar a sua imagem, está a criar um efeito que os fotógrafos profissionais chamam de Simetria Dinâmica. tente manter o seu assunto focal num dos pontos de intersecção e coloque outra informação visual nos triângulo que já subdividiu. O resultado será uma composição muito atraente que poderia não obter de outra forma.
Como na Regra dos Terços, as Secções Douradas afectam as proporções de tamanho de uma imagem, assim como a colocação dos assuntos principais na fotografia. Esta proporção é próxima à dos filmes de 35mm, pelo que não precisa de mudar o tamanho da fotografia na maioria dos casos. Mas precisa ter em consideração a composição: o assunto principal deverá ficar numa das quatro linhas ou quatro intersecções (o olho do sujeito em foco, por exemplo). Para falar a verdade, estas regras não são as mesmas. A Regra dos Terços é uma versão simplificada da Média Dourada.
As opções Inverter Horizontalmente e Inverter Verticalmente podem ser usadas para aplicar a transformação por inversão nas divisões harmoniosas.
O botão Cor permite-lhe definir a cor das guias. Se tiver uma imagem de alto contraste de cores, as guias ficarão invisíveis. Já agora, poderá adaptar a cor da guia para a imagem actual.
Rodar ou Inverter
Se a fotografia mostrar uma orientação errada, poderá Inverter ou Rodar a mesma para a orientação que gostaria, usando as ferramentas de Inversão/Rotação por Transformação disponíveis nos menus .
With flipping options, you can flip or turn over the image horizontally or vertically like a card deck. With the rotating options, you can rotate the image in 90 degrees steps clockwise. It can be used to change the display mode to Portrait or Landscape. Be aware that this rotation is not lossless when using JPEG format. You also can rotate more accurately to a finer degree by using the Free Rotation tool. You can access it from the menu entry. See the dedicated Free Rotation section below for more information.
Rotação Livre
The digiKam Free Rotation tool can rotate an image by any arbitrary angle.
It is all too easy to hold the camera a little rotated from the horizontal when taking an image. This produces an image where everything is tilted at an angle. The Free Rotation tool can fix this. From within the digiKam Image Editor, select .
Rotate your image by using the Angle slider (value in degrees). Press Reset Values to reset the slider to zero. The preview area shows the effect of the rotation. The new target image dimensions in pixels are shown.
For better orientation, the Free Rotation tool provides a vertical and horizontal guide. Move the mouse cursor over the image preview to display the dashed line guide. Move the cursor to any vertical or horizontal feature in the image like the sea or a building edge and press the left mouse button to freeze the position of the dashed lines. Now, adjust the angle to match the guide.
Aviso
After rotating the image, you often find that things are better but not quite perfect. One solution is to rotate a bit more, but there is a disadvantage to that approach. Each time you rotate an image, because the rotated pixels don’t line up precisely with the original pixels, the image inevitably gets blurred a little bit. For a single rotation, the amount of blurring is quite small, but two rotations cause twice as much blurring as one, and there is no reason to blur things more than you have to. So use the guide tool available in the Free Rotation preview to help you to get the correct rotation angle before applying the rotation.
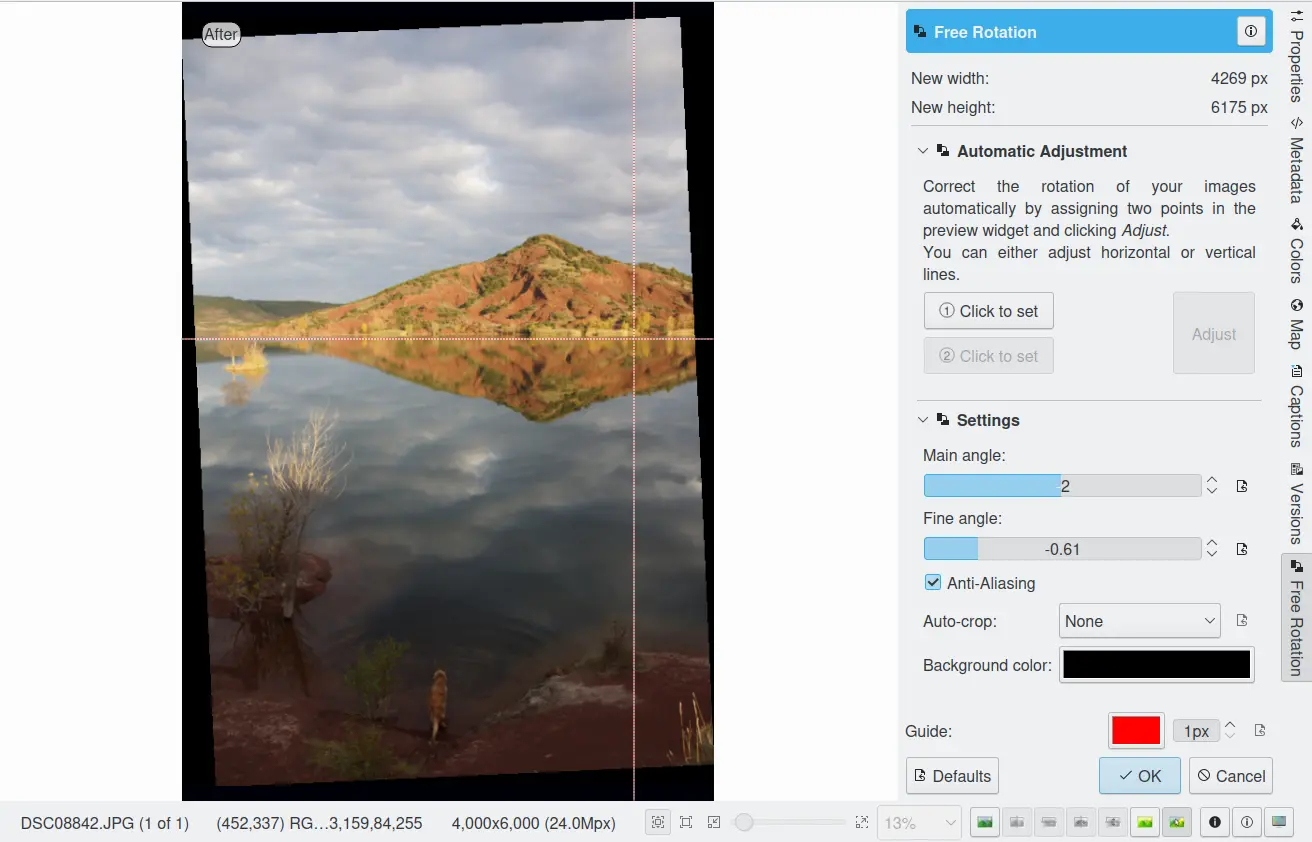
A Ferramenta de Rotação Livre do Editor de Imagens do digiKam
Depois de ter rodado uma imagem, existirão pequenos buracos triangulares nos cantos. Uma forma de os corrigir é recortar a imagem com a opção do menu do Editor de Imagens.
A more elegant way to crop the rotated image is to use the Auto-Crop function. Choose any one of the following options from the combo-box based on your preference:
Área mais larga: Esta opção recorta a imagem rodada com a secção rectangular (largura) o maior possível.
Largest area: This option crops the rotated image to the biggest surface.
Mantenha o rato sobre a lista e desloque com a roda pelas duas possibilidades.
A opção Suavização irá tentar suavizar a imagem um pouco após a rotação. Por favor, leia o aviso acima.
Ajuste de Perspectiva
The digiKam Perspective Adjustment tool geometrically remaps an image to adjust the image’s perspective.
With this tool you can work on the perspective in a photograph. This is very useful when working with photographs that contain keystone distortion. Keystone distortion occurs when an object is photographed from an angle rather than from a straight-on view. For example, if you take an image of a tall building from ground level, the edges of the building appear to meet each other at the far end. On the other hand, you can use this tool to introduce a new perspective that is not a face-on view but gives the image a creative spin.
Todas as transformações de perspectiva são efectuadas em torno de um ponto fixo, chamado de ponto de referência. Este ponto está no centro do item que você vai transformar e é mostrado com um círculo vermelho.
To change the perspective, drag the square areas in the corners of the image. The perspective preview is rendered automatically. On the right of the dialog you’ll find a set of information which should help you control the perspective change:
New Width: is the new image width in pixels including the empty area around the image resulting from the geometrical transformation.
New Height: is the new image height in pixels including the empty area around the image resulting from the geometrical transformation.
Top Left Angle: is the current angle in degrees at the top left corner of the perspective area.
Top Right Angle: is the current angle in degrees at the top right corner of the perspective area.
Bottom Left Angle: is the current angle in degrees at the bottom left corner of the perspective area.
Bottom Right Angle: is the current angle in degrees at the bottom right corner of the perspective area.
Aviso
Depois de aplicar o ajuste da perspectiva, a imagem fica, inevitavelmente, um pouco borrada. Para um ajuste simples, a quantidade do borrão é bastante pequena, mas dois ajustes causam o dobro do efeito de um ajuste único, como tal não existe razão para borrar mais as coisas do que o necessário.
Depois de ter ajustado a perspectiva de uma imagem, irão aparecer buracos triangulares desagradáveis nos cantos. Uma forma de os corrigir é recortar a imagem com o menu do Editor de Imagens.
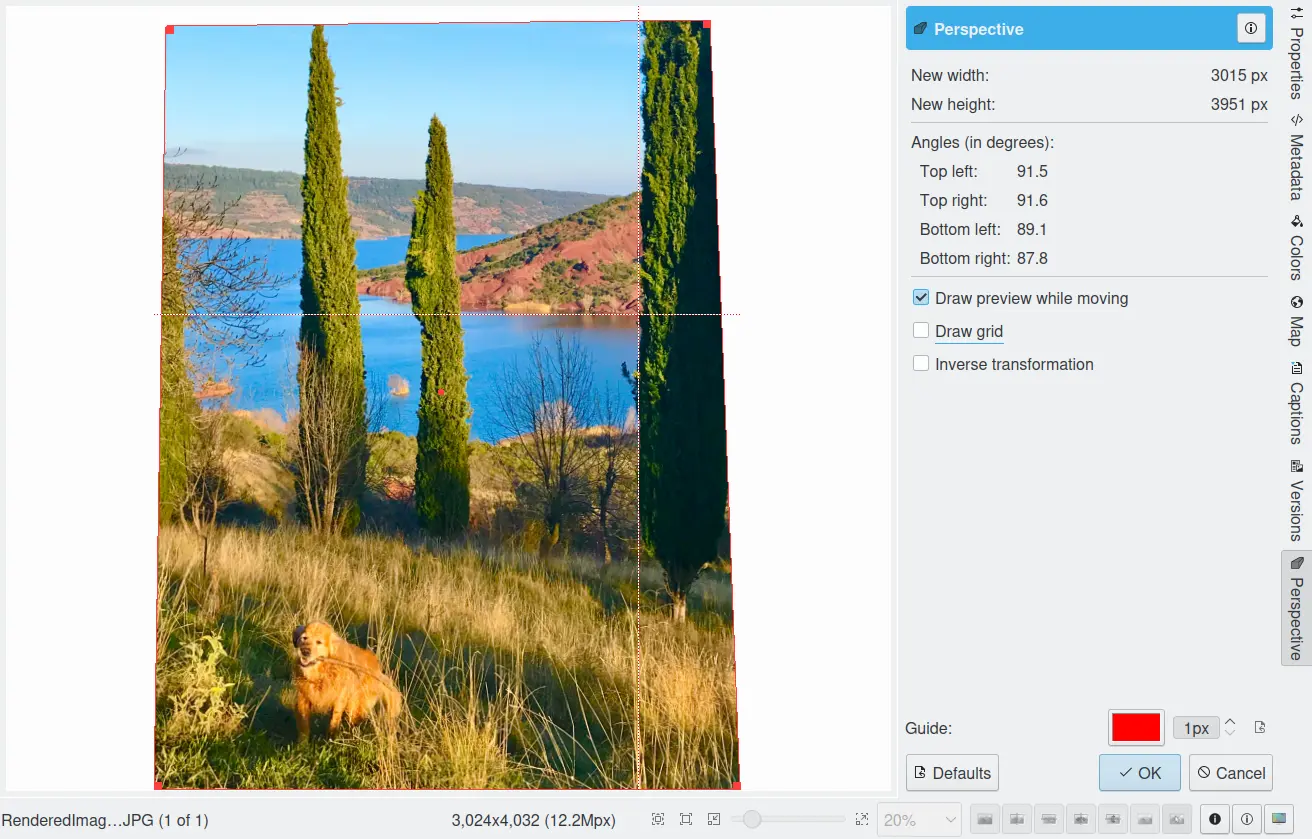
A Ferramenta de Perspectiva do Editor de Imagens do digiKam
Shear
The digiKam Shear tool is used to shear an image horizontally or vertically.
The Shear tool is used to shift one side of an image in one direction and the opposite side in the opposite direction. For instance, a horizontal shearing will shift the upper part to the right and the lower part to the left. This is not a rotation: the image is distorted. In other words, it will turn a rectangle into a parallelogram. This tool is available from or the Image Editor right sidebar tool view.
Shear your image by using the Horizontal Angle and Vertical Angle sliders (values in degrees). You can shear horizontally, or vertically, or both at the same time. Click on the Reset Values to reset. A shearing effect preview is shown on the center of dialog window. The new target image dimensions in pixels are displayed at the right side of dialog.
To assist you in alignment, the tool provides a vertical and horizontal guide. Move the mouse cursor over the image preview to display the dashed lines guide. Move the cursor to an important place in the image like the sea or a building edge and press the left mouse button to freeze the position of the dashed lines. Now, adjust the shear angles according to the guide.
Aviso
Depois de aplicar um ajuste de inclinação, a imagem fica inevitavelmente um pouco borrada. Para uma inclinação simples, a quantidade do borrão é bastante pequena, mas duas inclinações provocam o dobro do borrão e não existe qualquer razão para borrar as coisas mais do que o necessário.
Depois de ter inclinado uma imagem, irão aparecer buracos triangulares desagradáveis nos cantos. Uma forma de os corrigir é recortar a imagem com o menu do Editor de Imagens.
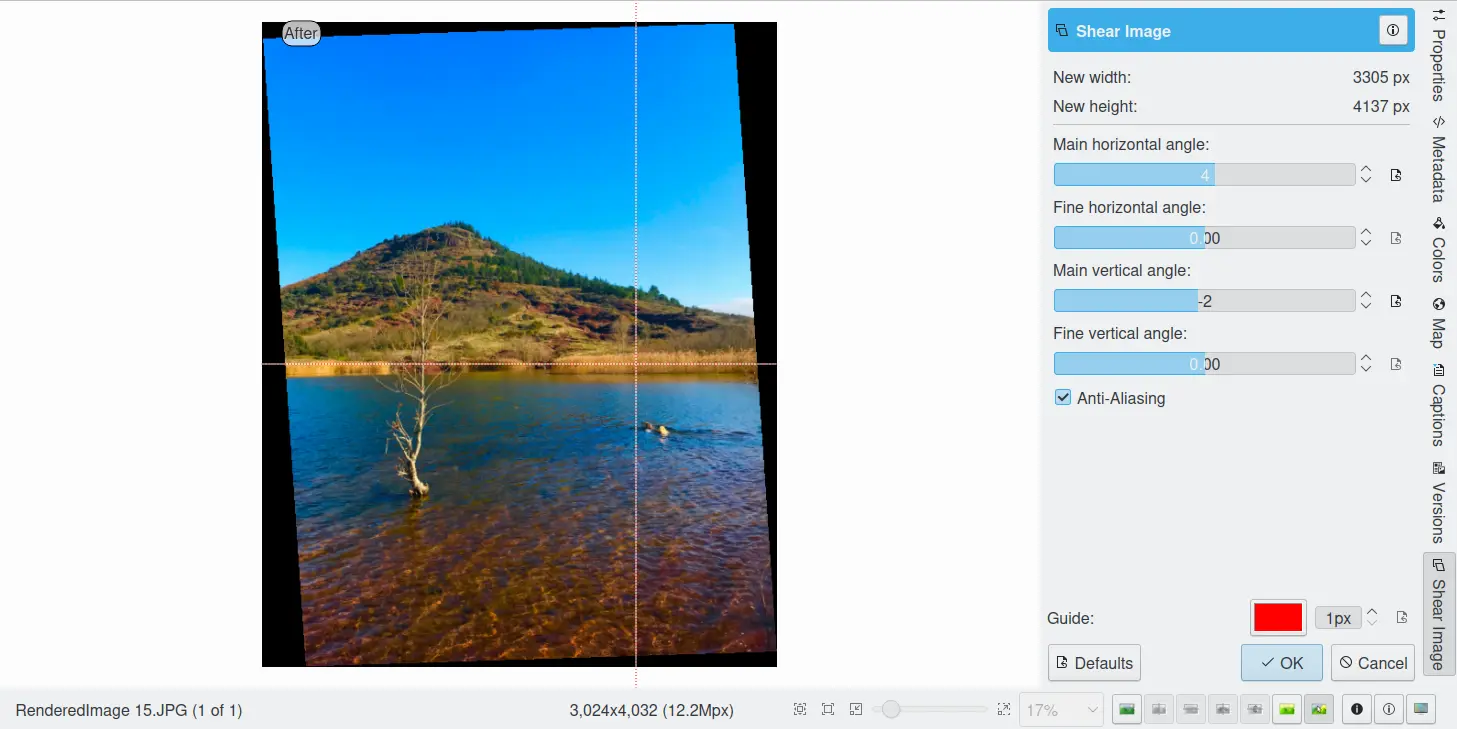
A Ferramenta de Inclinação do Editor de Imagens do digiKam
Resize
The Resize tool is definitely one of the most advanced tools to increase a photograph’s size with minimal loss in image quality.
Rescaling an image to make it smaller is easy. The big question is: how can you blow up an image and keep the details sharp? How can one zoom in when the resolution boundary has been reached? How can one reinvent or guess the missing information to fill in the necessarily coarse image after upsizing? Well, the algorithm we use here does an excellent job. Try it out and see for yourself.
Mudar o Tamanho de uma Fotografia
If the photograph has the wrong size, you can scale it to the size you would like by using the Resize tool. Select and adjust the target values. The Resize tool dialog is shown below.
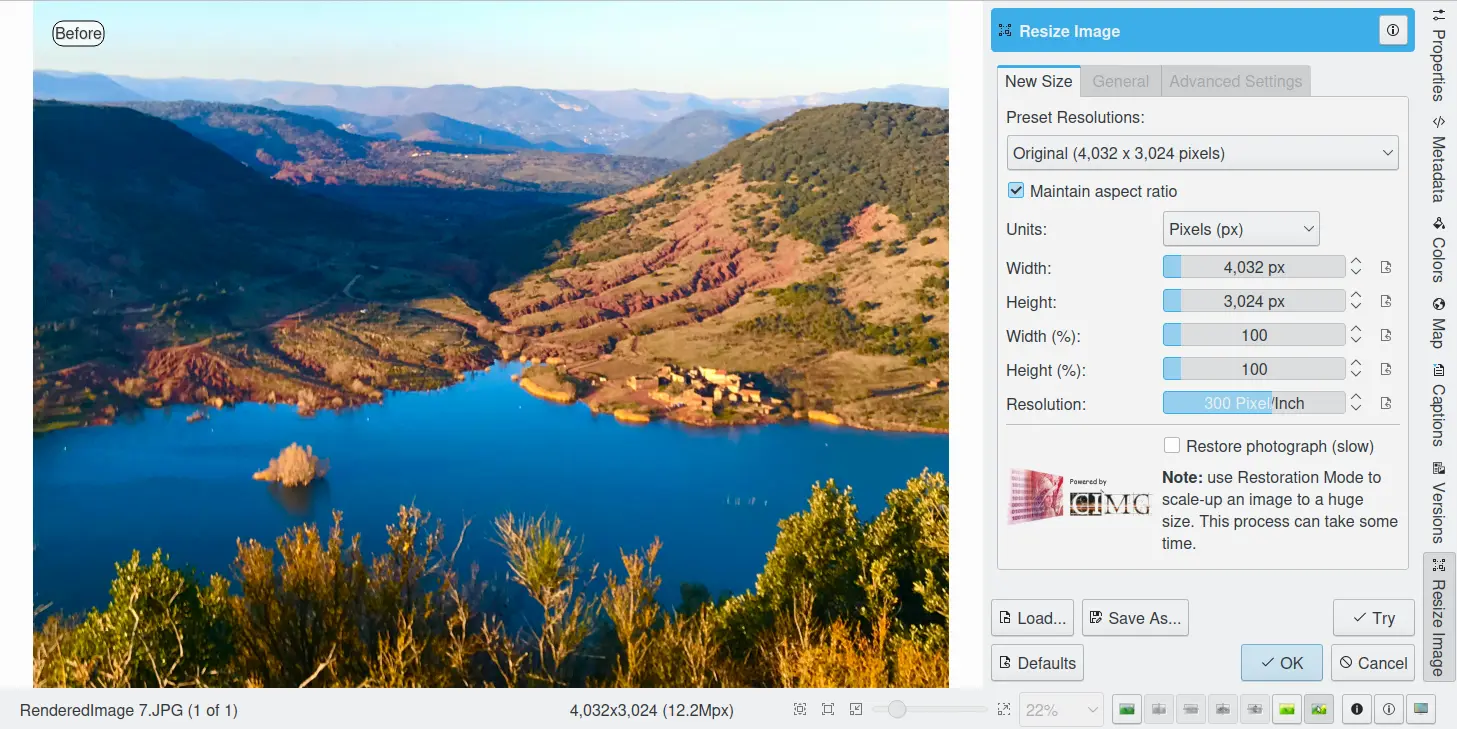
A Ferramenta de Dimensionamento da Fotografia do digiKam
This image resizing tool uses a standard linear interpolation method to approximate pixels.
Aumentar o Tamanho da Imagem
Muitos programas de edição de imagens usam alguma espécie de interpolação p.ex. interpolação ao longo de uma curva para aumentar a escala de uma imagem. O digiKam usa uma abordagem mais sofisticada.
Tem de indicar à ferramenta o tipo de dimensionamento que pretende fazer. Estas definições estão disponíveis na página de Novo Tamanho e aparecem em baixo:
Manter as Proporções: se esta opção estiver activa, a definição do novo tamanho da imagem irá preservar as proporções da imagem original.
Largura: a nova largura da imagem a usar para o aumento.
Altura: a nova altura da imagem a usar para o aumento.
Se quiser definir os parâmetros do filtro para ajustes mais finos, use as páginas de Configuração da Suavização e Configuração Avançada:
Configuração da Suavização no Dimensionamento da Fotografia:
Detail Preservation [0, 1]: this controls the preservation of features in the image. A low value forces an equal smoothing across the image, whereas bigger values preferably smooth the homogeneous regions, leaving sharper details. A value of 0.9 does a good job of preserving details so that no sharpening is required afterwards. Note that Detail Preservation must be always inferior to Anisotropy.
Anisotropy alpha [0, 1]: a low value smooths equally in all directions, whereas a value close to 1 smooths in one direction only. If you have film grain or CCD kind of noise a high value will result in wave-like pattern, whereas JPEG artifacts are suited for values close to 1.
Smoothing [0, 500]: this sets the maximum overall smoothing factor, while Detail Preservation defines the relative smoothing. Set this value based on the noise levels in the image.
Regularity [0, 100]: this parameter is concerned with the uniformity of the smoothing. Imagine the smoothing process as a combing of the image. Then the Regularity would correspond to the size of the comb. The bigger this value, the more even the overall smoothing will be. This term is required when there is a lot of noise in the image, making it difficult to estimate the local features in the scene.
Iterações do Filtro: número de vezes que o algoritmo do borrão é aplicado. Normalmente, 1 ou 2 é suficiente.
Configuração Avançada do Dimensionamento da Fotografia:
Angular Step [5, 90]: angular integration of the anisotropy alpha. If alpha is chosen small, the Angular Step should also be chosen small. But beware that small angles result in long runs! So choose a value as large as you can accept.
Passo Integral [0,1, 10]: o passo de integração espacial em termos de pixels. Deverá ser inferior a 1 (suavização em sub-pixels) e nunca deverá ser superior a 2.
Usar a Interpolação Linear: O ganho em qualidade, se escolher esta opção, só é marginal e irá perder um factor de 2 em velocidade. A nossa recomendação é que deixe esse valor desligado.
Save As and Load buttons are used to do just that. Any Resize settings that you have set can be saved to a text file and reloaded later.
Aviso
Resize Photograph is very fast given what it is doing, but it can take a long time to run and cause high CPU load. You may always abort computation by pressing Cancel button during rendering.
Escala Líquida
The digiKam Liquid Rescale tool uses the Seam Carving method to non-uniformly resize pictures while preserving their important features. The tool can intelligently decrease the width (or height) of an image by deleting vertically or horizontally oriented seams of pixels that do not contain important features. Think of the seams as wiggly columns or rows that snake through the image avoiding important features. The tool can also use the same approach to increase the size of an image by inserting seams. The tool supports manual selection of masks to identify features to be deleted or retained, to supplement its automatic seam evaluation capability.
The best way to understand how this tool is used is to follow along as the tool as applied to the sample image in the figure below.
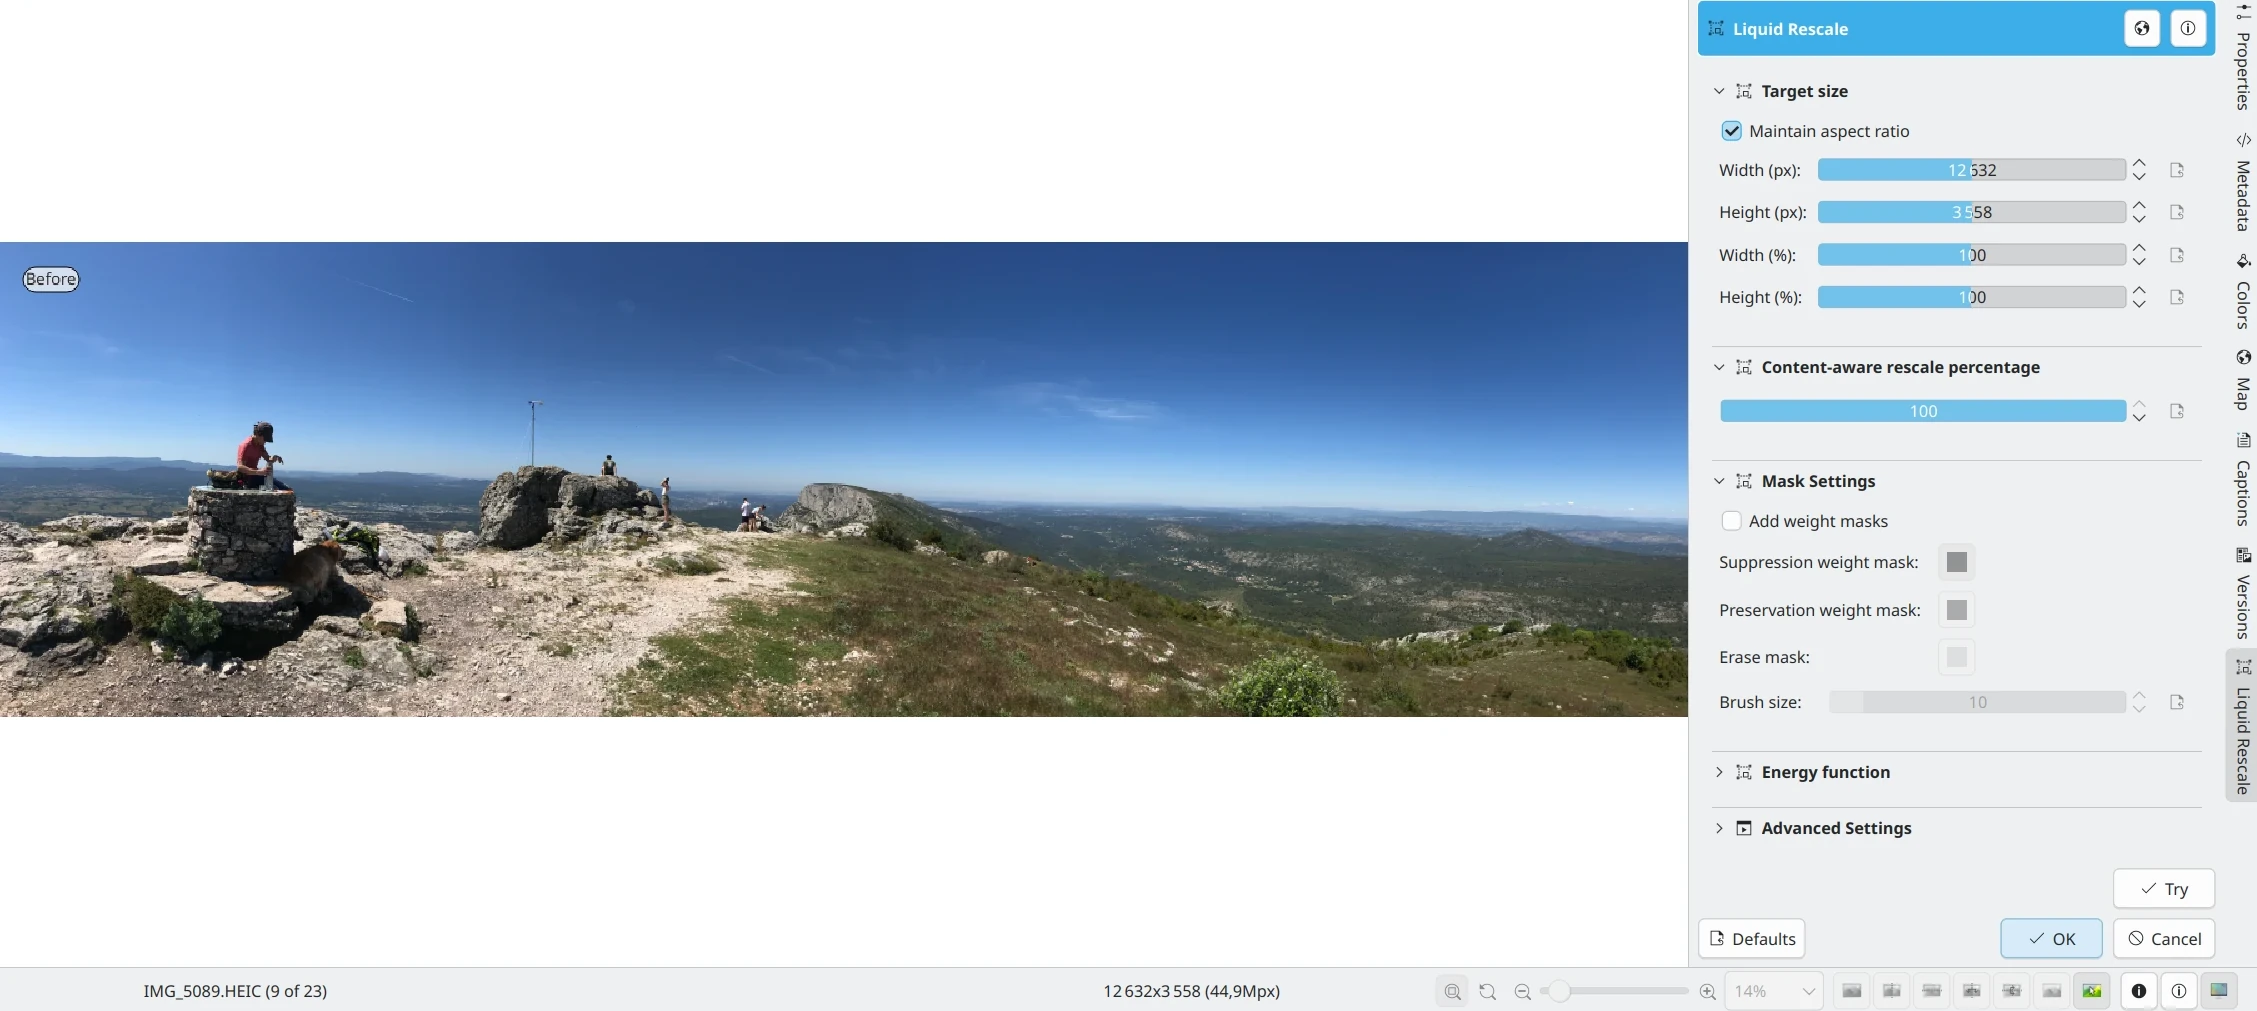
Passo 1: Uma Imagem de Exemplo Antes de ser Dimensionada com a Ferramenta de Escala Líquida
Tamanho-Alvo
After starting the Liquid Rescale tool, a series of parameters have to be set. The first set of parameters specifies the desired size of the final image.
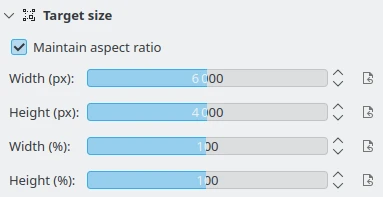
A Configuração do Tamanho da Escala Líquida no digiKam
It is advisable to always rescale in one direction at a time. If both the width and the height are changed, rescaling is performed by default on the width first, then on the height. You can also Preserve aspect ratio from the original image. Dimensions can be set in pixels (px) or in percents.
Percentagem da Escala Nova
The next set of parameters sets the desired content-aware rescaling percentage.

Configuração da Percentagem da Escala Líquida do digiKam
This option sets the maximum enlargement which will be performed in a single rescale step. When the final size is greater than this, the tool will automatically stop and restart the rescaling as many times as needed. You might need to reduce this value if you have large preservation masks. Note that in this case, the same areas will be affected over and over by the rescaling.
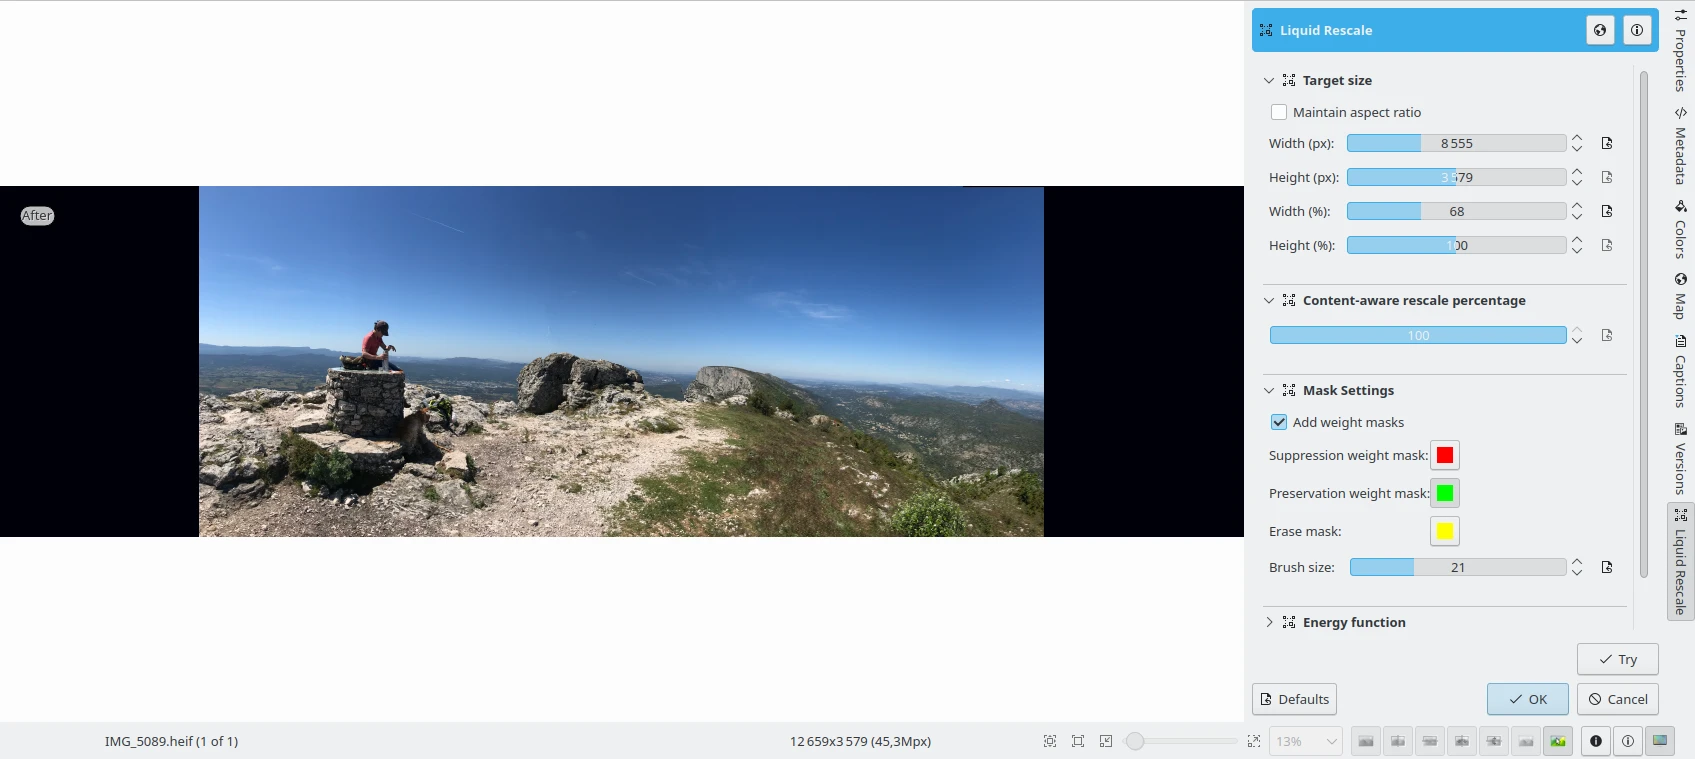
As Máscaras das Características
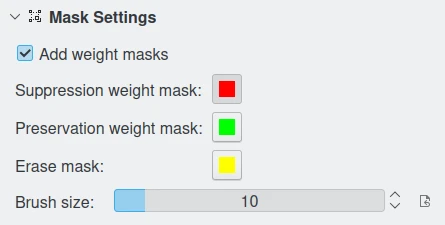
A Configuração das Máscaras das Ferramentas da Escala Líquida no digiKam
Feature masks are the easiest way to manually select the features of the image that you want to protect or discard. Turn on the Add weight masks option to switch into mask edit mode.
To discard a portion of the image, press the Suppression weight mask button and paint the red mask over the canvas. The mask is a virtual transparent layer using Red color, with 50% opacity to indicate the area to discard.
To protect a portion of the image, press the Preservation weight mask button and paint the green mask over the canvas. The mask is a virtual transparent layer using Green color, with 50% opacity to indicate the area to protect.
You can change the Brush size to paint masks on the canvas. To change mask regions, use the Erase mask button to erase desired portions of masks from the canvas.
Nota
Object removal is only possible when shrinking an image. By default, feature discard masks are ignored when enlarging, because in that case the masked areas would be inflated rather then removed. If you actually want to get this effect, you need to unset the corresponding option in the Advanced Settings tab.
Preservation of features is not possible if enlarging too much. The inflation process is the exact reverse of the shrinking process, so the maximum amount of pixels you can add to a layer corresponds to the amount of pixels that are not protected. For example, if you have a 1000 pixel wide image and you have marked a 800 pixel wide area for protection, the final width should be less than 1200.
The sample image below illustrates where masks have been applied to preserve important areas in green and remove unwanted areas in red. The image width will be reduced by 40% and the height will be unchanged.
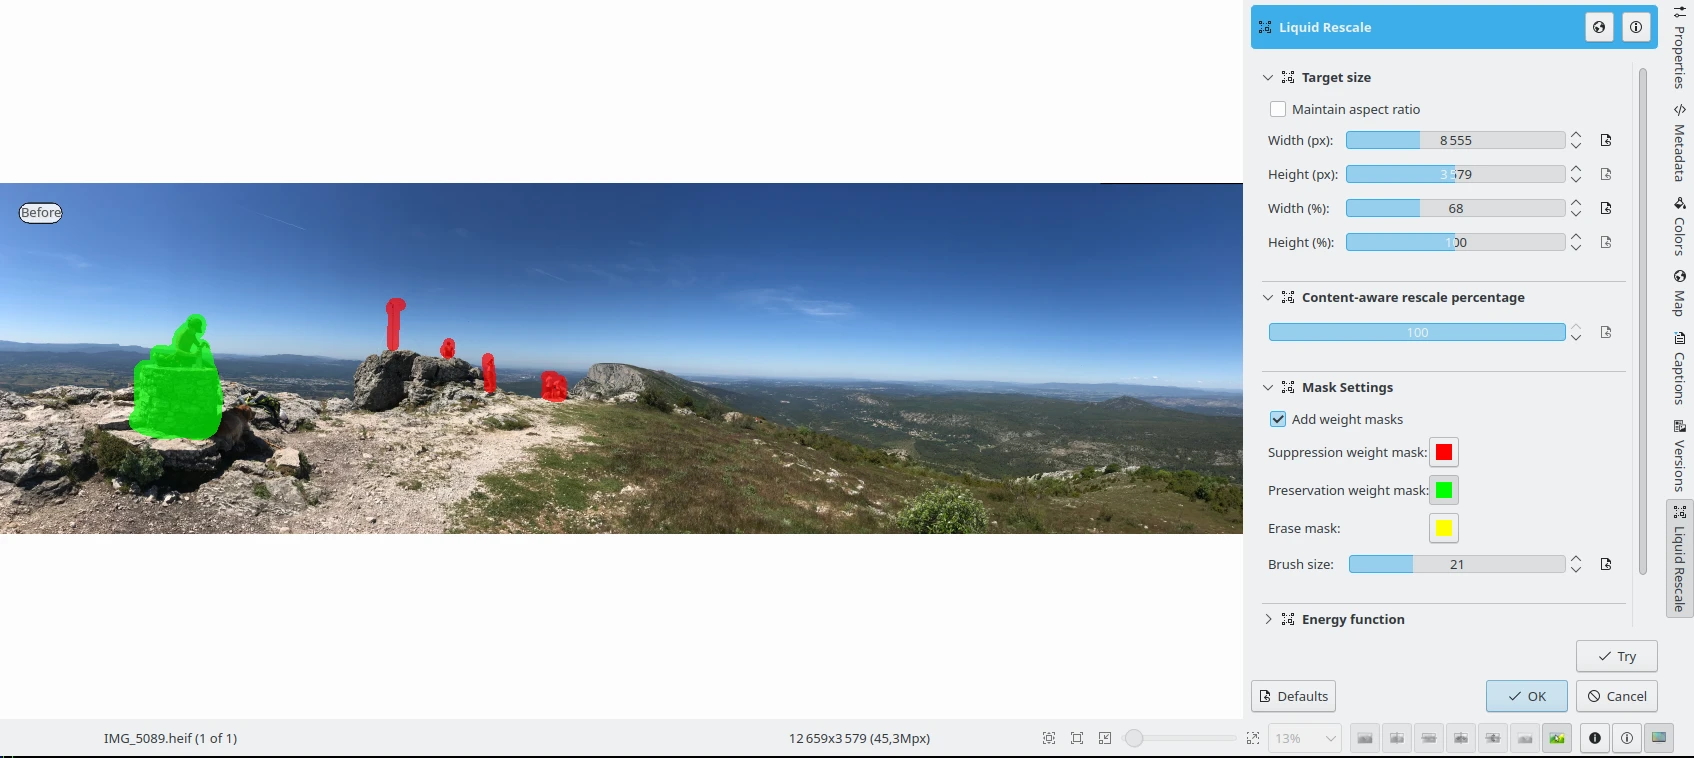
Step 2: Liquid Rescale Preservation and Suppression Masks Applied Over the Sample Image Before Width Resizing Down
Função de Energia
These options are used to the gradient function applied while rescaling. The gradient function is used to determine which pixels should be removed or kept.
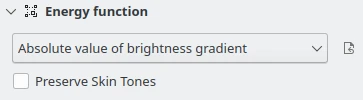
A Configuração da Função de Energia da Escala Líquida do digiKam
Possible values are listed below:
Norma do gradiente do brilho: O valor da norma do gradiente do brilho.
Soma dos valores absolutos dos gradientes de brilho: a soma dos valores absolutos dos gradientes de brilho em ambas as direcções.
Valor absoluto do gradiente do brilho: valor absoluto do gradiente do brilho na direcção da escala (esta é a opção por omissão).
Norma do gradiente do Luma: O valor da norma do gradiente do Luma.
Soma dos valores absolutos dos gradientes de brilho: a soma dos valores absolutos dos gradientes de Luma em ambas as direcções.
Valor absoluto do gradiente do brilho: valor absoluto do gradiente do L na direcção da escala.
The Preserve Skin Tones option allows you to preserve pixels whose color is close to a skin tone.
Configuração Avançada
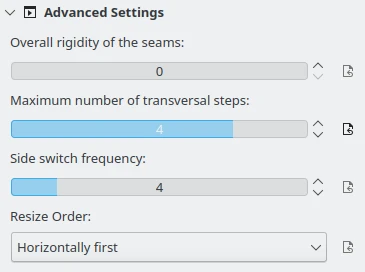
A Configuração Avançada da Escala Líquida do digiKam
Nesta secção, poderá ajustar alguns valores avançados para afinar a ferramenta.
Overall rigidity of the seams: Use this value to give a negative bias to the seams that are not straight. May be useful to prevent distortions in some situations, or to avoid artifacts from pixel skipping (it is better to use low values in such case). This setting applies to the whole selected layer if no rigidity mask is used.
Nota
O peso é proporcional à diferença na coordenada transversal entre dois pontos sucessivos, elevada ao expoente de 1,5 e somada para obter o valor total.
Maximum number of transversal steps: This option lets you choose the maximum transversal step that the pixels in the seams can take. In the standard algorithm, corresponding to the default value of step = 1, each pixel in a seam can be shifted by at most one pixel with respect to its neighbors. This implies that the seams can form an angle of at most 45 degrees with respect to their base line. Increasing the step value lets you overcome this limit, but may lead to the introduction of artifacts. In order to balance the situation, you can use the rigidity setting.
Frequência de mudança de lado: Durante o processo de escavação, em cada passo o seam óptimo a ser escavado é escolhido com base no valor de relevância para cada pixel. Contudo, no caso em que dois seams são equivalentes (o que pode acontecer, por exemplo, quando partes grandes da imagem tenham a mesma cor), o algoritmo escolhe sempre os seams de um lado. Em alguns casos, isto poderá gerar alguns problemas, p.ex. um objecto centrado na imagem original poderá não ficar centrado na imagem resultante. Para dar a volta a este efeito, esta configuração permite ao lado favorecido mudar automaticamente durante a mudança de escala, às custas de uma potencial pior performance.
Ordem do Dimensionamento: Aqui poderá definir se deseja dimensionar primeiro na horizontal ou primeiro na vertical.
Mais Detalhes Sobre a Técnica de “Seam Carving”
A ferramenta funciona através da descoberta das ditas seams de uma imagem, i.e. linhas continuas em ziguezague que atravessam a imagem de cima para baixo (seams verticais) ou da esquerda para a direita (seams horizontais). Quando uma dessas linhas, por exemplo uma vertical, é removida de uma imagem, a operação de carving (escavação), a largura da imagem é reduzida em um pixel. Se remover as “seams” horizontais reduz a altura. A iteração desses operações (descobrir uma linha e removê-la), uma pessoa poderá reduzir o tamanho da imagem como desejar. Se recolher em conjunto todos os seams que foram escavados de uma imagem, pela sua ordem respectiva, constitui-se o que se chama um mapa de seams.
Replicando o processo de escavação, inserindo “seams” adicionais ao lado dos que já foram descobertos pelo algoritmo, em vez de os remover, também poderá obter a ampliação da imagem. O significado do mapa de seams é invertido nesse caso.
In order to get good results from this technique, the main issue is finding which are the most suitable seams to carve or to insert. If the aim is simply to change the proportions of the image without too much effect on the content, good seams will be those that don’t cross important features of the image, and instead pass through a background landscape.
By default, the tool tries to find the seams which cross the lowest-contrast areas (how this happens exactly is specified by the energy function settings). Therefore, each pixel in the image is assigned a so-called energy value. Higher contrast means higher energy, and seams are less likely to cross high-energy areas.
Dado que, em muitos casos, este método baseado no contraste não é óptimo, a função de energia poderá ser ponderada pelo utilizador, que poderá decidir que algumas áreas deverão ter uma energia maior (usando máscaras de preservação) ou, pelo contrário, que deverão ter uma menor energia (usando uma máscara de supressão), dirigindo assim de forma efectiva os seams e o processo em si.
See the sample image below after it has been resized, reducing its width by 40%. The image height is still the same. Notice the preserved areas were not deformed by the operation, but the unwanted areas have magically disappeared.
Passo 3: A Largura da Imagem de Exemplo Finalmente Reduzida com as Máscaras de Escala Líquida Aplicadas