Albums View
Overview
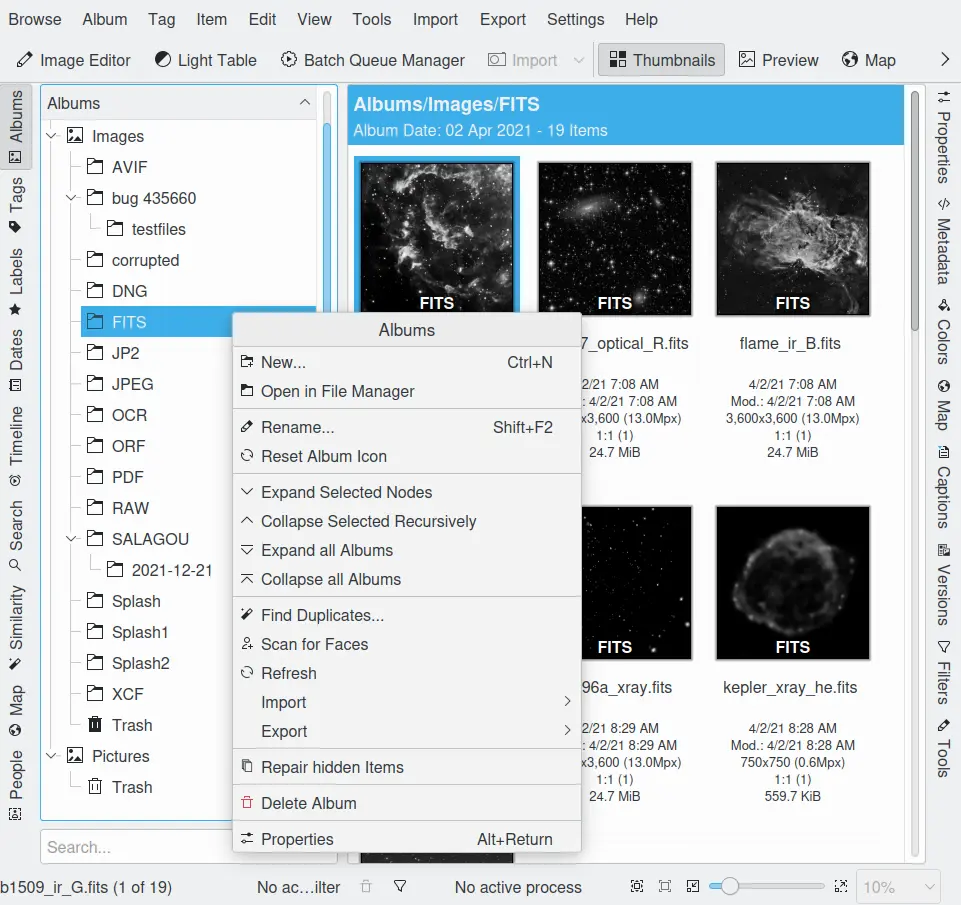
The digiKam Main Window Album-View
By clicking the Albums button on the left side bar you toggle the Albums tree which provides an organized view of your photograph albums. The top item Albums just shows the Welcome to digiKam screen in the view area. The next level of the Albums tree shows your different Collections (marked by the icon ![]() ) or at least one if you haven't added one or more yet in the and Collections section. Each Collection represents a folder branch on your hard disk, on removable media or on network shares and the next levels in the tree show the structure of those folders, here called Albums. The albums can be sorted by their folder layout on the hard disk, by the Category that has been set in the Album Properties or by the Date of that Albums (this date can also be changed in the Properties of each Album). You can invert the sort order (ascending/descending) by clicking on the title bar of the album tree.
) or at least one if you haven't added one or more yet in the and Collections section. Each Collection represents a folder branch on your hard disk, on removable media or on network shares and the next levels in the tree show the structure of those folders, here called Albums. The albums can be sorted by their folder layout on the hard disk, by the Category that has been set in the Album Properties or by the Date of that Albums (this date can also be changed in the Properties of each Album). You can invert the sort order (ascending/descending) by clicking on the title bar of the album tree.
You can switch between these sort orders using Sort Albums from the View menu.
Creating a New Album
There are a number of ways to create a new Album. You can create a new Album when you upload new photographs from the Camera using . You can also create a new empty Album with Ctrl+N in the Albums view. As an additional option, you can create a new Album by importing an existing folder of photographs from your computer; just select from the menu bar and select the folder that you want to import. An Album will be created with the same name as the hard disk folder. You can use drag and drop to import a folder. Drag a folder icon, for example from your preferred files-manager. Then drop it on the album list on the left. A menu will appear that gives you the option to move or copy the folder into digiKam.
Note
A album is hosted in a collection root path registered in the database. If a settings about collections has changed or if the collection no longer exists (for example with a removable media), no new albums can be created. You needs to check the collection properties in the digiKam setup dialog.
Important
Under Windows, file locking used by the system can introduce time latencies or dysfunctions. digiKam uses a low level file management with Qt framework that cannot handle locked files. The following conditions must be met so that there are no problems with digiKam:
Album monitoring in digiKam must be deactivated. See the Collection Settings for details.
Folders must not be part of a Windows file or network share.
Folders or pictures must not be open in other programs such as Explorer or similar.
Deleting an Album
When you delete an Album from digiKam it will be moved into the internal Trash Can. As an option you could change this behavior, so that delete really will remove the Album and all of the photographs in it. This can be changed by selecting and selecting the Miscellaneous page. At the top of this page are the settings that control what happens when a photograph is deleted. To delete an Album, click with the right mouse button over the Album in the Albums tree and select Delete Album from the context menu.
Adding a Photograph to an Album
Most of the time you will create new Albums and populate them with photographs directly from your camera using the Camera Tool. However, sometimes you may want to add a photograph that you already have on your computer to an existing Album. To add a photograph to an Album select Alt+Shift+I from the menu bar. Select a source folder from the dialog and click OK. An import window will open. Select the photographs that you want to add and choose Download Selected from the Download drop down menu. A dialog will open where you can choose the destination album. The photographs will be copied into the Album. Download New Ctrl+N from the same menu will copy only those images which are not in the destination folder yet.
Additionally, you can use drag and drop to import photographs. Drag the photographs icons, for example from your preferred file manager. Then drop it on the image list on the right hand side.
If you have a scanner configured, you can also scan a photograph straight into an Album. Select menu entry .
Moving or Copying Photographs
Between Albums
Simply drag the photograph and drop it on the destination Album to move or copy it from one Album to another. A menu will appear that gives you the option to Move or Copy the photograph. You can move or copy multiple photographs the same way, just select all the photographs that you want to move and drag them on to the destination Album.
With Other Applications
The behavior will be the same as copying between albums, but the difference will depend on the target application where you paste items and on what information the target program takes from the clipboard. With a text editor, pasting input fields will host the path. A word processor that can also use images may take the URL and insert the image.
Managing Albums
Album Properties can help you remember which kind of photographs are in an Album and can also help you to organize the Albums tree. To access the Album Properties, click with the right mouse button on an Album and select Properties Alt+Enter from the context menu.
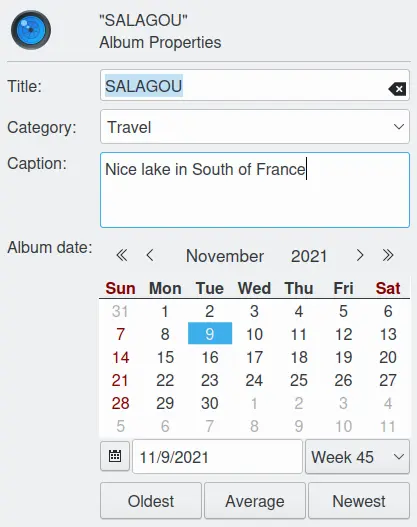
The digiKam Album Properties Dialog
The Album Properties dialog allows you to set:
The Album Title: Name of the Album, identical with the name of the folder on your hard disk. If you edit it here, the folder will also be renamed.
The Album Category: this is a way of grouping your Albums together by a common label. The Category you set will be used to order your albums when you select By Category from the drop down box in the tool bar or using . If you want to add and delete Category labels, choose from the menu entry .
The Caption for the Album: Usually a short description of the content, but of course you are free to abuse it in any conceivable way. But beware: this will be shown in the banner at the top of the main Image Window ;-)
The Album Date: this will be used when you order your Albums by date using .
Oldest, Average, and Newest buttons: these will set the Date to the oldest, average or latest date of the images in that album. It will first try to calculate the average date of the images in the album based on the Exif-headers. If that fails it will fall back to the modification date of the files in that folder.
Setting the Album Icon
digiKam displays the usual folder icon in the Albums list. You can choose one of your photographs instead. This may help you to remember what kind of photographs are contained in an Album.
To select a photograph as the Album icon, click with the right mouse button on the photograph that you want to use as the Album icon and select Set as Album Thumbnail from the context menu. Additionally you can use drag and drop to set the Album icon. Drag the photographs icon from the thumbnail area and drop it on the currently selected Album in the Album list.
Note
An Album can only be in one Album Collection and Album Collections cannot be nested.
digiKam also supports tagging individual photographs. Album Categories are different from photograph tagging because the Album Category applies to all the photographs in an Album rather than to individual photographs. You can use both Album Category and tagging to organize your photographs.