Camera Profiles
Using Camera Profile
Many excellent professional and amateur photographers save all their images as in-camera JPEGs and work exclusively in the sRGB color space. But if you want to work in a larger color space, or if you want to work with RAW files (even if you output sRGB image files from your RAW files), read on.
If you are reading this manual you probably are shooting RAW images with a digital camera and you are hoping that somewhere in the arcane waters of color management lies the answers for how to get a nice picture from your RAW image file. The next thing you need is the right camera profile for developing your RAW image. But first let’s answer the question you really might have been asking.
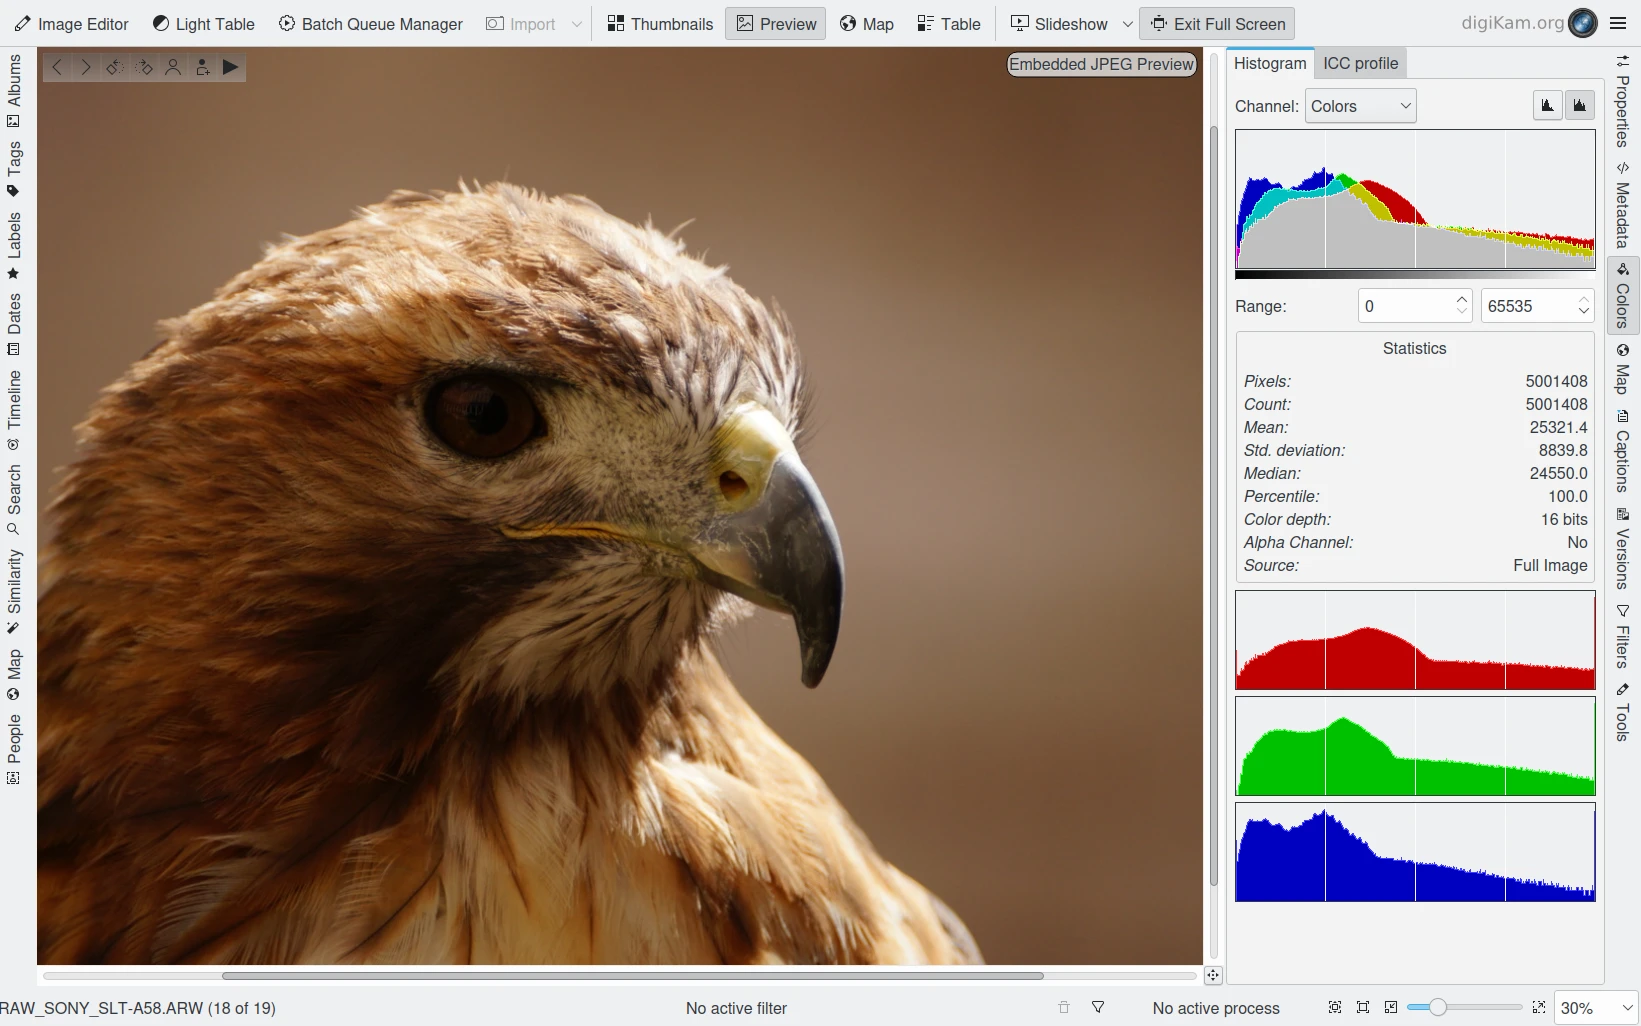
digiKam RAW Preview Using Embedded JPEG Image
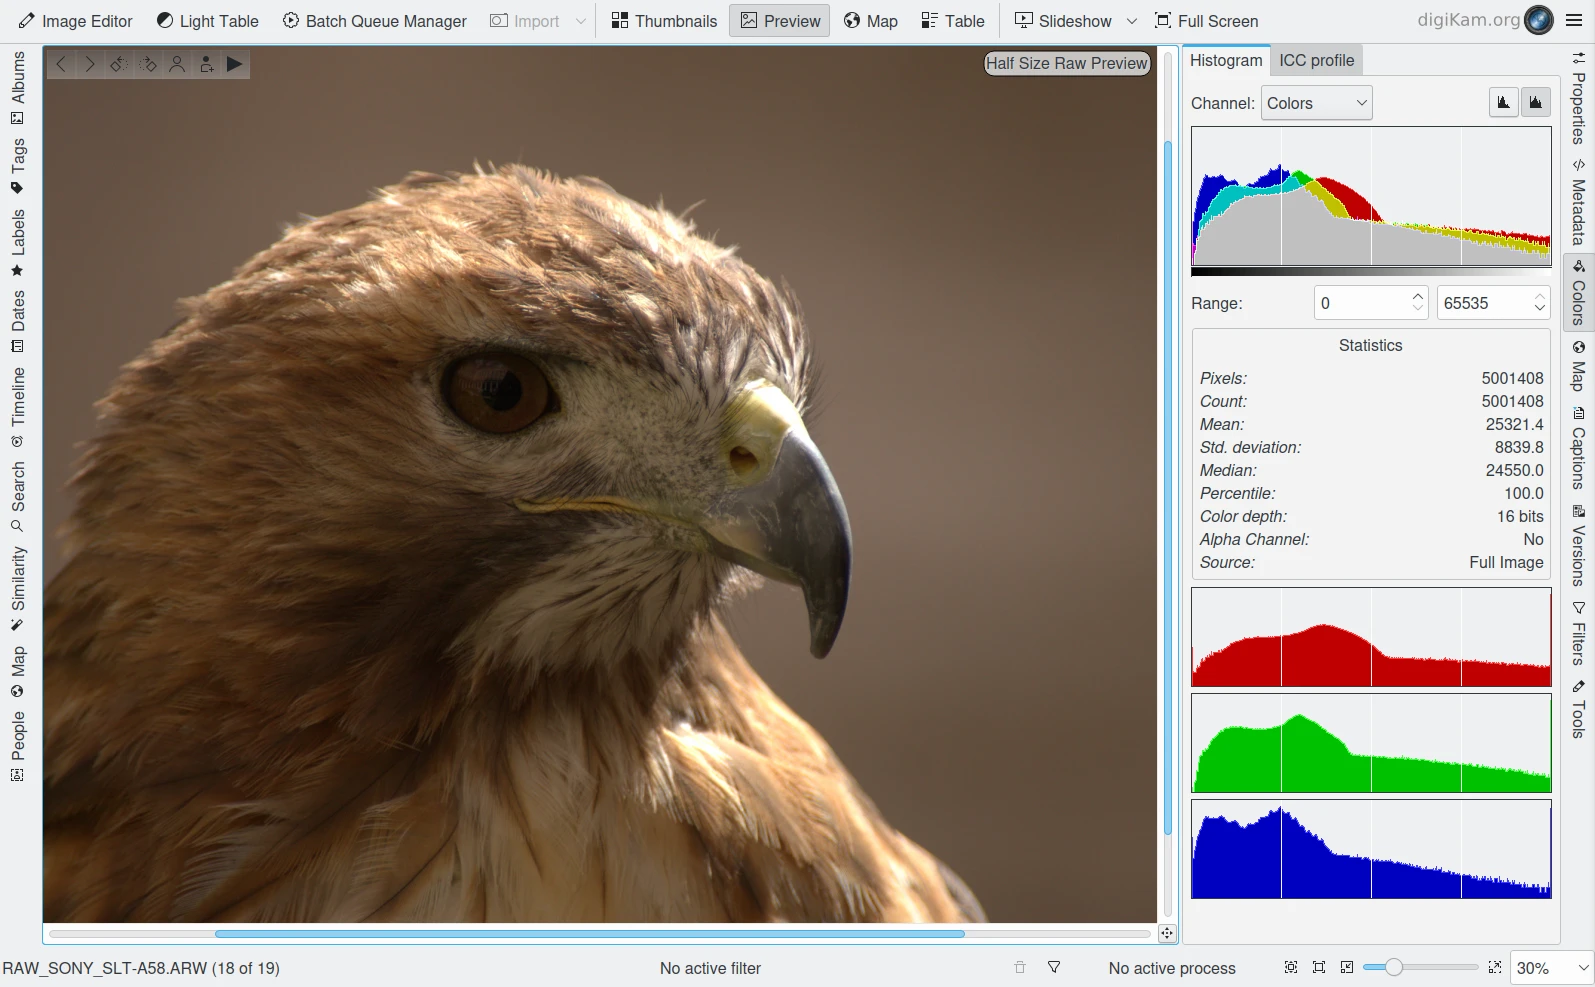
digiKam RAW Preview Using an Half Sized Demosaiced in 8 bits and Bilinear Method
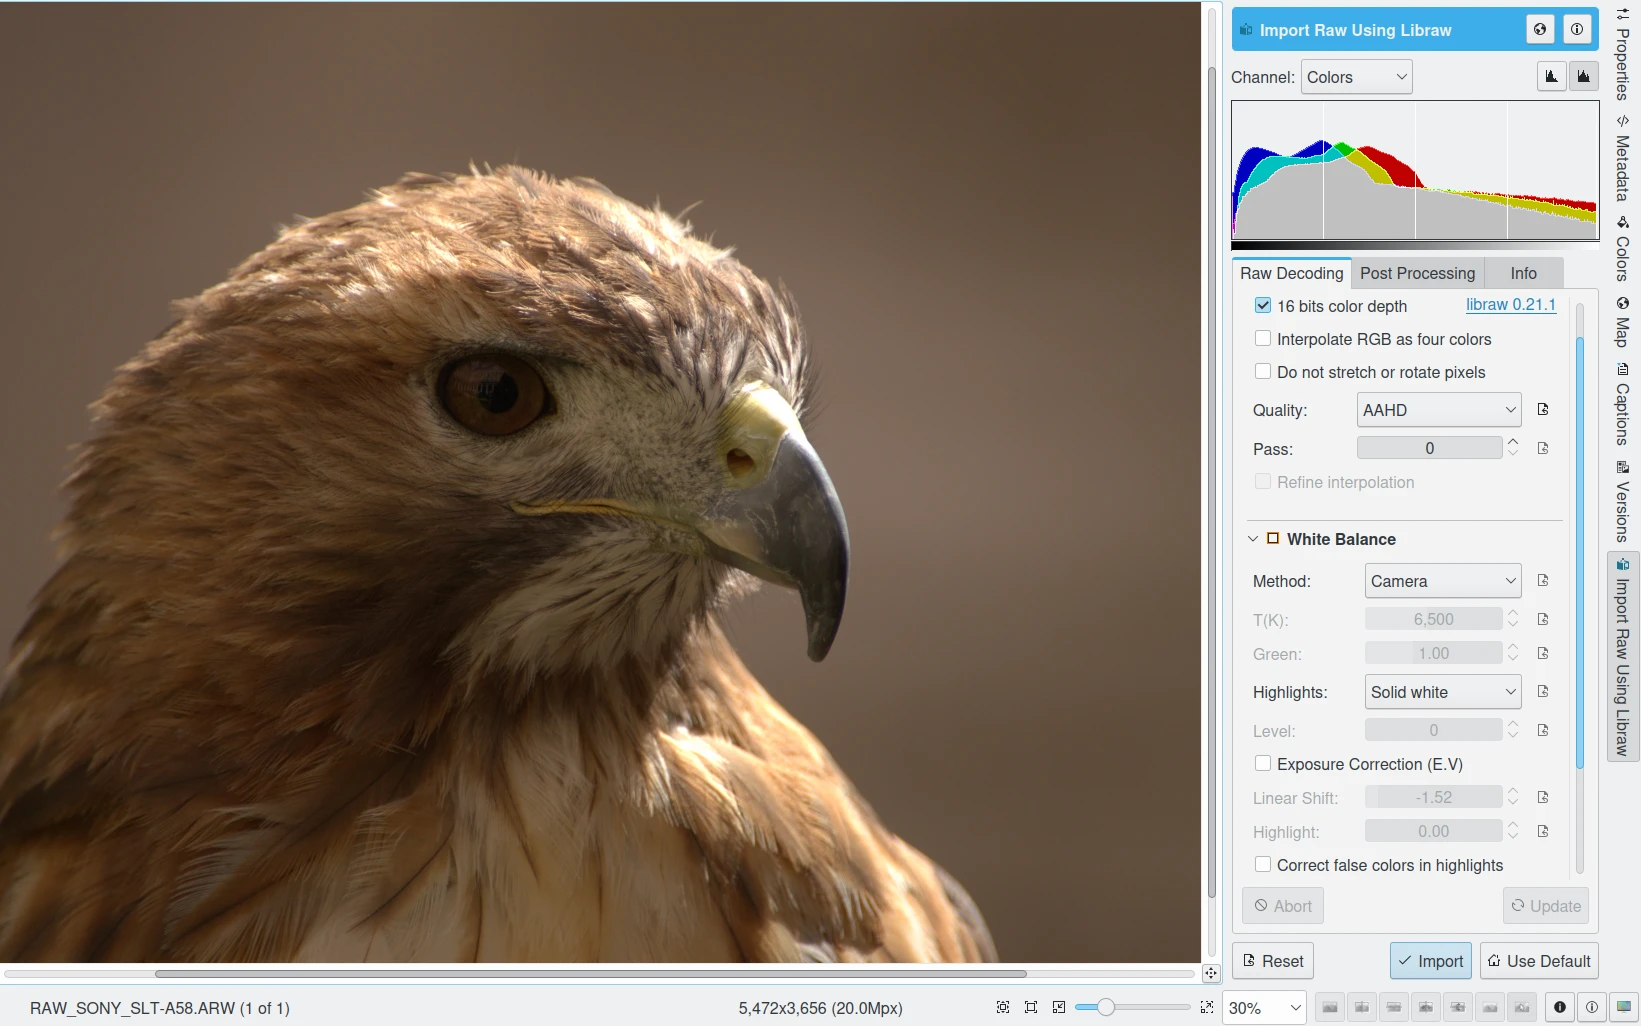
digiKam RAW Import Tool from Image Editor Loading RAW file Demosaiced in 16-bit and AHD Method
Why doesn’t the image produced by RAW converters like Libraw look like the embedded preview displayed by digiKam? All digital camera images start out as RAW files, whether or not the camera allows the user the option to save the image as a RAW file. When you ask the camera to save JPEGs instead of RAW files, the camera uses its on-board processor to convert the RAW file to a JPEG. That embedded preview is what your final image would have looked like if you had set your camera to save JPEGs instead of RAW files.
Canon for example offers the user several picture styles - neutral, standard, portrait, landscape, and so forth - that determine what kind of processing will be done to the RAW image file to produce the final image, whether or not the processing is done in-camera or later, using the proprietary Canon software. This processing software does give the user additional control, but still manipulates the RAW image file in accordance with the chosen picture style. Most of the Canon picture styles add a heavy S-curve and extra color saturation to give the picture more pop. Even if you choose the neutral picture style (the Canon picture style that gives you the least modified tonality); and select less contrast, less saturation, no noise reduction, and no sharpening in the Cannon RAW development software, you will find, if you know what to look for, that an S-curve and also shadow de-noising has been applied to your image.
Libraw, which digiKam uses to convert RAW files to image files, doesn’t add an S-curve to your image tonality. Libraw gives you the lights and darks that are actually recorded by the camera sensor. Libraw is one of only a handful of RAW developers that actually gives you the scene-referred tonality. And the Libraw scene-referred image is flat-looking, because the camera sensor records light linearly, whereas our eyes are constantly interacting with our brain to accommodate dim and bright areas in a scene, meaning our brain to some extent applies an S-curve to the scene to enable us to better focus in on the areas of particular interest as we look around.
The embedded JPEG preview looks so much nicer than Libraw’s output, so what is the value in scene-referred tonality? When you take a picture, presumably you have an idea of what you want the final image to look like. It is much easier to achieve that final image if you don’t have to undo stuff that has already been done to your image. Once Canon (or Nikon, or Sony, etc.) has applied their proprietary S-curves and shadow de-noising, sharpening, etc. to your image, then your shadows, highlights, edge detail, etc. are already squashed, clipped, chopped, and otherwise altered and mangled. You’ve thrown information away and you cannot get it back, especially in the shadows. This is true even with 16-bit images, that are actually 12- or 14-bit images, depending on the camera that have been encoded as 16-bits for the computer’s convenience. There just isn’t that much information to begin with.
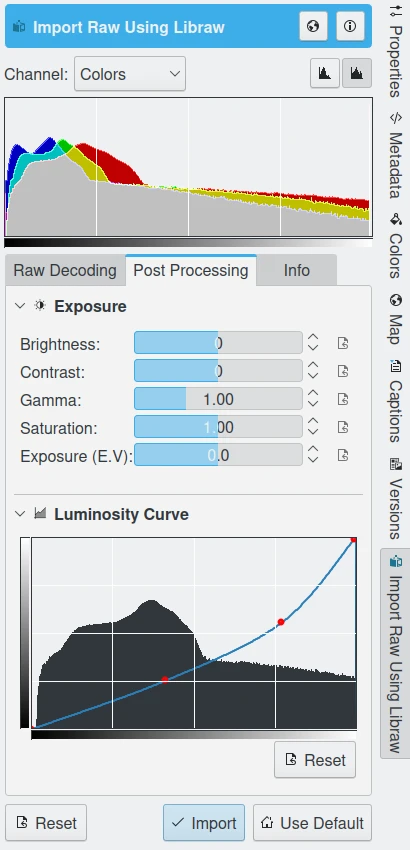
digiKam Raw Import Tool from Image Editor Allows Post Processing of Exposures and Curves just After Demosaicing
It seems to me that the heart and soul of image processing is the deliberate manipulation of image tonality, color, selective sharpening, and so forth, so that the viewer focuses in on what you, the photographer, found of particular interest when you took the picture. Why give the art of image processing over to some proprietary RAW processing software? In other words, flat is the preferred starting point if you’d rather give your images your own artistic interpretation. The alternative is to let the canned, proprietary algorithms produced by Canon, Nikon, Sony, etc. interpret your images for you. On the other hand, there is no denying that for many images, those canned algorithms are really pretty good.
You can see the value in starting your image-editing with a scene-referred rendition instead of the eye-popping rendition that you see in the embedded JPEG. But the images produced by digiKam and Libraw look a little bit different. If you asked Libraw to output a 16-bit file and the image looks very dark, then you have run into a problem with Libraw not applying a gamma transform before outputting the image file. You can use the Image Editor to apply the appropriate gamma transform to the image file produced by Libraw. Or you can find or make a camera profile with a gamma of 1.
If your image has pink highlights, check your White Balance settings in the RAW Import tool, especially the highlights options.

digiKam Raw Import Tool from Image Editor Allows to Tune Many Options about the Camera Colorimetric Values
If the image isn’t dark but it looks really weird, you probably made some injudicious choices in the Raw Import user-interface from the Image Editor. The Libraw interface conveniently allows you to dial in options. However, convenience always comes at a price. First, the interface might not provide access to all options. And second, to get the most from the Libraw interface, you have to know what the buttons, sliders, etc. in the interface actually do.
Camera Profile Specificity
Why are the Canon and Nikon colors better than the colors produced by Libraw? Color rendition is one place where the Canon (and presumably Nikon) proprietary RAW developing software does a really good job.
The proprietary RAW processing software is coupled with camera profiles that are specific to the RAW images coming from your make and model of camera, when processed using your make and model camera’s proprietary RAW processing software. With digikam’s Libraw user interface, you can apply Canon’s camera model picture style specific color profile to the Libraw output during the RAW development process, and the colors will still not be exactly the same as what Canon produces.
Digital cameras have an array of millions of little light sensors inside, in the form of either a CCD or a CMOS image sensor. These light-sensing pixels are by construction color-blind - they only record the amount, not the color, of light falling on them. So to allow these pixels to record color information, each pixel is capped by a transparent red, green, or blue lens, usually alternating in what is called a Bayer array (except for Sigma Faveon sensors, which work differently). A RAW image is nothing more than an array of values indicating how much light passed through the red, blue, or green lenses to reach the sensor.
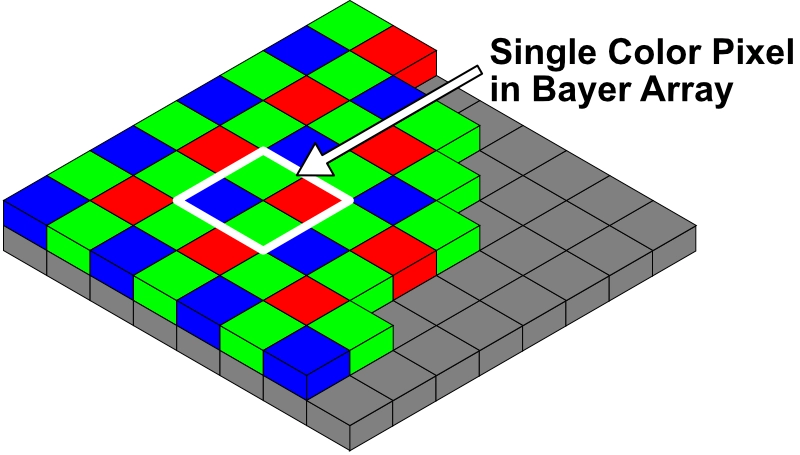
Bayer Array of RGB Filters Used to Measure Color
Clearly, pixel response to light is the result of lots of camera specific factors including: the nature of the sensor array itself, the precise coloring/transmissive qualities of the RGB lenses, and the particular analog to digital conversion and post-conversion processing that happens inside the camera to produce the RAW image that gets stored on the card.
Analog to Digital Conversion
Analog means continuously varying, like how much water you can put in a glass. Digitizing an analog signal means that the continuously changing levels from the analog signal source are rounded to discrete quantities convenient to the binary numbers used by computers. The analog to digital conversion that takes place inside the camera is necessary because the light-sensing pixels are analog in nature – they collect a charge proportionate to the amount of light that reaches them.
The accumulated charge on each pixel is then turned into a discrete, digital quantity by the camera’s analog to digital converter. Which by the way explains why a 14-bit converter is better than a 12-bit converter – more precision in the conversion output means less information is thrown away in the conversion process.
The charge accumulated in each pixel is also subject to a variety of noise terms. These noises add fluctuations to the RGB measurements, that are particularly visible in pictures taken with low light conditions. The digiKam and Libraw interface provides a Noise Reduction correction based on wavelets which can be applied while demosaicing.
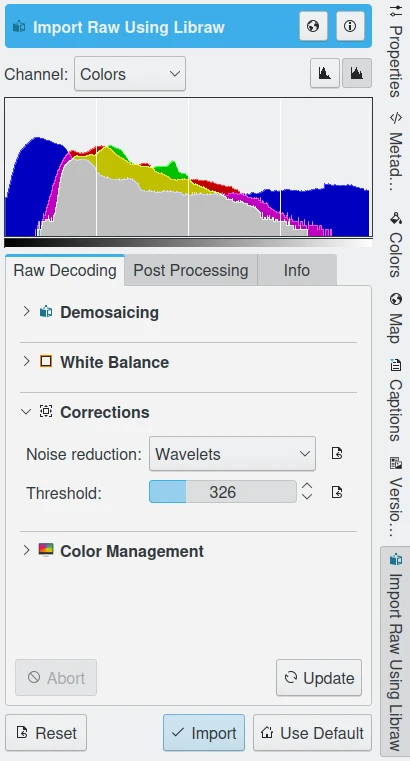
digiKam Raw Import Tool from Image Editor Allows Wavelets Noise Reduction While Demosaicing
Camera Profile and RAW Treatment
The whole point of interpolation using demosaicing algorithms such as Libraw’s default AHD (see Wikipedia’s article on Demosaicing for more information) is to estimate what color and intensity of light actually fell on any given pixel by interpolating information gathered from that single pixel plus its neighboring pixels. Every RAW processing program makes additional assumptions such as how much of the measured value is signal and how much is background noise, or at what point has the sensor well reached full saturation. The resulting output of all these algorithms, and the assumptions that RAW processing software makes, is a trio of RGB values for each pixel in the image. Given the same RAW file, different RAW processors will output different RGB values.
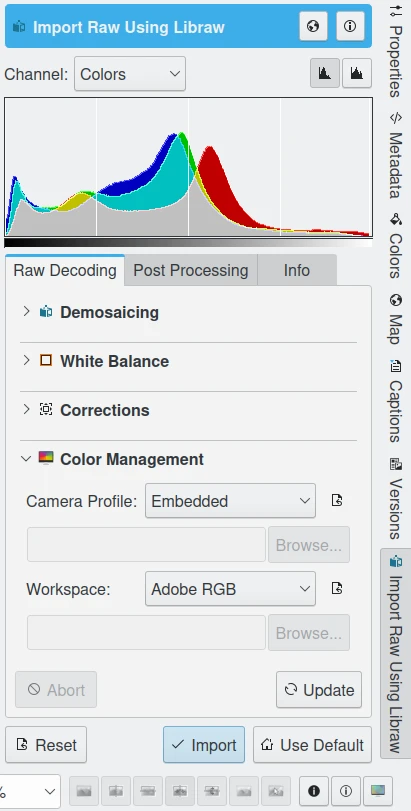
digiKam Raw Import Tool from Image Editor Allow to Tune the Color Profile to Apply While Demosaicing
Obtaining Camera Profiles
We wish we could tell you it was easy to find ready-made camera profiles. If you poke around the digiKam users forum archives, you’ll find additional advice. If you keep hunting and experimenting, likely you will find a generic profile that works well enough. However, as stated above, it’s an unfortunate fact of digital imaging that the camera profiles supplied by Canon, Nikon, and the like don’t work as well with open-source RAW converters as they do with each camera manufacturer’s own proprietary RAW converter. This is why proprietary programs have to make their own profiles for all the cameras that they support. And this is why you may eventually decide that you want a camera profile that is specific to your camera, your lighting conditions, and your RAW processing workflow.

The Draft of Color Management Logic for RAW Workflow Processing
Many commercial services provide profiling services, for a fee, of course. Or you can use Argyll to profile your camera yourself. If you want to profile your own camera, you will need an IT8 target, that is, an image containing squares of known colors. Along with the IT8 target, you will receive the appropriate set of known values for each square of color on the target.
If you plan to use Argyll to profile your camera, check the documentation for a list of recommended targets. To profile your camera, you photograph the IT8 target under specified lighting conditions (for example, in daylight, usually taken to mean noon on a sunny day in the summer, with nothing nearby that might cast shadows or reflect color onto the target) and save the image as a RAW file. Then you process the RAW file using your particular RAW processing software+settings and run the resulting image file through the profiling software. The profiling software compares the RGB values in the image produced by your camera+lighting conditions+RAW processing routine with the RGB values in the original target and then produces your camera (ICC) profile.
Profiling a camera is exactly analogous to profiling a monitor. When profiling a monitor, the profiling software tells the graphics card to send squares of color with particular RGB values to the screen. The spectrophotometer measures the actual color that is produced on the screen. When profiling a camera, the known colors are the RGB colors in the original patches on the IT8 target, which the profiling software compares to the colors produced by the digital image of the target.
Applying Camera Profiles
To set the default camera profile used for importing images into digiKam, navigate to , and select the desired camera profile. See the Color Management Settings section of the manual for more information.
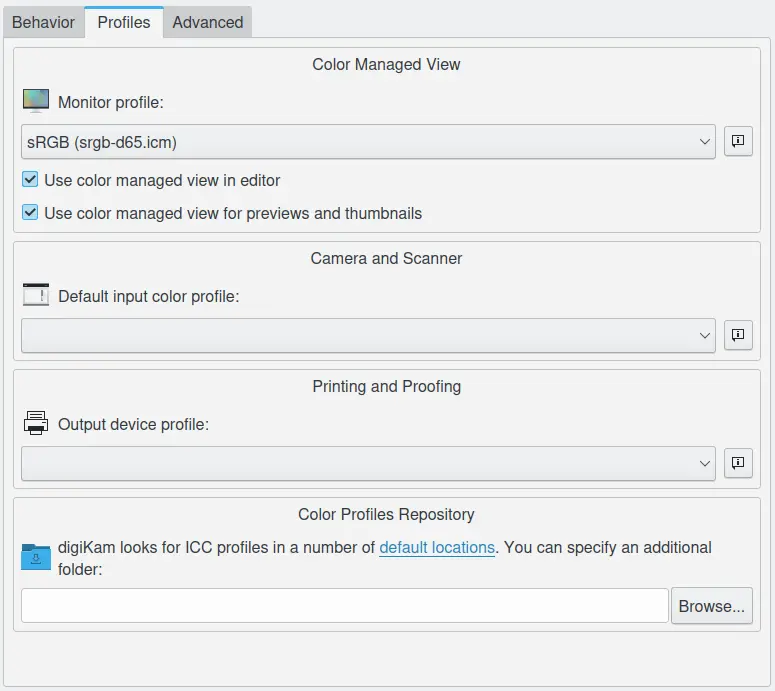
Dialog to set the Color Profiles in digiKam
You can also use the Batch Queue Manager to convert a 16-bit image file produced by some open-source RAW processing software into your working color space.
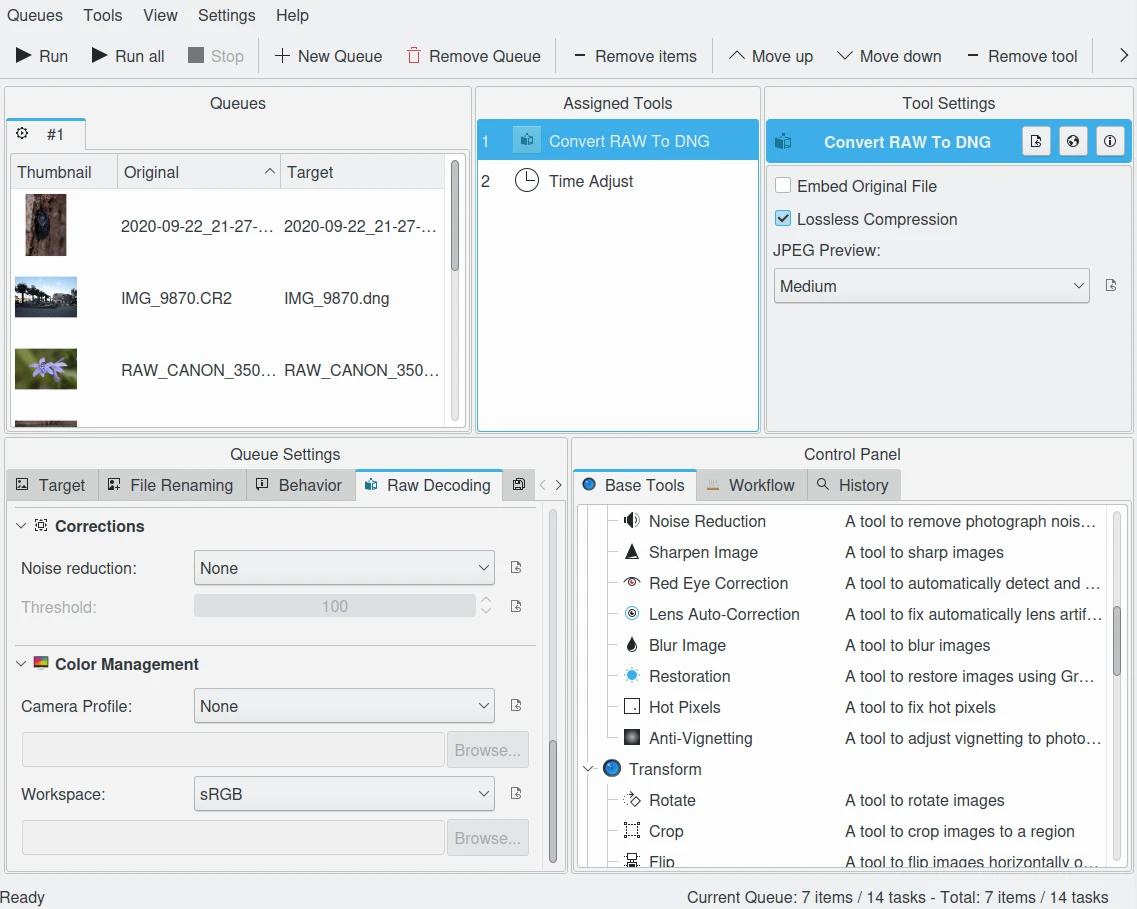
The digiKam Batch Queue Manager Raw Converter has the Same Noise Reduction and Color Profile Options as the Image Editor
Once a camera profile has been assigned, digiKam can display the color gamut of the selected image in the colors tab in the right sidebar.

digiKam can Display your Camera Color Profile from the Right Sidebar Colors Tab