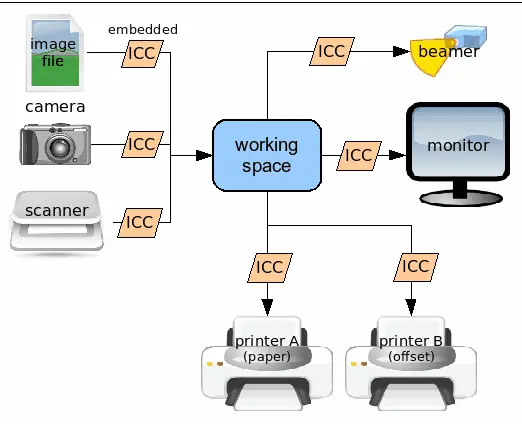
The point of a color-managed workflow is to ensure that the colors coming from your camera or scanner have a predictable relationship with the colors you actually photographed or scanned, that the colors displayed on your monitor match the colors coming from your camera or scanner, and that the colors you print or display on the web match the colors you produced in your digital darkroom.
The Overall Scheme of Color Spaces Used in a Color Managed Application as digiKam
When it comes to color management, everyone wants to know, which buttons to push to get the wanted results. Unfortunately, color management of necessity involves making informed choices at every step along the image-processing workflow. The purpose of this section is to provide sufficient background information on color management, along with links to more in-depth information, to enable you to begin to make your own informed decisions, based on your own desired results.
What follow is some additional comments and definitions to understand the Color Management:
Assign a profile means change the meaning of the RGB numbers in an image by embedding a new profile without changing the actual RGB numbers associated with each pixel in the image. Convert to a profile means embed a new profile, but also change the RGB numbers at the same time so that the meaning of the RGB values - that is, the real-world visible color represented by the trio of RGB numbers associated with each pixel in an image - remains the same before and after the conversion from one space to another.
On the other hand, every time you assign a new working space profile rather than convert to a new working space (except when initially assigning a camera profile to the image file you get from your RAW processing software), the appearance of the image should more or less drastically change (usually for the worse, unless the wrong profile had previously been inadvertently embedded in the image).
In theory, you should be able to do multiple conversions of an image from one working space to another, and if you are using a color-managed image editor, even though all the RGB numbers in the image will change with each conversion, the image displayed on your screen should look the same. In actual fact, because of rounding errors upon each conversion, not to mention gamut-clipping when going from a larger to a smaller working space, every time you convert from one space to another the image degrades a bit.
Device-dependent and device-independent profiles: The camera profile, a scanner profile, your monitor’s profile, and your printer’s color profile are all device-dependent profiles - these profiles only work with the specific device for which they were produced by means of profiling. Working space profiles and the Profile Connection Space are device-independent. Once an image file has been translated by Lcms to a device-independent working space, in a sense it no longer matters what device originally produced the image. But as soon as you want to display or print the image, then the device (monitor, printer) used matters a great deal and requires a device-dependent profile.
An interpolated RAW file isn’t a RAW file. For some reason this simple point causes a lot of confusion. But after a RAW file has been interpolated by RAW processing software and then output as a TIFF or JPEG, the original RAW file is still a RAW file, of course, but the interpolated file is just an image file. It isn’t a RAW file.
Linear has two related and easily confused definitions. Linear can mean that the image tonality reflects the tonality in the original scene as photographed instead of being altered by the application of an S-curve or other means of changing local and global tonality. It can also mean that the gamma transfer curve of the color space is linear. An image can be linear in either, both, or neither of these two senses. A RAW image as developed by Libraw is linear in both senses. The same image as developed by Canon’s RAW processing software won’t be linear in either sense.
HDR and LDR do not refer to the bit-depth of the image. High dynamic range and Low dynamic range refer to the total dynamic range encompassed by an image. A regular low dynamic range image, say encompassing a mere 5 stops (the average digital camera these days can easily accommodate 8 or 9 stops), can be saved as an 8-, 16-, 32-, or even 64-bit image, depending on your software, but the dynamic range of the image isn’t thereby increased. Only the number of discrete steps from the brightest to the darkest tone in the image has changed. Conversely, a 22-stop scene (way beyond the capacity of a consumer-oriented digital camera without using multiple exposures) can be saved as an 8- or 16-bit image, but the resulting image will exhibit extreme banding (that is, it will display extreme banding in any given tonal range that can actually be displayed on a typical monitor at one time) because of the relatively few available discrete tonal steps from the lightest to the darkest tone in the image.
In-camera produced JPEGs don’t need a camera profile: All JPEGs (or TIFFs) coming straight out of a camera (even if produced by point-and-shoots cameras that don’t allow you to save a RAW file) start life inside the camera as a RAW file produced by the camera’s Analog to Digital converter. If you save your images as JPEGs, then the processor inside the camera interpolates the RAW file, assigns a camera profile, translates the resulting RGB numbers to a working space (usually sRGB but sometimes you can choose AdobeRGB, depending on the camera), does the JPEG compression, and stores the JPEG file on your camera card. So JPEGs (or TIFFs) from your camera don’t need to be assigned a camera profile which is then translated to a working space. JPEGs from a camera are already in a working space.
Useful mathematical information: If you are dealing with Libraw’s linear gamma output: Mathematically speaking, when doing a gamma transform you normalize (that is, divide by 256 if you are working with 8-bit values) the RGB numbers and raise the resulting numbers to an appropriate power depending on the respective gammas of the starting and ending color space, then re-normalize the results to a new set of RGB numbers. It’s not hard, and very instructive, to do this with a calculator for a few sets of RGB numbers spaced from (0,0,0) to (255,255,255) to see how RGB numbers change from one gamma encoding to another. Lcms does this for you when you ask Lcms to convert from one color space to another.
Copyrighted and copyleft working spaces:
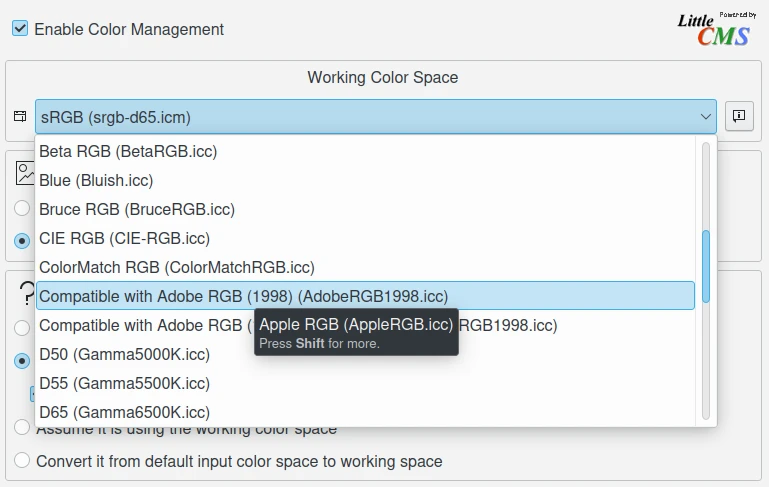
The several variants of sRGB. See the chapter dedicated to this color space.
AdobeRGB, Adobe WideGamutRGB, and Kodak/Adobe ProPhotoRGB (Kodak and Adobe ProPhoto are the same, just branded differently) and their non-branded, non-copyrighted counterparts.
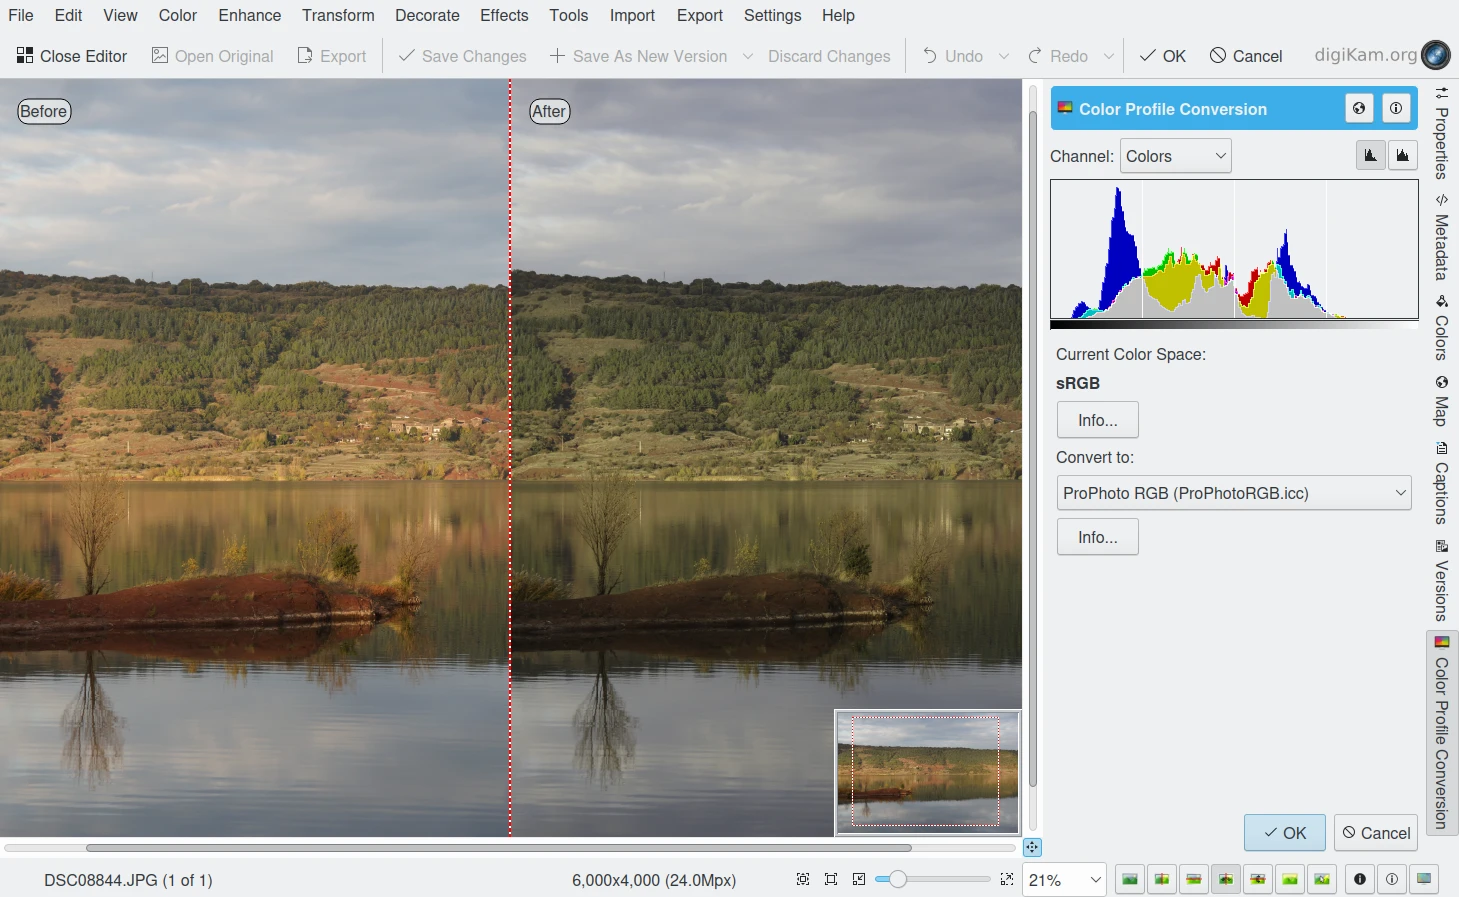
digiKam Image Editor Color Space Converter Allows to Switch to Another Color Profile
And quite a few other working spaces that could be added to this list, are all more or less suitable as working spaces. Which working space you should use depends only and solely on you, on your requirements on the Image Editor with your eventual output intentions (web, fine art print, etc.). However, as a critical aside, if you are using Adobe or other copyrighted working space profiles, these profiles contain copyright information that shows up in your image Exif information.
Soft Proofing is a way of previewing on the screen the result to be expected from an output on another device, typically a printer. Soft proofing will show you the difference to be expected before you actually do it (and waste your costly ink). So you can improve your settings without wasting time and money. For more information take a look to the dedicated section from this manual.
Rendering intent refers to the way gamuts are handled when the intended target color space cannot handle the full gamut. For more information take a look to the dedicated section from this manual.
The question for each RGB trio of values in the (let us assume) 16-bit TIFF produced by Libraw becomes, what does a particular trio of RGB values for the pixels making up images produced by this particular (make and model) camera really mean in terms of some absolute standard referencing some ideal observer.
This absolute standard referencing an ideal observer is more commonly called a Profile Connection Space (PCS). A camera profile is needed to accurately characterize or describe the response of a given camera’s pixels to light entering that camera, so that the RGB values in the output file produced by the RAW converter can be translated first into an absolute Profile Connection Space and then from the Profile Connection Space to your chosen working space.
As a very important aside, in digiKam the software used to translate from the camera profile to the Profile Connection Space and from the Profile Connection Space to your chosen working space and eventually to your chosen output space (for printing or perhaps monitor display) is based on Lcms (the Little Color Management engine). For what it’s worth, Lcms does more accurate conversions than Adobe’s proprietary color conversion engine. Further, the RAW conversion in digiKam is based on decoding of the proprietary RAW file done by Libraw. This library, is a great open-source component as without it we’d all be stuck using the usually Windows or Mac only proprietary software that comes with our digital cameras. The Libraw’s interpolation algorithms (not to be confused with the aforementioned decoding of the proprietary RAW file), which are part of digiKam if properly used, produce results equal or superior to commercial, closed source software.
There are two commonly used Profile Connection Spaces - CIELAB and CIEXYZ (see this wikipedia Color management section for details). Lcms uses the camera profile to translate the RGB values from the interpolated RAW file, into the appropriate Profile Connection Space (usually CIEXYZ). A profile connection space is not itself a working space. Rather a Profile Connection Space is an absolute reference space used only for translating from one color space to another - think of a Profile Connection Space as a Universal Translator for all the color profiles that an image might encounter in the course of its journey from camera RAW file to final output:
Lcms uses the camera profile, also called an Input profile, to translate the interpolated Libraw-produced RGB numbers, which only have meaning relative to your (make and model of) camera, to a second set of RGB numbers that only have meaning in the Profile Connection Space.
Lcms translates the Profile Connection Space RGB numbers to the corresponding numbers in your chosen Working space so you can edit your image. And again, these working space numbers only have meaning relative to a given working space. The same red, visually speaking, is represented by different trios of RGB numbers in different working spaces; and if you assign the wrong profile the image will look wrong, slightly wrong or very wrong depending on the differences between the two profiles.
While you are editing your image in your chosen Working space, then Lcms should translate all the working space RGB numbers back to the Profile Connection Space, and then over to the correct RGB numbers that enable your monitor (your display device) to give you the most accurate possible display representation of your image as it is being edited. This translation for display is done on the fly and you should never even notice it happening, unless it doesn’t happen correctly - then the displayed image will look wrong.
When you are satisfied that your edited image is ready to share with the world, Lcms translates the Working space RGB numbers back into the Profile Connection Space space and out again to a Printer color space using a Printer profile characterizing your printer/paper combination (if you plan on printing the image) or to sRGB (if you plan on displaying the image on the web or emailing it to friends or perhaps creating a slide-show to play on monitors other than your own).
To back up a little bit and look at the first color profile an image encounters, that is, the camera profile (see point 1. immediately above) - Libraw can in fact apply your camera profile for you (Libraw uses Lcms internally). But the generating data composed of the interpolated RGB values derived from the camera RAW file, and the application of the camera profile to the interpolated file, are two very distinct and totally separable (separable in theory and practice for Libraw; in theory only for most RAW converters) steps.
This manual section has a bit of information on where to find ready-made camera profiles. It’s an unfortunate fact of digital imaging that the camera profiles supplied by Canon, Nikon, and the like don’t work as well with RAW converters other than each camera manufacturer’s own proprietary RAW converter. They have to make their own profiles for all the cameras that they support - keep this proprietary propensity of your camera manufacturer in mind next time you buy a digital camera.
To finding a camera profile for your camera is to make your own camera profile or have one made for you. There are quite a few commercial services who provide profiling services (for a fee, of course). Or you can use Argyll to profile your camera yourself. We cannot speak about how easy or difficult the process of profiling a camera might be. But we would imagine, knowing how very meticulous the people behind Argyll, and Lcms are about color management, that making your own camera profile is very do-able and very likely the results will be better than any proprietary profile. After all, Canon didn’t profile your camera, they just profiled a camera like your.
So now your RAW file has been interpolated by Libraw and you’ve obtained a camera profile and used Lcms to apply your camera profile. What does all this mean? The real answer involves a lot of math and color science that goes way over my head and likely yours. The short, practical answer is that neither the camera profile space nor the Profile Connection Space is an appropriate space for image editing.
Your next step is to choose a working space for image editing. Lcms, the color management engine that digiKam uses, perform a double translation. First Lcms uses the camera profile to translate the RGB values of each pixel in the Libraw output image without camera-profile applied into the aforementioned Profile Connection Space. Then it translates the RGB values of each pixel from the Profile Connection Space to your chosen working space.
digiKam Knows Where to Find the Color Profiles Installed on Your System and list Files in Setup Dialog For Selection