Printer Profiles
Usar um Perfil de Impressoras
You are now almost ready to print that image. But where do you get a printer profile? You already know the answer. You can use the generic profile that comes with your printer. You can purchase a professionally produced profile. Some commercial printing establishments will send you their printer profiles (which will with their printers, but not your printer). Or, you can make your own printer profile using Argyll, in which case your profile can be tailored to your particular paper, inks, and even image characteristics. For example, if you are printing a series of images with a color palette limited to subdued browns, you don’t need a printer profile that tries to make room for saturated cyan and blue.
To set the default printer and soft-proofing profile used in digiKam, navigate to , and select the desired profile. See the Color Management Settings section of the manual for more information.

digiKam Color Management Setup Dialog Page for Customizing the Printer and Soft Proofing Color Profile
Soft Proofing
Soft-proofing will show you the differences to be expected between what you see on your screen and what you will see when you make a print. To soft-proof, you need a profile for your printer (actually, for your printer-paper combination, as the paper used affects the ink colors and the white point). If you don’t like the soft-proofed image, you can make changes in your working space, before converting the image to your printer space.
Soft-proofing is enabled within the Image Editor by selecting .
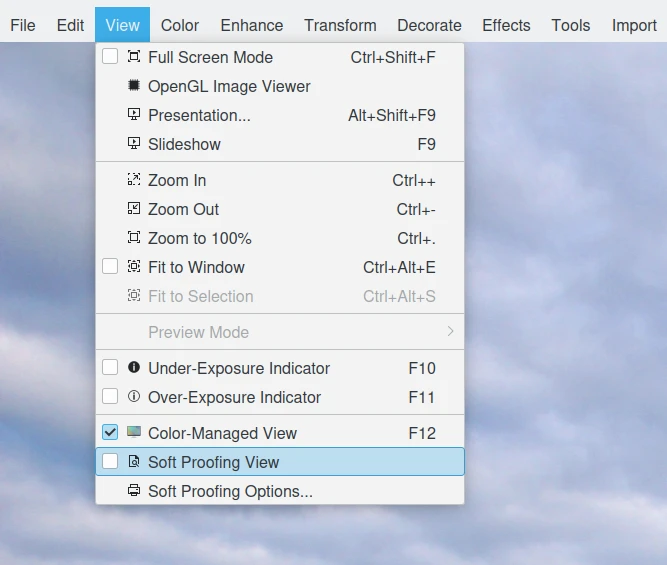
Itens de Menu de Prova Suave no Editor de Imagens do digiKam
As illustrated below, options for Soft-proofing can be set by selecting while in the Image Editor.
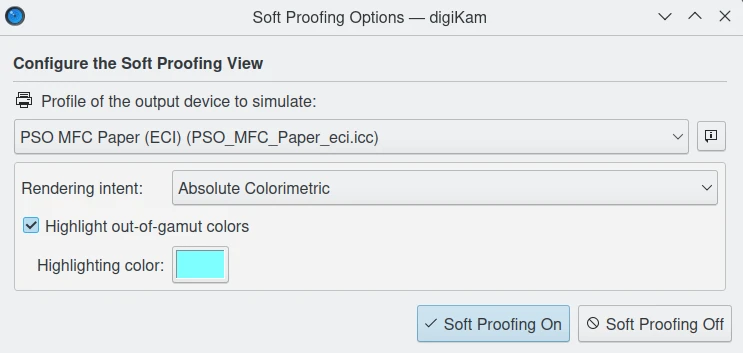
Opções da Prova Suave do Editor de Imagens do digiKam
Perceptual intent may or may not give the best results with soft-proofing, depending on the respective gamuts of the image and printer/paper combination in question. Usually, the Colorimetric intents give clearer, brighter colors, albeit at the cost of having to carefully re-edit the image to avoid clipping highlights and shadows. So while Perceptual is always an option, it may not be the best option.
A tentativa de desenho por Percepção é uma escolha segura, porque evita a distorção dos tons escuros e claros, ainda que seja à custa de reduzir a saturação de todas as suas cores. Por isso, se não se quiser incomodar a fazer qualquer prova suave, escolha a tentativa de desenho por percepção (se não quiser fazer a prova suave, provavelmente também deverá ficar com o sRGB).
Compensação do Ponto Negro
A Compensação do ponto preto é uma forma de fazer ajustes entre os níveis de preto máximos dos ficheiros digitais e as capacidades de preto dos vários dispositivos digitais, como as impressoras.
To turn black point compensation on or off, navigate to . See the Color Management Settings section of the manual for more information.
Black point compensation results depend on the context. Try soft-proofing with black point compensation on. If you like it, use it. Otherwise, don’t use it.
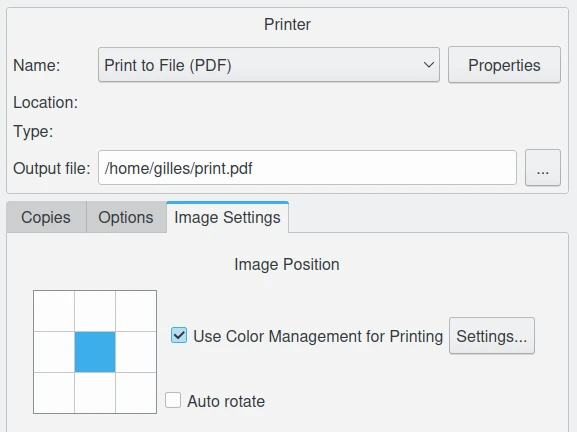
digiKam Image Editor Print Feature Allows Using Your Preferred Printer Color Profile and Tune the Black Point Compensation