Coordinates Tools
Details
The coordinates can be set manually in the Details tab. The location can be found and iteratively adjusted with the displayed map. Move the mouse cursor to the region of interest, zoom in, manually adjust the location, zoom in again, and so on until sufficient accuracy is achieved. Note that the zoom center will always be at the cursor position. Eventually you can click with the right mouse button at the desired position and choose Copy Coordinates. Now you can go to the list of images below the map, select one or more images, right click on any of the selected images and choose Paste Coordinates. The coordinates will then be displayed in the Latitude and Longitude fields to the right of the map. Click the Apply button under the DOP field in the right sidebar to apply the changes to the last image that was selected in the image list. Click the Apply button under the list of images at the bottom of the window to save your changes to the selected images.
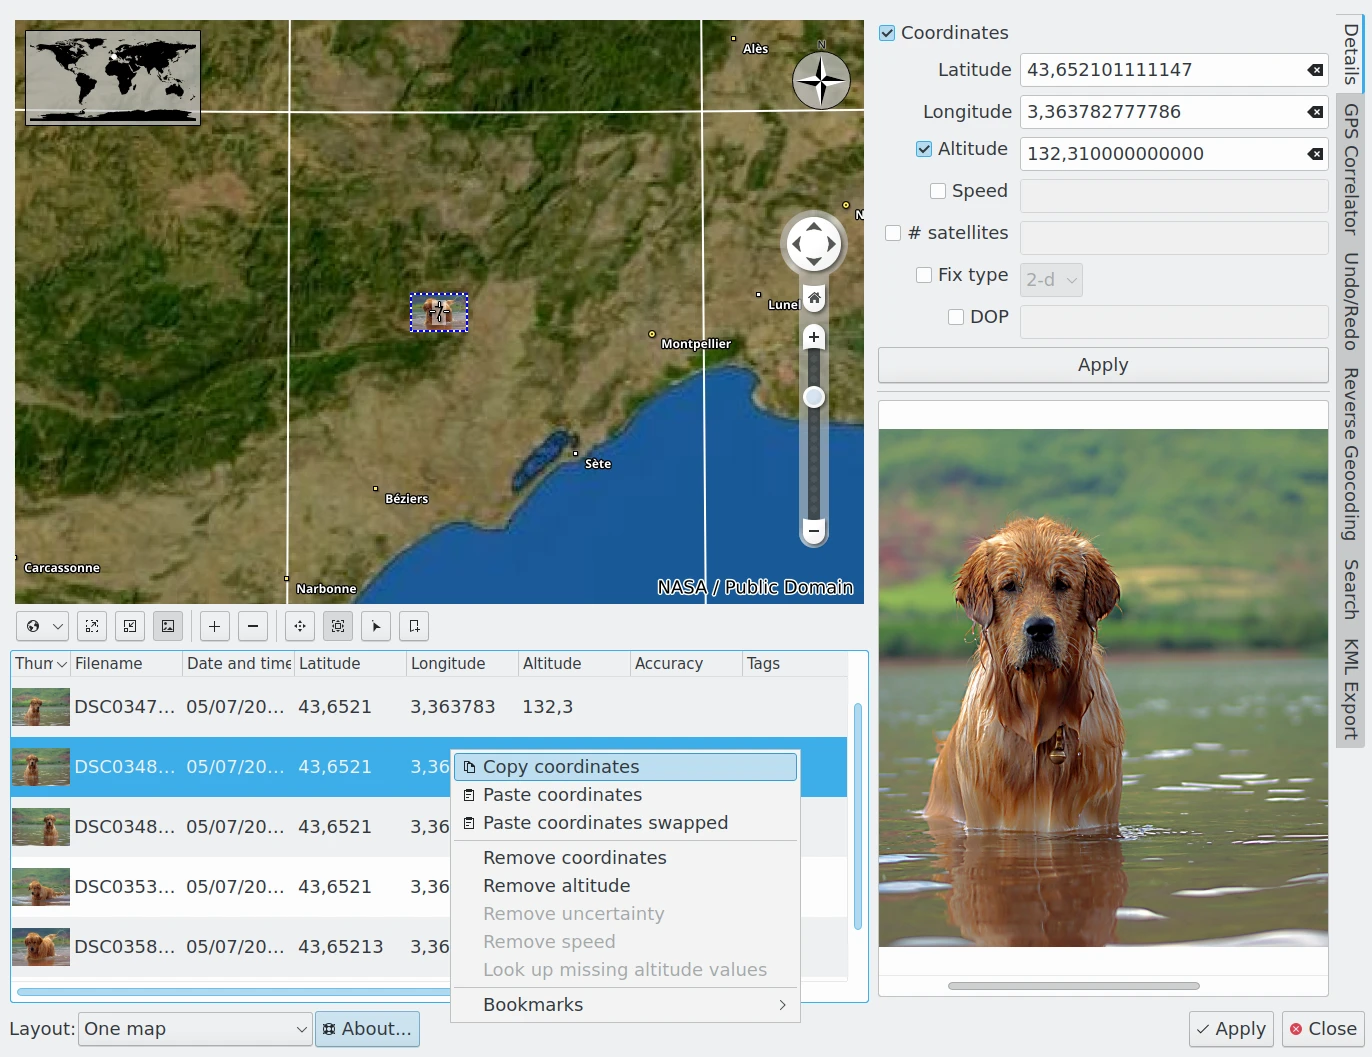
The digiKam Geolocation Details View with a Map Using Off-Line Data
If you have one or more images that already have GPS data you can copy the coordinates from one of those and paste them to one or more other images by using the respective items from the context menu on the list of images. This comes in handy if there is a series of photos taken at the same location.
To the right of the map there are, beside latitude and longitude, fields for altitude, speed, number of satellites, fix type and positional uncertainty (DOP which stands for Dilution of Precision). You may see these fields already filled in if you select a photograph where your camera wrote this information into the Exif data. Otherwise if you have these data from somewhere else, e.g. a separate GPS receiver, you can fill them in manually. Note that you have to check the relevant checkbox before you can edit a field (under Windows® you may have to double-click it).
There is a simple alternative to filling in the Altitude field for images that have an assigned latitude and longitude. Use the context menu in the list of images to select Look Up Missing Altitude Values. This causes the editor to look up the altitudes in the map data and assign it to the photographs.
To delete geolocation data you must un-check the relevant checkbox and click the Apply button right under the DOP field. Alternatively, the context menu for the list of images offers several items that remove GPS fields from the image. The last item in the context menu for the list of images is Bookmarks which is described in this section of the manual.
GPS Correlator
The GPS Correlator will correlate the picture time recorded in the camera image file with a coordinate file created by a GPS device. In order to do this, the camera must have an accurate time setting and GPS tracking information must be available as a XML file in GPX format. The idea is to carry a small GPS device with you that is continuously running and recording your position while you take your pictures. Once you are done, download the pictures and the GPS track file (converting to GPX if necessary), run the correlator to find the image file timestamps in the GPX track file, and tag the pictures with the correct locations. There are many options for creating GPX files, with one useful example of a conversion utility being gpsbabel which can download and convert tracking data from a GPS device.
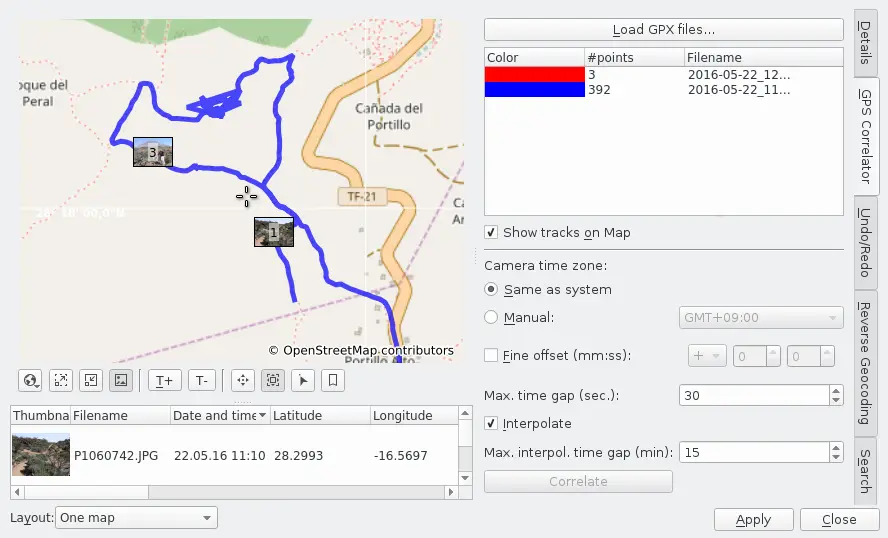
The digiKam Geolocation Correlator
Select the images you want to correlate in the application main view, then call the geolocation editor with Ctrl+Shift+G and switch to the GPS Correlator tab on the Right Sidebar. The above dialog will show up with the selected images in the list below the map. To indicate possible time/location correlations, use Load GPX File to load a GPS track file that contains GPS data taken at the same time and location as the pictures.
When the file is loaded and Show Tracks On Map is checked, the track is displayed on the map. You can load more than one track file. digiKam will assign different colors to each loaded track for display on the map.
GPS track data is invariably recorded in UTC (Universal Time Coordinated). If your camera is set to timestamp images in UTC, then you are all set. Otherwise, you'll need to use the Camera Time Zone setting to allow digikam to convert the image time stamps to UTC. Select Same As System if you took the photographs in your home time zone and digiKam will set the difference to UTC based on your system time. If you took the photographs somewhere else, you have to check Manual and choose the appropriate time zone difference from the drop-down field to the right. You can also use the Offset of pictures setting to correct for smaller mis-adjustment of your camera's clock. This allows you to add or subtract a specified number of hours, minutes and seconds from the image time stamps. None of these corrections will affect your images, but are used in correlating the image timestamps with the GPS tracks.
If Match directly is selected, the Max. Time Gap (sec.): setting specifies the limit that GPS time and camera time are deemed to be coincident. The maximum value is 2000 seconds. This means that if no entry in the gpx-file exactly matches the time stamp of the photograph, the position of the entry with the smallest time gap to the photograph will be assigned to it as long as this time gap is smaller than the Max. time gap (sec.) setting. If you wonder what value you should specify here, a look into the settings of your track recording device/software or into the gpx-file (which is easily viewed with a text editor) might help. The faster you were moving while taking the photograph(s) the more important this decision will be.
Interpolate offers another option in case there is no exact match between the time stamp of your photograph(s) and an entry in the gpx-file. It will be the more precise option as long as you were moving more or less in a straight line between the two recorded GPS positions. Here the position of the photograph is calculated using linear interpolation from the positions of the two closest entries in the gpx-file and the respective differences in time. If, for instance, the time gaps between the two closest entries and the photograph are equal, the position assigned will be on a straight line midway between the positions of the two entries.
Max. Interpol. Time Gap (min): has nothing to do with policeman Max from Interpol. It instead determines whether a GPS point is eligible for interpolation. If the closest GPS time is farther away from the picture time than this limit, then it is not used. The maximum time difference that can be set here is 4 hours.
Once your settings are complete, you click on the Correlate button. If there are no time matches you will get the message "Could not correlate any image - please make sure the timezone and gap settings are correct." Otherwise you will get something like "2 out of 4 images have been correlated. Please check the timezone and gap settings if you think that more images should have been correlated." In the best case you get "All images have been correlated. You can now check their position on the map."
If you want to follow this recommendation it is a good idea to change to the Details tab since there you have a preview of the images that can help identify the actual locations of the images on the map. Remember that you always have to click on an image in the list under the map to make its preview show up.
If you find some errors after correlating, you can always adjust the time zones and offsets, and perform another correlation. Once you are satisfied with the results click the Apply button at the bottom of the Geolocation Editor to save the changes to the image file and the database.
Undo And Redo
The Undo/Redo tab displays a history of all the changes you apply to the images loaded into the Geolocation Editor. The history shows changes made in only one tab or in several tabs and is deleted only when you leave the editor. After a few actions in the different tabs the record might look like this:
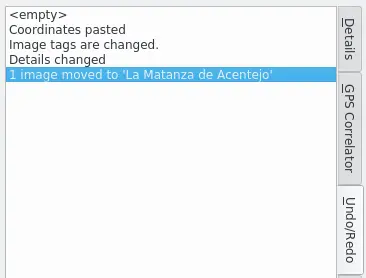
The digiKam Geolocation Correlator Undo/Redo View Example 1
The last step is highlighted when you enter the tab. The first step is always labeled “empty” and represents the status the images had when they were loaded. You can click on every step and, depending on what kind of changes you made, you might see the images appearing, disappearing or moving on the map, or see the differences in the list of images under the map.
Now let's assume that you realize that the move in the last step was wrong. You just click on the step before (Details changed), you go to the Search tab (described further below) and you do another move. After returning to the Undo/Redo tab it might look like this:
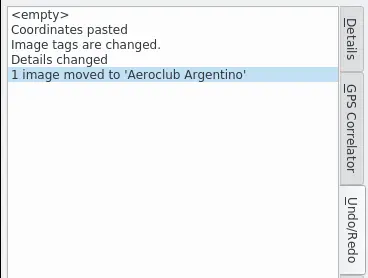
The digiKam Geolocation Correlator Undo/Redo View Example 2
If you want to ignore all the changes you made in this Geolocation editor session, click on “empty” and then Close.