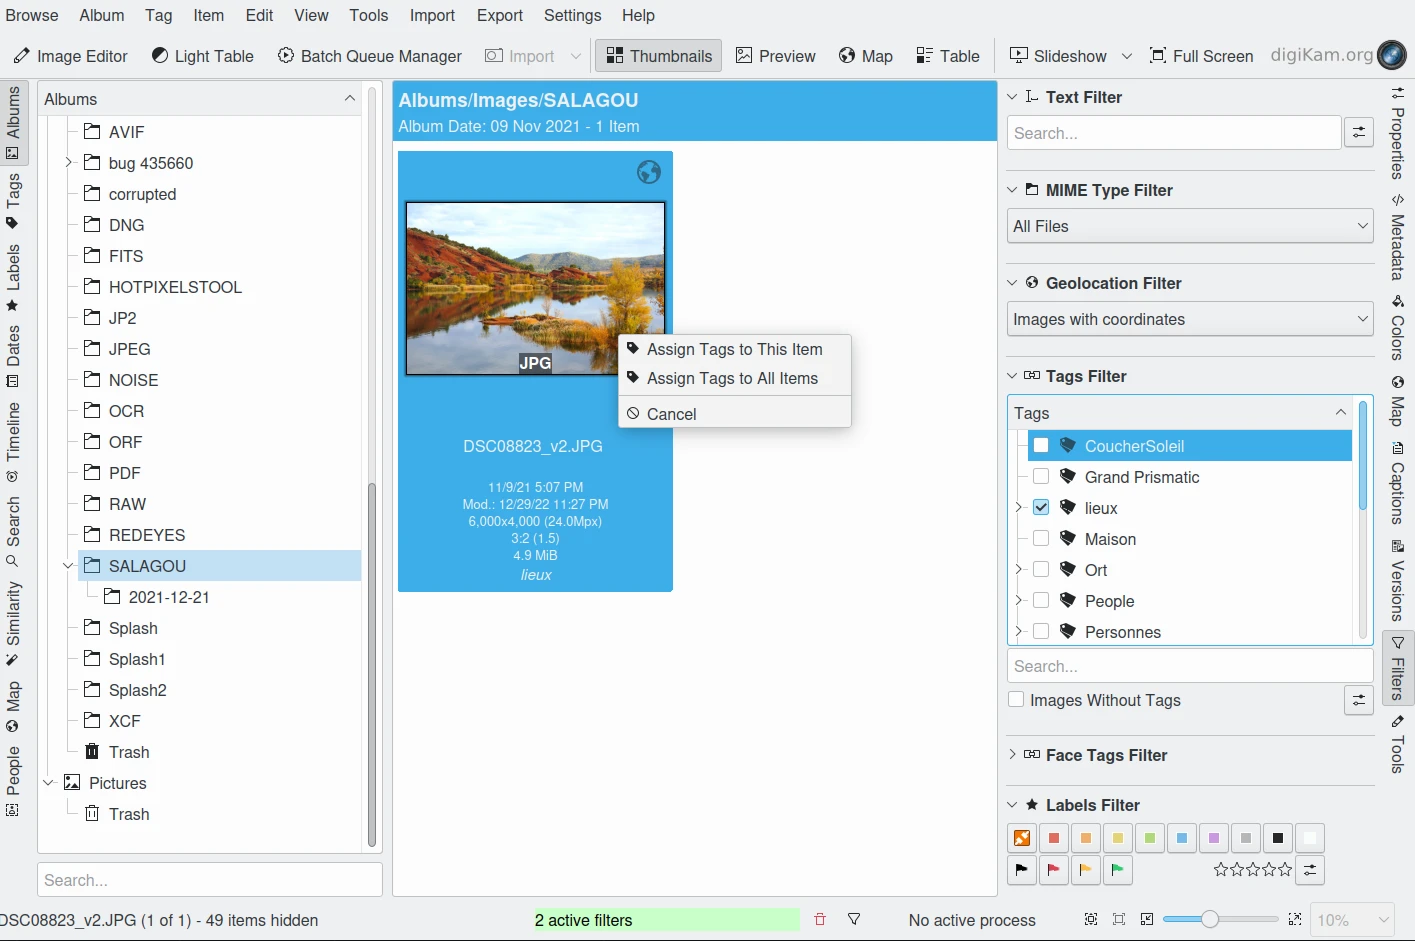
Filters View
The Filters tab is used to limit the set of images displayed in the Image Area. Normally one uses the Left Sidebar with its different views to limit which images are displayed. For example, selecting an album in the Left Sidebar limits the content in the Image Area to images in that album, while selecting a label in the Left Sidebar limits the content in the Image Area to images with that assigned label. The Filters tab on the Right Sidebar offers a number of filters which if selected, will further limit the content displayed in the Image Area.
To give an example, suppose you have a tag called public which tags all images except your private ones. Then you can check this public tag in the Right Sidebar to hide the private images (all those do not have the public tag). Then whatever view mode you chose from the Left Sidebar, only public images will be displayed.
Another typical example is the selection of a subset of tags in a hierarchical tree. Suppose you want to display red and green from a tag tree containing 7 different colors as sub-tags. Simply click on the color tag in the Left Sidebar and check red and green in the Right Sidebar.
You can also use a combination of the filters, but that requires a little more explanation. Image selection is based in the boolean AND of all of the different filter types in the Filter sidebar. This include the Text, MIME Type, Geolocation, Tags, and Face Tags filters, along with the color, pick, and rating filters in the Labels Filter section. These means that all selected filters have to be satisfied for an image to be displayed. If you select JPG in the MIME type Filter and red in the Labels Filter only those photographs from the selection on the Left Sidebar will be displayed that have JPG format AND are labeled red.
On the other hand, the tags in the tag filter and the individual labels within one type of labels are connected with boolean OR, as you might have noticed already in the public/private example above. That means if you check more than one tag in the Tags Filter all images with at least one of these tags applied will show up (as long as they are not ruled out by one of the other filters).
Another use of the Right Sidebar’s Filter tab is drag and drop tagging. Let’s say you chose a numbers of images to display using the Left Sidebar. In order to apply an existing tag to a selection of these images, simply drag the tag from the Right Sidebar onto an image. A dialog will pop-up and ask if this tag should be applied to this item only, to all (displayed) items, or to the selected items in the case that more than one icon was selected. Images can also be tagged by dragging the image(s) onto the tag in the Right Sidebar.

The Filters View From Right Sidebar
In the above example the main window shows the images from an album, the tag filter is set to ‘Lieux’, which reduces the set to 3 images. In the Geolocation Filter, we select Images With Coordinates which leaves only one picture from the list of items including GPS information. Then a tag is dragged from the Tag Filter over the icon and dropped. A pop-up dialog asks if the tag shall be applied to this item only or to all (displayed) items.
Note that the Text Filter includes a drop-down menu to select which image information should be included in the search and the rating group in the Labels Filter has a drop-down menu to choose whether you want a certain rating or a range.